VersIC evaluation guide
using Subversion or Perforce seamless from within your design cockpit.
User introduction to VersIC
Welcome to the VersIC evaluation guide. In this document we'll assume your workspace is already configured and will be stepping you through the VersIC Cadence interface.
Library Manager Overview

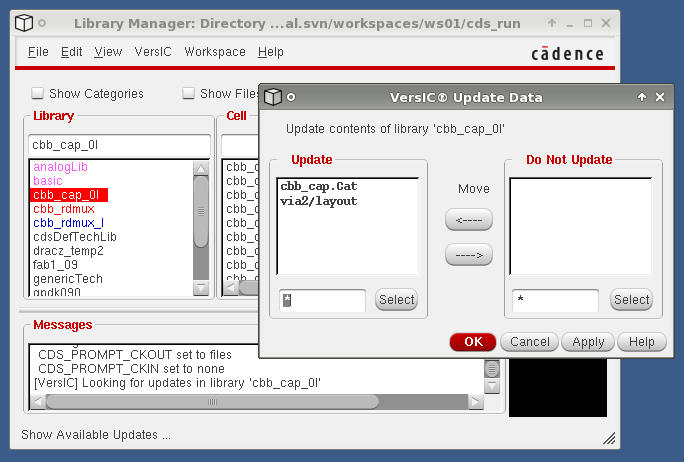
The first aspect of the VersIC interface you'll encounter is the VersIC overlay on the standard Cadence Library Manager. Managed libraries are color coded according to their state and function.
| Reference libraries | Purple |
| Managed Libraries (sync'd to the latest checked in files) | Blue |
| Managed Libraries (updates waiting in the DM repository) | Red |
| Managed Libraries (sync'd to a fixed release) | Orange |
| Unmanaged Libraries | Black |
VersIC can be configured to automatically update changes in the repository in which case libraries will rarely show as red, or users can right click on the library and show which cells are waiting for an update, and from there select all or a subset of the changed cells for updating (see below)
Locked (checked-out) cellviews can be identified by green/red ticks on the cellviews using the native Cadence GDM API
Functional Operations
Basic Checkin/Checkout
Checkout
A checkout can be done for an entire library, a cell (ie: all the underlying views), or a cellview. An object can be checked out from the VersIC menu in the cellview window, from the VersIC menu in the Library Manager, or from a right mouse button popup on the object in the Library Manager
Note that library and cell files (including category files) are generally checked in/out automatically as needed, but can be checked in and out manually.
Checkin
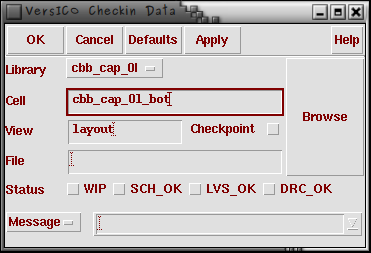
As part of a Checkin users are required to define the state of the cells being checked in using the "Status" radio buttons. The default states are:
- WIP - Work In Progress
- SCH_OK - Schematic simulates and is ready for layout
- LVS_OK - Layout is LVS clean
- DRC_OK - Layout is DRC clean
By default, only one state can be selected. This behavior, and the status flag names can be set in the VersIC Configuration file (versic.conf).
Cellviews can be Checked-out hierarchically.
The Checkpoint feature allows a cell to be Checked-in but maintain locks. This allows a user to make available their current latest version without allowing others to start editing
- Task 1
- Check out a cell using the Library Manager menu item.
- Use the Manage Checkouts Form to see the resulting locks
- Modify the cell you just checked out and check in the cell
- Experiment with the different ways of specifying your commit message in the Checkin form.
- Checkout a different cellview and use the Manage Checkouts form to revert
- Checkout the same cellview, make a change and then Checkpoint
Hierarchical operations
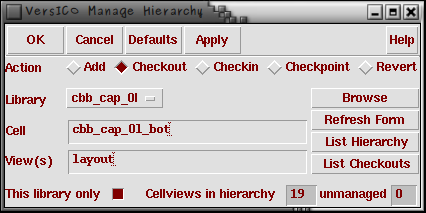
Add/Checkout/Checkin/Checkpoint/Revert operations maybe performed hierarchically using the VersIC hierarchical operations.
- Task 2
- Hierarchically checkout and then revert the top-level cellview for a block in your library.
- Make a change to one of the cells
- Open the Manage Checkouts form and look for the Modified and Unmodified checkouts in your working copy.
- Hierarchically checkin the same cell
- Specify the commit message using the "From File" mechanism
Manage checkouts form

VersIC manage checkouts is the main form for determining the state of your working copy. From the Manage Checkouts form you can view your checkouts and those of your team-members.
The 'Others' tab displays checkouts belonging to other users.
Use the Search field to filter the contents of the selected tab.
- Manage Checkouts also has a hierarchical mode and by selecting this radio button all the checkouts in a particular hierarchy can be seen.
- The Manage Checkouts also shows unmanaged cellviews - from the form you can Add these to the repository or Delete from the filesystem.
- Task 3
- Checkout a collection of different cellview types from your working copy
- Display only the schematic views checked out in the Manage Checkouts form
- Toggle between "All" libraries and a single library, see the list of checkouts change
- Double click on one of the items in the Manage Checkouts form, what do you see?
- Turn off the "Auto-Add cellviews" option in the preferences form and create an unmanaged cellview.
- Manually add this to the repository from the Unmanaged Tab in the Manage Checkouts form
Manage VersIC data form
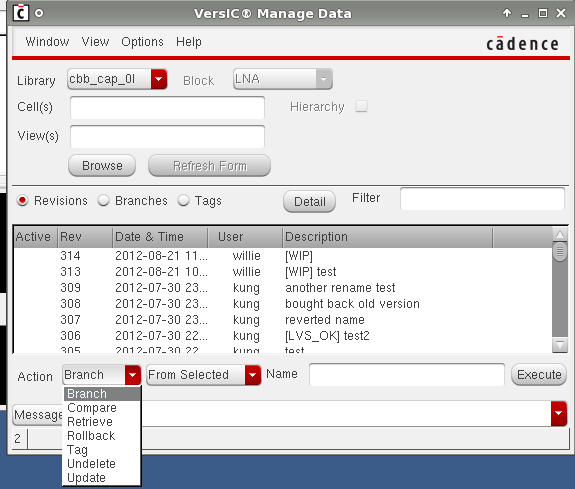
The Manage VersIC data form shows the history of the designated library, cell or cellview, and allows users to perform operations on these versions.
The columns in the form are described as follows:
| Column | Description |
| Active | The current version in the workspace |
| Change List | The list of objects |
| Date/Time | Submit time |
| User | Commit Username |
| Description | Commit message |
Users may perform an action on a changelist by selected the row of interest and executing one of the following operations:
- Branch
- Create a branch from the selected Version. Note that a branch in both Subversion and Perforce are lightweight database operations that don't create any new data on the filesystem. These are very fast operations compared to a CVS or RCS branch operation.
- Compare
- The compare function will compare 2 libraries (or cellviews) based on the version in the workspace and the selected version in the Manage Data form. A list of cells that were edited/added or deleted is generated and users can bring up the MergeIC GUI to explore what the differences are between objects. See MergeIC for more details.
- Label (Perforce only)
- If a label is being made from a changelist number VersIC uses "Auto-Label" creation for efficiency. This is effectively an alias for the original changenumber. If the Label is modified VersIC converts the Auto-Label into a regular Label which allows for different versions to be collected in the same Label
- Tag (Subversion only)
- A Subversion Tag is created using the same underlying Subversion operation but by convention is read-only. Typically Tags are used for to record important versions of the design such as tapeout releases, LVS clean versions etc.
- Retrieve
- The Retrieve function copies an older version of a cellview into the cell directory and adds a "_vsc_" suffix to make it unique.
- Note that the retrieved cellview is unmanaged and readonly
- The Retrieve function copies an older version of a cellview into the cell directory and adds a "_vsc_" suffix to make it unique.
- Rollback
- The Rollback feature checks out an older version of a library/cell/cellview and checks it back in at the HEAD of the trunk. This allows the user to switch to an older version of the design and continue editing, VersIC will only allow users to edit files that in the HEAD to avoid merge conflicts later.
- Update (Subversion only) or Sync (Perforce only)
- The Sync/Update feature allows a user to sync their workspace to an older version in the repository. This can be done on a lib/cell/cellView or on a hierarchy.
- VersIC keeps track of what versions have been synced using the VSC_SYNC_FILE variable in VersIC Configuration file (versic.conf), which by default creates a .vscSyncFile in VSC_RUN_DIR.
- This can be used as an alternative to creating Branches/Tags for verification releases - The verification user can keep the list of working versions in a sync file and as newer functional versions of blocks become available the sync file can be updated to include these. This mechanism can be easier to manage than modifying Tags or Labels.
- Undelete
- To use this feature users should select a change in the Manage Data Form that includes a deleted cell operation. The deleted object will be retrieved from the repository as a managed object in the HEAD of the trunk
Note that all the above have a hierarchical mode - eg: create a label or branch for a hierarchical subset of a library, hierarchical retrieve etc
- Task 5
- Use the Filter field in the Manage VersIC Data form to search for the LVS clean commits for All Libraries
- Specify !LVS in the Filter field to search for all the non-LVS_OK commits
- Use the Options->Form-Options form in the Manage VersIC Data form to change the number of versions displayed
- Use the Options->Form-Options form to hide Orphans and Checkpoints
- Task 6
- Create a hierarchical Tag for a block
- Perform a Hierarchical Retrieve on one of your cells, open the top level cellview and confirm the instance pointers have changed to reflect the new hierarchy
- Use the Unmanaged tab on the Manage Checkouts form to delete these Retrieved *_vsc_* cellviews
- Rollback the hierarchy of the same cell to the version of the you performed the previous Retrieve
- Sync hierarchically to a previous version of a different block, View the vscSyncFile from the View menu item on the Manage Versic Data form
Collaborative Work
- Experiment with multiple user checkouts, trigger Stale-Data checks
- Task 7
- Open the User Preferences form and set the VSC_STALE_INTERVAL to 15s
- Open a cellview in readonly mode
- Have one of your colleagues open the same cellview for edit, make some edits and checkin the changes
- Do you see the Stale Data Warning dialog box?
- List the cellviews to be updated from the dialog box
- When you hit the OK button check the list of cells that were reported as updated in the CIW
User Preferences
A user may adjust certain settings from VersIC preferences.
- The AutoOps tab controls the level of user interaction with checkins and checkouts. Libraries and Cellviews maybe auto-added to the repository on creation and users can be prompted with the list of outstanding checkouts when they exit Cadence.
- The repository can be polled on a regular basis for changes to cells open for read in the Cadence session, when a new version is available in the repository a dialog box is opened warning the user they have stale data and offering to refresh it.
- Changes in the Preferences Form are always active for the duration of the Cadence session but are only persistent if VSC_DISABLE_USER_PREFS is set to nil in VersIC Configuration file (versic.conf)
Note that the full set of preferences are defined in the versic.conf file. This is deployed at the site level using the VSC_CONFIG_DIR variable but customized versic.conf fragments may be loaded on a project basis using the directives included at the bottom of the template versic.conf file.
- Task 8
- Set Auto Add Cellview to Off in the Preferences form.
- Make a copy of cellview in Cadence.
- In the Unmanaged Tab of the Manage Checkouts form, add the unmanaged cellview we just copied.