The dashboard description found in Definition of the dashboard requires a
stoplight symbol to show the overall status for a region. To
achieve this, you need to follow these steps:
Creating a base object
In this section you will be shown how to
use object gradients to create the stoplight symbol background.
-
Open the bampalette.
-
Create a new symbol by pressing Ctrl+N.
-
Select and delete the Text object.For more information, see Deleting an object.
-
Select the Shape object.
-
Select Edit > Flip or Rotate > Rotate Left.
-
Select the Paint tab in the Styling Customizer.
-
Click the button in the Fill Paint field.
-
Click the Color tab; then click the RGBA tab.Change the Red, Green and Blue settings to 0,0,70.
-
Select the Linear Gradient tab.
-
Move the right handle to the middle of the gradient field, as shown in the following figure.
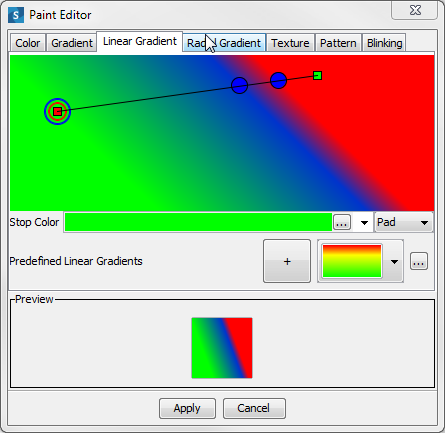 The linear gradient tab
 -
Click Apply.The stoplight base object is now complete.
-
Create a category
stoplightsin the bampalette. -
Save this symbol as
stoplightbasicin the stoplights category.
Using shapes to create a light template
The stoplightbasic symbol requires three
lights to show the three states allowed. To do this, you create
a single light object that is used as a template for the other
two lights.
-
Open the stoplightbasic symbol from the bampalette.
-
Click Add Shape as shown in figure The Add Shape button to open the Choose Shape dialog box.
-
Select the circle shape.
-
Click OK.The circle is added to the symbol.
-
In the Transform tab of the Styling Customizer, set the width and height of the circle to 20.
-
In the Paint tab, set the Fill paint color of the circle to black.See Changing the fill style for more information.
-
Change the name of the circle object to
light.See Performing basic object customization for more information.
Aligning and grouping multiple objects
In the Using shapes to create a light template
section, you created a single black light. You will now use this
shape as the template for the other lights.
To create multiple lights:
-
Open the stoplightbasic symbol from the bampalette.
-
Right-click the light object.
-
Click Copy on the pop-up menu.
-
Press Ctrl+V twice.You now have three light objects: light, light2, light3.
-
Move the light objects so they are aligned next to the base object, as shown in the following figure.
 Align objects
 -
Select all three lights.For more information, see Selecting an object.
-
Right-click one of the lights.
-
In the pop-up menu, click Align or Distribute > Align Horizontal Center
-
In the pop-up menu, click Align or Distribute > Distribute Vertically.The lights are now perfectly aligned and distributed.
-
In the toolbar, click Group Selection.
 The Group Selection button
 -
In the General tab of the Styling Customizer, set the attachment and anchor points to the center point as shown in the following figure.
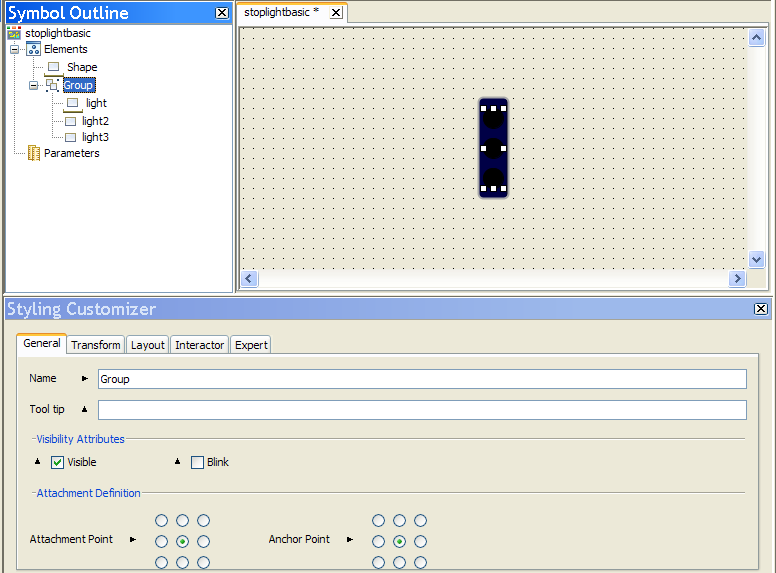 Aligning objects in the stoplight symbol
 -
Save the stoplightbasic symbol.
Note
Each group of objects has a base object
separate from the symbol base object.
Setting allowed values for a parameter
The stoplight symbol must always have one
active light to display the status of the activity being
monitored. This is done by setting conditions on the value of a
parameter. A stoplight has three possible states:
- Problem
- Warning
- Good
These states are created by limiting a
parameter to values relating only to the states. As the
parameter changes value, conditions set on individual objects
change their appearance.
To create a parameter with only
specific values allowed:
-
Open the stoplightbasic symbol from the bampalette.
-
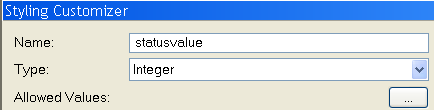
Create a new Integer parameter,
statusvalue.For more information, see Creating a new parameter. -
Select the statusvalue parameter in the Symbol Outline pane.
-
Click the Allowed Values button in the Styling Customizer.
 The Allowed Values buttonThe Value Set Editor is displayed.
 -
Click Add.
-
In the Value field, type
0. -
In the Name field, type
Good. -
Click OK.
-
Add the values 1, Warning, and 2, Problem, by repeating steps 5 to 8.
-
Click Apply.
-
Set the Default Value for statusvalue to Good in the Styling Customizer.
The list of values is displayed in the Allowed
Values field.
Setting conditions on an object
A Condition is used to transform the
object or objects to which it is bound in either of the
following cases:
- A parameter changes to a specific state.
- The object is selected.
You will use conditions to change the colors of the stoplights
as the value of the
statusvalue
parameter changes.
To set a condition on an object:
-
Open the stoplightbasic symbol.
-
Right-click the light object in the Symbol Outline pane.
-
Select New Condition.The New Condition dialog box opens.
-
Set the condition in the For Symbols Where pane to read,
statusvalue, equals, Problem. -
Click OK.The new condition is added under the light object in the Symbol Outline pane. The Styling Customizer displays the properties for this object when the status Problem condition is met.
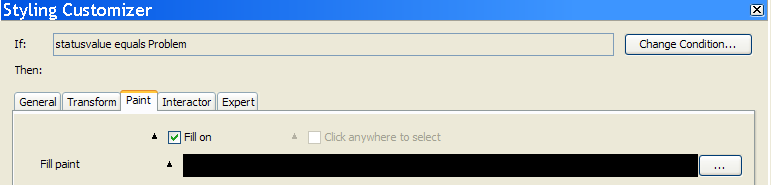 Properties for a conditionNoteThe settings you apply in the Styling Customizer for a condition are applied only when the condition is fulfilled.
 -
In the Paint tab, click the ellipsis button next to the Fill paint field.The Paint Editor opens.
-
Set the RGB settings in the Color tab to 255, 0, 0 and press Enter.See Changing the fill style for more information.
-
Click Apply.
-
Repeat steps 2 to 8 for the light2 and light3 objects using the following values.ConditionsObjectCondition nameCondition SettingRGB Valuelight2status warningstatusvalue equals warning255,153,0light3status goodstatusvalue equals Good71,231,71The stoplightbasic symbol is now complete.
-
Run your symbol in Preview mode to test its functionality.For more information, see Testing your symbol.
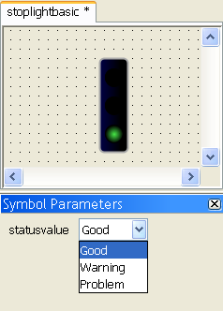
The stoplightbasic symbol
Tip
The green status Good light is active by
default when you test the stoplightbasic symbol. This is
because the default value for the statusvalue parameter is
Good. To change this, select the statusvalue parameter in the
Symbol Outline pane and change the state of the Default Value
list in the Styling Customizer.