Pipeline script from SCM setup
Pipeline lets you fetch the pipeline script (usually called a Jenkinsfile) directly from source control. The file is typically stored in the root of your project. To use this with the P4 for Jenkins, you’ll need to provide Perforce credentials and set up a workspace mapping for the Jenkinsfile location.
Credentials
This plugin integrates with the Jenkins Credential Store, simplifying the management of P4 Server (P4D) connection across multiple Jenkins jobs. For details about creating a Perforce Password Credential or Perforce Ticket Credential, see Add a credential.
Add a new Pipeline from SCM setup
To set up a new Pipeline from SCM, follow these steps to create a Pipeline and begin configuring its settings.
- From the Jenkins dashboard, click New item from the sidebar menu.
- At the top of the page, enter a name for the new job in the Enter an item name field.
- Click Pipeline.
- Click OK to start configuring your new Pipeline job.
- (Optional) Add a description in the Description field.
- Proceed with configuring the pipeline, starting with the definition.
Pipeline configuration
Configure the following aspects of your pipeline:
Definition
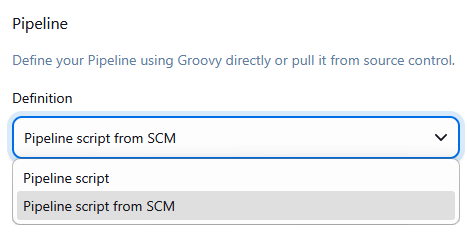
To use a Pipeline script stored in source control, select Pipeline script from SCM in the Definition dropdown.
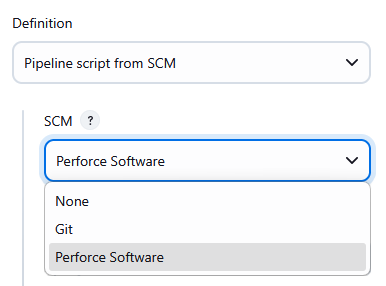
SCM
To configure the project to use the P4 Server, select Perforce Software from the dropdown.
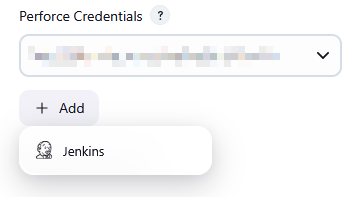
Perforce Credentials
Select the credentials for the project from the Perforce credentials dropdown.
If you do not have any credentials set up, click Add beneath the Perforce credentials dropdown to create your credentials.
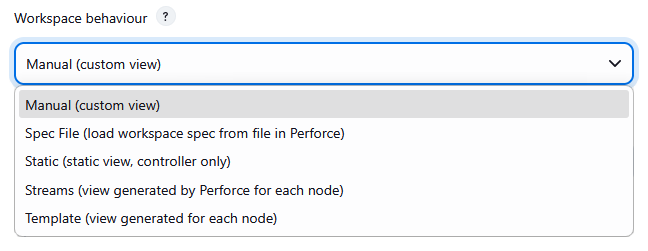
Workspace behavior
The Workspace behavior you select determines which configurations are available to you.
To enable you to identify builds, consider using variables in the Workspace name. For more information about environment variables, see Variable Expansion.
Perforce workspaces support the following behaviors:
- Manual (custom view): Manually define the workspace view and sync options. Creates the workspace if it does not already exist or updates the workspace spec by setting the various options if it already exists. Jenkins will fill out the workspace root and may override the clobber option. For details about manually configuring your workspace, see Manual workspace.
- Spec File (load workspace spec from file in Perforce): Loads the workspace configuration from a depot file containing a client workspace spec. This is the same output as p4 client -o and the Spec depot .p4s format. The name of the Workspace must match the name of the client workspace spec. For details about using a spec file for your workspace, see Spec File workspace.
- Static (static view, controller only): Uses a predefined workspace, the workspace must have a valid view and must already exist. The plugin user must either own the workspace or the spec must be unlocked allowing the plugin user to make edits. The workspace view remains static, but Jenkins will update other fields such as the workspace root and clobber option. For details about using a static predefined workspace, see Static workspace.
- Streams (view generated by Perforce for each node): Uses a specified stream to generate the workspace view. The name of the workspace is generated using the Workspace Name Format field. This makes it an ideal choice for Matrix builds. For details about using a stream to generate the workspace, see Streams workspace.
- Template (view generated for each node): Uses a specified template to generate the workspace view. The name of the workspace is generated using the Workspace Name Format field. This makes it an ideal choice for Matrix builds. For details about using a template to generate the workspace, see Template workspace.
When setting up a workspace for your Jenkinsfile, consider the following to avoid conflicts and extra syncing:
-
Use a unique workspace name. Add a
-scriptsuffix so it’s clear the workspace is only for the Jenkinsfile, not for code sync steps.
-
Create a different workspace for each sync. If your pipeline has more than one sync, each one must use its own workspace name. For more information, see Multiple Syncs.
-
Map only what you need. Limit the workspace view to the Jenkinsfile (and optional Pipeline libraries). Jenkins may create an
@scriptdirectory on the controller, and there’s no need to sync unused code into it.
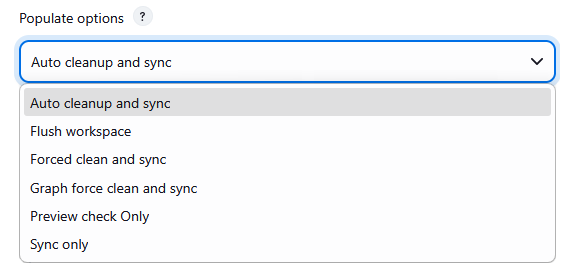
Populate options
The Populate option you select determines which configurations are available to you. Perforce populates the workspace with the file revisions needed for the build, the options are:
- Auto cleanup and sync: Use when the Perforce P4 Server controls the files in the workspace. This is an efficient option that cleans and syncs file revisions in the workspace. Extra (non versioned files) are removed, missing and modified files are re-added. This option is best for clean builds. For details about the Auto cleanup and sync options, see Auto cleanup and sync.
- Flush workspace: Use when files in the workspace are not added by the Perforce P4 Server. No file Sync or cleanup is attempted and no files are removed, but the workspace "have list" is updated. This is effectively the same as using the p4 sync -k command. For details about the Flush workspace options, see Flush workspace.
- Forced clean and sync: Not recommended because this option is very inefficient. Use if you do not trust the content of your workspace. Removes all of the files in the workspace root, including the build history, and then force syncs the required files. For details about the Forced clean and sync options, see Forced clean and sync.
- Graph force clean and sync: Perforce Git Connector required. Use for Perforce Graph and Hybrid only. Removes all of the files in the workspace root, including the build history, and then force syncs the required files. For details about the Graph force clean and sync options, see Graph force clean and sync.
- Preview check only: No file sync or cleanup is attempted, and the Workspace "have list" is not updated. This is effectively the same as using the p4 sync -n command. For details about the Preview check only options, see Preview check only.
- Sync only: Use if you have a hand-crafted build environment that you don't want to lose any files from. No cleanup is attempted and the sync will update all files (as CLOBBER is set) to the required revisions. This option is best for incremental builds and is mostly used for Pipeline builds. For details about the Sync Only options, see Sync Only.
Parallel sync
Parallel sync enables concurrent transfer of files between Jenkins and the P4 Server. Parallel sync can greatly reduce the amount of time it takes to update a workspace, especially when connecting across a high latency network. For more information on parallel sync, see Using parallel processing for submits and syncs in P4 Server Administration Documentation. Parallel sync is disabled by default, to enable parallel sync:
- Click Advanced.
- Select Enabled.
- The parallel sync settings depend on the capabilities of the Jenkins build machine and the P4 Server:
- Threads: Set the number of threads available for parallel sync.
- Minimum Files: If the number of files being sync'ed is less than this value, parallel sync is not used.
- Minimum Bytes: If the total size of files being sync'ed is less than this value, parallel sync is not used.

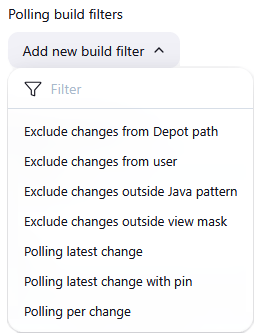
Polling build filters
When polling is used, changes can be filtered to not trigger a build. If the build has more than one filter, the filters are processed starting from the top of the list of filters. Filters can be dragged up or down the list to change the order they are processed in. Click Add a new build filter and select a filter from the dropdown list, options are:
- Exclude changes from Depot path: Changes can be filtered to not trigger a build if all of the files within a change match the specified path. For examples, see Exclude changes from Depot path.
- Exclude changes from user: Changes owned by the Perforce P4 Server user specified in the filter will not be built.
- Exclude changes from outside Java pattern: Changes can be filtered to not trigger a build if none of the files within a change match the Java patterns (regular expression) listed. For examples, see Exclude changes from outside java pattern.
- Exclude changes outside view mask: Changes can be filtered to not trigger a build if none of the files within a change are contained in the view mask. For examples, see Exclude changes outside view mask.
- Polling latest change: A build is carried out for the latest change found during polling.
- Polling per change with pin: A build is carried out for each submitted change, but the polling event is pinned to a specific changelist or label. This ensures that builds always start from the pinned point and proceed incrementally with each new change.
-
Polling per change: A build is carried out for every change that is submitted. The polling event will only return the oldest unbuilt change, resulting in incremental builds.
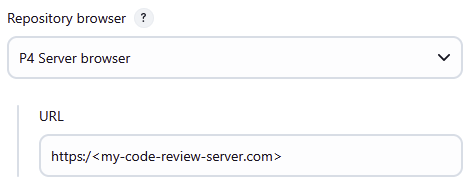
Repository browser
Repository browsing lets Jenkins use an external browser to navigate files and changes associated with a Jenkins build. Select the P4 Code Review browser from the Repository browser dropdown list, and provide a valid URL to the external browser.
Script path
The Jenkinsfile script is generated automatically from the details you provide for your Pipeline. Enter the Perforce depot location where you want to save the Jenkinsfile, for example
//depot/main/Jenkinsfile
Lightweight checkout
Pipeline script from SCM typically uses a Perforce sync to fetch the versioned Jenkinsfile. If your workspace view includes more than just the Jenkinsfile, this can be slow and resource-heavy. Lightweight checkout avoids that by using a p4 print to fetch only the Jenkinsfile, without syncing everything else.
Lightweight checkout works only with Pipeline scripts written in the pipeline { ... } format, not the older node { ... } style. If your workspace includes many files, you may also want to disable the default implicit checkout to prevent Jenkins from syncing the whole workspace.
To disable implicit checkout use: options { skipDefaultCheckout() }
To enable this feature, select Lightweight checkout in the job configuration.
Save
When you have finished configuring the pipeline, click Save.
Building
When your job is configured, it’s ready to build. For information about building jobs, see Building Jobs.