Credentials
P4 for Jenkins makes use of the Jenkins Credential store, making it easier to manage the P4 Server (P4D) connection for multiple Jenkins jobs. P4 Plugin credentials must be added to a Global or User defined domain, using one of the two supported P4 Plugin Credentials:
-
Perforce Password Credential
-
Perforce Ticket Credential.
Add a credential
The first steps to set up a Perforce Password Credential or Perforce Ticket Credential are the same.
- In Jenkins, in the top right corner of the page, click Manage Jenkins.
- In the security section, click Credentials.
- There are two tables in the Credentials page. In the Store scoped to Jenkins table, click (global).
- In the Global credentials page, click Add credentials.
- In the Kind dropdown field, choose one of the following:
Depending on what you select determines which fields are displayed.
Add a Perforce password credential
To add a Perforce password credential, follow these steps:
- In the Kind dropdown field, ensure that Perforce Password Credential is selected.
- In Scope, select one of the following:
Global - Makes the credential available to all jobs and all agents in Jenkins. Use this when multiple jobs or nodes need access to the same credential.
System - Makes the credential available only to Jenkins itself, not to jobs or pipelines. Typically used for internal Jenkins operations, such as connecting to agents or system-level services.
-
(Optional) In ID, provide an identifier that allows you to reference that credential in your pipelines or configuration scripts. If you are using Freestyle to configure jobs, the ID field can be left blank. If you are using Pipeline or MultiBranch to configure jobs, enter a unique short name for the credential ID.
If you are using Freestyle to configure jobs, the ID field can be left blank.If you are using Pipeline or MultiBranch to configure jobs, enter a unique short name for the credential ID.
- (Optional) In Description field, enter a description for the credential.
-
In Port, enter the P4 Server and port number details. For example:
10.0.0.4:1666
perforce:1666
perforce.domain.com:1666
localhost:1666
-
If the P4 Server is configured for SSL connections, select the SSL connection and enter you Trust fingerprint in the Trust field.
If you have a problem connecting with SSL, see Error using SSL below.
- The P4 Plugin defaults to TLSv1.2 for SSL connections to the P4 Server. For information on specifying a different TLS version for the SSL connection, see Solution 2 in Troubleshooting: Connection Issues.
- P4 Server version 2019.1 or later is required for TLSv1.2 SSL connections.
- In Username, enter a username.
- In password, enter your password.
- (Optional) To allow any host machine to use these credentials, click Advanced, select All Hosts
- (Optional) To check the credentials are configured correctly, click Test Connection. The credentials are tested against the P4 Server and if they are correctly configured a Success message is displayed.
- Click Create to add the credentials to Jenkins.

Add a Perforce Ticket Credential
The Perforce ticket credential supports using a ticket file such as the default P4TICKETS file or a ticket value returned by the command p4 login -p.
To add a Perforce ticket credential, follow these steps:
- In the Kind dropdown field, ensure that Perforce Ticket Credential is selected.
- In Scope, select one of the following:
Global - Makes the credential available to all jobs and all agents in Jenkins. Use this when multiple jobs or nodes need access to the same credential.
System - Makes the credential available only to Jenkins itself, not to jobs or pipelines. Typically used for internal Jenkins operations, such as connecting to agents or system-level services.
-
(Optional) In ID, provide an identifier that allows you to reference that credential in your pipelines or configuration scripts. If you are using Freestyle to configure jobs, the ID field can be left blank. If you are using Pipeline or MultiBranch to configure jobs, enter a unique short name for the credential ID.
If you are using Freestyle to configure jobs, the ID field can be left blank.If you are using Pipeline or MultiBranch to configure jobs, enter a unique short name for the credential ID.
- (Optional) In Description field, enter a description for the credential.
-
In Port, enter the P4 Server and port number details. For example:
10.0.0.4:1666
perforce:1666
perforce.domain.com:1666
localhost:1666
-
If the P4 Server is configured for SSL connections, select the SSL connection and enter you Trust fingerprint in the Trust field.
If you have a problem connecting with SSL, see Error using SSL below.
- The P4 Plugin defaults to TLSv1.2 for SSL connections to the P4 Server. For information on specifying a different TLS version for the SSL connection, see Solution 2 in Troubleshooting: Connection Issues.
- P4 Server version 2019.1 or later is required for TLSv1.2 SSL connections.
- In Username, enter a username.
-
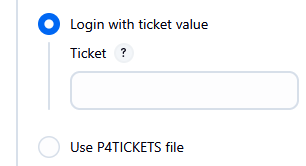
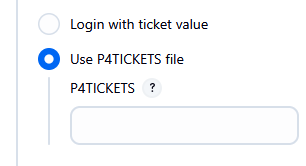
Select one of the following options for the Perforce ticket:
-
Loin with ticket value: Select this option and enter a valid session ticket.
To find the ticket value, run the p4 login -p command to print the ticket value.to enable the ticket to be used from any machine, add the '-a' flag. For example: p4 login -p -a
-
Use P4TICKETS file: Select this option and enter the full path to the Perforce tickets file. For example:
-
/[HOME]/.p4tickets -
c:[HOME]\p4tickets.txt.
-
-
- (Optional) To allow any host machine to use these credentials, click Advanced, select All Hosts
- (Optional) To check the credentials are configured correctly, click Test Connection. The credentials are tested against the P4 Server and if they are correctly configured a Success message is displayed.
- Click Create to add the credentials to Jenkins.

Troubleshooting: Connection Issues
Error using SSL
Error: Connection to an SSL enabled P4 Server (P4D) fails.
Unable to connect: com.perforce.p4java.exception.ConnectionException:
Error occurred during the SSL handshake:
invalid SSL session
There are two common causes for this SSL error and your connection might fail for both of them:
- Your Java distribution does not have the required JCE libraries for 256-bit SSL connections, see Solution 1 below.
- You have configured your P4 Server for a minimum TLS version greater than v1.2, see Solution 2 below.
Solution 1
Due to current US export control restrictions for some countries, the standard JDK package only comes with 128 bit encryption level cyphers. In order to use P4 API for Java to connect to an SSL-enabled P4 Server (P4D), those living in eligible countries can download the unlimited strength JCE (Java Cryptography Extension) package and replace the current default cryptography jar files on the build server with the unlimited strength files. The libraries can be downloaded from: http://www.oracle.com/technetwork/java/javase/downloads/jce-7-download-432124.html Installation instructions can be found in the file 'README.txt' in the JCE download.
Solution 2
To use a different TLS version from the default one used by the P4 Plugin, start Jenkins with the additional flag -DsecureSocketEnabledProtocols=VERSION where VERSION is a comma-separated list of accepted protocol versions.
For example, edit /etc/default/jenkins and set the flag to JAVA_ARGS:
JAVA_ARGS="-Djava.awt.headless=true -DsecureSocketEnabledProtocols=TLSv1.1"
This will need to be set on the primary server and on every build agent.
Error with Edge or Commit Server
Error: Perforce login error part way through a build with an Edge/Commit setup.
Perforce password (P4PASSWD) invalid or unset.
- no such file(s).
ERROR: Unable to update workspace:
com.perforce.p4java.exception.AccessException: Perforce password (P4PASSWD) invalid or unset.
Solution: The following configurables must be set to allow the Edge to forward the login information to the Commit server.
p4 configure set cluster.id=myID
p4 configure set myEdge#rpl.forward.login=1