Building jobs
This section describes how to a build job using P4 for Jenkins.
Ensure your Jenkins job is properly configured. There are several setup options available which are covered in more detail in the following sections:
There are two primary ways to build a Jenkins job when using P4 for Jenkins:
-
Automatic build - Triggered by Perforce when a changelist is submitted.
-
Manual Build - Started manually by clicking Build Now in the Jenkins UI.
Automatic build
You can configure Jenkins to automatically start a build when a change is submitted to Perforce.
To enable this:
-
Open the Jenkins job configuration.
-
Navigate to the Triggers section.
-
Select Perforce triggered build.

This option allows the P4 Server to trigger Jenkins builds based on events such as submitted changelists.
For more information on configuring Perforce triggered builds, see Perforce Triggered Build.
Known Limitations
- Use workspace names that include the recommended environment variables. For more information, see Variable Expansion.
-
Do not use parameterized builds with Perforce triggered jobs, as they are not supported.
Manual build
The following outline how to manually trigger a job build:
Manual build using Build Now
Trigger a build manually from the Jenkins UI:
-
Open the job from the Jenkins dashboard.
- Click Build Now in the sidebar menu.
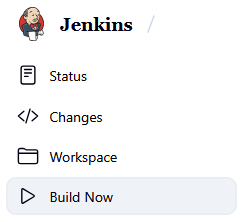
The job will start to build. You can see the build progress in Build History in the job sidebar.
Manual build using P4 Trigger
Jobs can be manually triggered from the Jenkins home page by using P4 Trigger in the sidebar menu
Manually trigger a build with P4 Trigger:
-
From the Jenkins dashboard, click P4 Trigger in the sidebar menu.
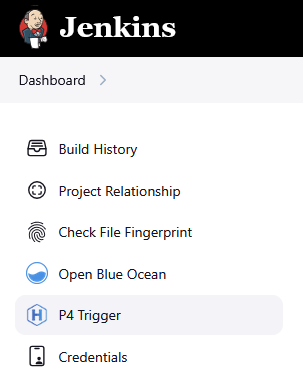
- In the P4 Trigger page, fill out the following:
P4Port: This is the address of your P4 Server. It should match the P4PORT value used in your Jenkins job's Perforce configuration.
Change: This is the Perforce changelist number that you want Jenkins to respond to.
- Click the Trigger button.
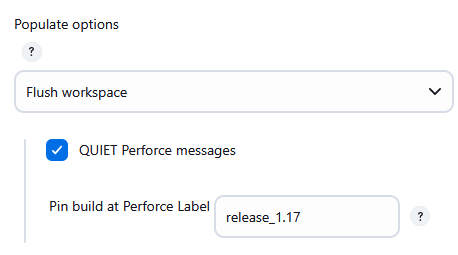
Building at a change
A Jenkins job can build at any point in the codes history, identified by a PerforceP4 Server change or label. To pin a build, add a value to the Pin build at Perforce Label field under the Populate options.
This field can accept:
-
A Perforce label (for example,
release_1.17) -
A changelist number (for example,
200)
When triggered, the job will sync the workspace to that changelist or label, ensuring consistent builds.
If using downstream jobs, you can pass the changelist using the the Parameterized Trigger Plugin to pass ${P4_CHANGELIST} as the parameter to the downstream job. This ensures both upstream and downstream jobs build against the same revision.
Alternatively, a changelist or label can be passed with Build Review parameters or the URL endpoint. For more information, see Build using a review.
Parallel and Review-Based Builds
These advanced build strategies help scale Jenkins for high-performance teams and integrate seamlessly with Perforce workflows. Parallel builds allow multiple jobs to run simultaneously using isolated workspaces, improving throughput and reducing wait times. Review-based builds enable automated testing of shelved or submitted changes directly from P4 Code Review, ensuring code quality before integration.
Parallel builds
Jenkins supports parallel execution by creating separate workspace directories for each executor. This allows multiple builds to run simultaneously without interfering with each other.
Jenkins creates separate workspace directories (for example, workspace@2, workspace@3, etc) for parallel execution.
To manage these, the P4 for Jenkins automatically generates workspace templates named workspace.clone2, workspace.clone3, and so on for each executor.
Custom parallel builds
This build options is similar to the parallel builds approach but offers more control for naming workspaces. To define your own workspace names manually, you can use the Jenkins environment variable ${EXECUTOR_NUMBER}:
For example: /Users/Workspaces/custom@${EXECUTOR_NUMBER}
This gives you control over naming while still supporting parallel execution.
Build using a review
This feature integrates Jenkins with P4 Code Review to trigger builds based on code reviews. These builds are triggered with a review/build/ URL endpoint. No special plugin settings are needed to enable the build using a review feature as it's build into P4 for Jenkins.
The endpoint accepts a set of parameters (via POST request) that tell Jenkins:
-
Which shelf to unshelve.
-
Which changelist to sync to.
-
The status of the review (shelved or submitted).
-
Optional callback URLs for reporting build results
This is configured in the Automated Tests section of a P4 Code Review project. Find this section by clicking on a project, in the right side bar click Settings and click on the Integrations tab.
The URL in the example below triggers a review-based build in Jenkins, with parameters passed in the POST body using standard JSON variables.

The Build Review feature supports the following parameters in the Post Body:
- review - (Required) The shelf number to unshelve the pending change in the workspace prior to the build.
- change - (Required) The change number to sync the workspace to before unshelving.
- status - (Required) The review status. This must be one of the following strings:
- shelved
- committed
- submitted
- pass - (Optional) A callback URL typically generated by P4 Code Review. This is called to indicate the build passed.
- fail - (Optional) A callback URL typically generated by P4 Code Review. This is called to indicate the build failed.
- update - (Optional) A P4 Code Review update URL to get a build status message of either running, pass and fail in P4 Code Review. If possible, use the update parameter instead of pass and fail.
- p4.label - (Optional) Use this parameter to override the change number to sync the workspace before unshelving.
All parameters are stored as environment variables and can be accessed in build steps using variable expansion (for example, ${review}, ${change}). Avoid using these names (review, change, etc.) for Jenkins agents or matrix axes to prevent conflicts.
Review authorization
If your Jenkins instance requires user authentication, your Perforce trigger must use a Jenkins authorized account to trigger builds from P4 Code Review reviews.
To authenticate the trigger, you’ll need the API token for a Jenkins user account. To find the API Token in Jenkins:
- In Jenkins, click on your profile in the top right corner of the page.
- Click Secutiry in the sidebar menu.
- In the API Token section of the page, Click either Show API Token button or Add new token .
- Copy the token and go to P4 Code Review.
- In P4 Code Review, navigate to your Project Settings page.
- Add the API Token with Basic Authentication to the Test URL, for example:

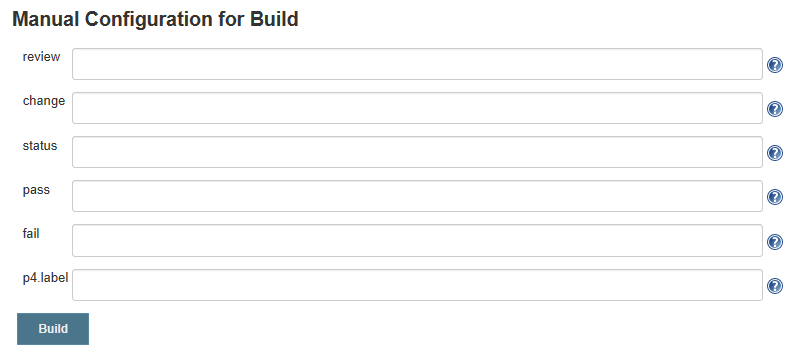
Manual Build review
You can manually trigger a Build Review in Jenkins with P4 for Jenkins. This is available for Freestyle project or Pipeline that include the Plugin.
To manually invoke the Build Review feature, follow these steps:
-
From the Jenkins dashboard, click the job name in the table.
-
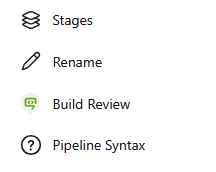
Click Build Review in the sidebar menu.
Complete the form to specify the parameters for build.
- review - (Required) The shelf number to unshelve the pending change in the workspace prior to the build.
- change - (Required) The change number to sync the workspace to before unshelving.
- status - (Required) The review status. This must be one of the following strings:
- shelved
- committed
- submitted
- pass - (Optional) A callback URL typically generated by P4 Code Review. This is called to indicate the build passed.
- fail - (Optional) A callback URL typically generated by P4 Code Review. This is called to indicate the build failed.
- update - (Optional) A P4 Code Review update URL to get a build status message of either running, pass and fail in P4 Code Review. If possible, use the update parameter instead of pass and fail.
- p4.label - (Optional) Use this parameter to override the change number to sync the workspace before unshelving.
-
To trigger the build, click the Build button.
Build steps and environment variable
When you use build steps such as Execute Shell in Jenkins, the standard Perforce environment variables (such as P4PORT, P4USER, and P4CLIENT) are not automatically set. This is intentional to avoid overwriting any preconfigured environment settings in your build system.
If your shell script or build step needs access to Perforce connection details, use the plugin variables:
-
P4_PORT
-
P4_USER
-
P4_CLIENT
You can map these variables in a shell script, for example,
export P4CLIENT=$P4_CLIENT
To make the standard variables accessible by default, set them in the Global properties section of the Jenkins System page:
-
Go to Manage Jenkins.
-
In the System Configuration, click System.
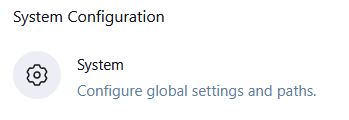
-
Scroll down to Global properties and select Environmental variables.
-
Add a Name and Value for the plugin variables

Here are some examples of variables you might add in the Global properties section of the Configure System page:
-
P4PORT =
your.perforce.server:1666 -
P4USER =
yourusername -
P4CLIENT =
yourworkspace
Post Build Options and Viewing the Build Results
When your build is complete you can view the change summary, and manually tag the build. For more information on you post build options, see Post Build Actions.