Shows you how to create a dialog for
showing equipment details. To prepare for this dialog, you must:
- Create a new data source
- Create an equipment component
- Connect the equipment component to the data source
- Read an XML file containing the description of business objects into the data source
- Read a configuration file containing a background
- Read an XML file containing object state updates
Then you can create a dialog to show the
equipment details and add the equipment component to the dialog.
The data for this part of the tutorial is
in the files:
This part of the code is referred to as
Step 7:
void step7() throws Exception{
To do Step 7:
-
Create the equipment component.
equipmentComponent = new IlpEquipment();
The new instance of IlpEquipment is calledequipmentComponent. -
Create the data source for accepting the equipment details.
equipmentDataSource = new IltDefaultDataSource();
The new instance of IltDefaultDataSource used to read in the XML file of equipment details is calledequipmentDataSource. -
Read in an XML file containing the equipment objects, their positions, and their sizes.
equipmentDataSource.parse("equipment_template.xml");The data source you have just created reads in the XML file by parsing the data. The method used is IltDefaultDataSource. parse.The data in the file describes items of equipment with their IDs, classes, and attributes.For example:<addObject id="Shelf1"> <class>ilog.tgo.model.IltShelf</class> <attribute name="name">Shelf1</attribute> <attribute name="slotSizes" javaClass="ilog.cpl.graphic.views.IlpSlotSizes"> <width> <value>150</value> <value>30</value> <value>30</value> <value>30</value> <value>30</value> <value>30</value> </width> <height> <value>34</value> <value>27</value> <value>27</value> <value>27</value> </height> </attribute> <attribute name="position" javaClass="ilog.cpl.graphic.IlpPoint"> <x>22</x> <y>154</y> </attribute> </addObject>See Loading a shelf defined in XML in the Business Objects and Data Sources documentation for details of these XML elements.This example uses the same static data file to display the detailed equipment view for each network element.The template file does not contain the states of the objects. These will be loaded in the next step. Creating the objects is done separately from updating their state, because in a real application the same template file would probably be used for many instances of the same type of equipment. Therefore, this file could not contain the state of individual objects. A template could typically be generated by the back end or by the JViews TGO equipment editor. See the tutorial in <installdir>/tutorials/browser for a more complete example. -
Apply a configuration from a CSS file.
String [] css = new String[] { "equipment.css" } ;
Try {
  equipmentComponent.setStyleSheets(css);
} catch (Exception e) {
  e.printStackTrace();
}
The equipment configuration specifies the background image to load, as well as the configuration of the objects to be displayed in the equipment component. -
Load the state of the equipment objects from an XML file.
equipmentDataSource.parse("equipment_state.xml");Load the current state of the equipment objects from a separate XML file. In a real life application, such a file could be periodically generated by the back end. -
Connect the data source and the equipment component.
equipmentComponent.setDataSource(equipmentDataSource);
-
Create a dialog (using pure Swing code).
equipmentDialog = createDialog(false);
equipmentDialog.setSize(350, 550);
equipmentDialog.setLocation(700, 300);
-
Add the equipment view to the dialog.
equipmentDialog.getContentPane().add(equipmentComponent,
                                       BorderLayout.CENTER);
This line of code adds the equipment component to the dialog. -
Fit the view to the pane such that all the contents of the view are displayed.
equipmentComponent.fitToContents();
The method IlpEquipment.fitToContents modifies the zoom factor so that all the contents are visible in the view. -
Hide the dialog at first.
equipmentDialog.setVisible(false);
}
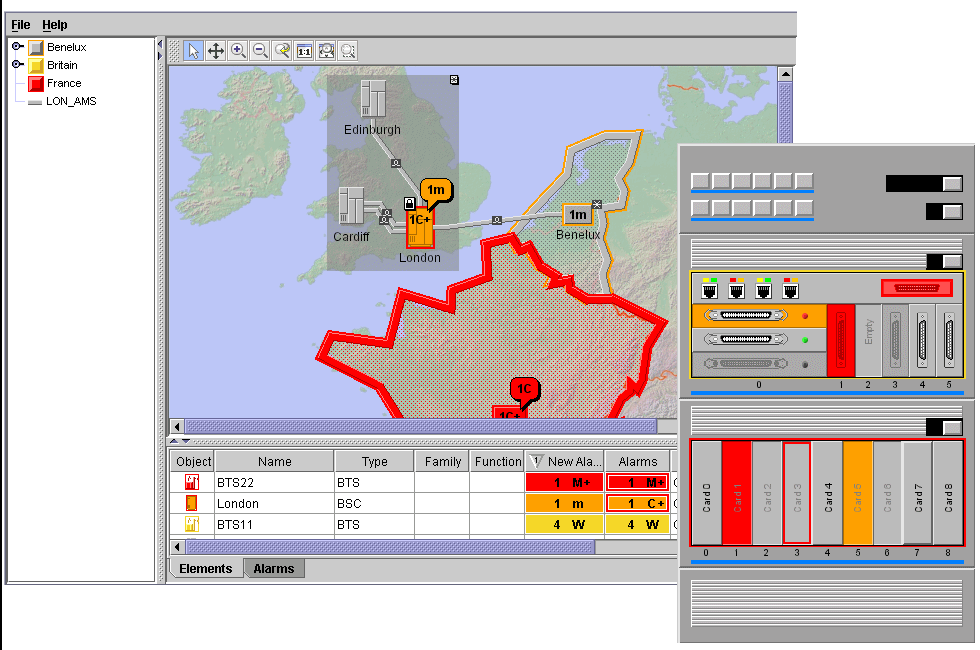
The dialog will become visible in the next step, Adding interactors, when an interactor is added to the network elements to show the dialog.The sample should now look as shown in the following figure.