To change the terrain style and performance of the 3D
View:
-
Click the
 button in the 3D View or right-click in
the 3D View and select Change Terrain Style & Performance in the
pop-up menu. The 3D View Terrain Style & Performance window appears. The following figure shows an example of a 3D View Terrain Style & Performance window.
button in the 3D View or right-click in
the 3D View and select Change Terrain Style & Performance in the
pop-up menu. The 3D View Terrain Style & Performance window appears. The following figure shows an example of a 3D View Terrain Style & Performance window.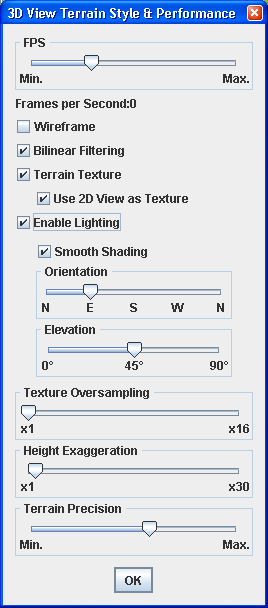 Change Terrain Style and Performance window
To set the number of Frames per Second (FPS):
-
Drag the slider to the position that corresponds to the FPS you want to set. This sets the number of 3D View refresh operations per second. The lower the value the less the graphics card has to work. If set too high, the graphics card may be overwhelmed and then the CPU will try to help the card, raising the CPU usage to perhaps 100%. If set correctly (depending on the graphics card capabilities), the CPU should remain at around 0% because the graphics card should be able to manage alone. If you want to leave most of the CPU capacity for other tasks, move this slider to the extreme left.
To show the 3D View as a terrain mesh:
-
Select Wireframe.
To activate bilinear filtering:
-
Select Bilinear Filtering (selected by default). This smooths the texture of the 3D image.
To activate terrain texture options:
-
Select Terrain Texture (selected by default).
-
Select the Use 2D view as texture: the texture applied on top of the 3D terrain mesh is generated by rendering a set of layers belonging to the map. This allows you to display roads on the 3D View. All the layers that have the attribute
Visible in 3D Viewset to true in their map style are drawn as part of the texture.
To activate light computation on a 3D scene:
-
Select Enable Lighting.
To use a Gouraud algorithm to compute the shading:
-
Select Smooth Shading (otherwise flat shading is applied).
To change the horizontal direction of the light:
-
Drag the Orientation slider to the position you want. For example, 'N' means that light is directed towards the north, 'S' towards the south and so on.
To change the vertical direction of the light:
-
Drag the Elevation slider to the position you want. You can set the elevation between 0˚ (the light is horizontal) and 90˚ (the light is vertical, descending).
To set Texture Oversampling:
-
Drag the slider to the position that corresponds to the value you want to set. This value forces the 3D engine to compute higher resolution textures for the terrain. For example, a factor of 4 for leads to generation of a texture 4x4=16 times bigger. Use this slider if you feel that the precision of the default texture does not suit your needs.
To set the Height Exaggeration:
-
Drag the slider to the position that corresponds to the value you want to set to bring the 3D View into relief. You can set the Height Exaggeration factor to between 1 and 30. By default the exaggeration factor value is 2, which means that all altitudes appear twice as high as they are in reality.orClick the 3D View to activate it and press the A key to increase the Height Exaggeration factor of the 3D image or the Z key to decrease it. This brings the 3D View into or out of relief.
To set the Terrain Precision:
-
Drag the slider to the position that corresponds to the value you want to set. You can choose between 3D View precision and CPU usage by increasing or decreasing this option. When set to minimum, very few 3D points are used to create the terrain mesh, so the terrain is less precise but the display is faster.When set to maximum, more 3D squares are created, so the terrain is more precise, but the display much slower. In this case, the sooner the zoom level is reached at which each terrain data point has its own mesh rectangle. The more powerful the graphics card, the higher the setting can be.This is the only option you can use to set the terrain precision. The dynamic more/less detail behavior is hard coded and depends only on the zoom level.The following figure shows an example of a 3D View (in Wireframe mode), showing a low and high setting for the terrain precision.
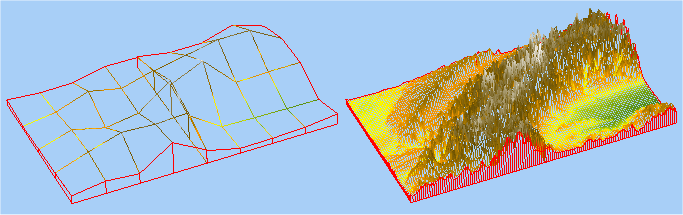 Low and high terrain precision settings