To create a Line of Sight you must first import a data
source containing elevation data, see Importing a simple data source for more information.
To create a Line of Sight:
-
Set the map to the position and zoom level you require.
-
Click the
 button on the toolbar and then draw a
line on the map that represents the origin and end of the Line of
Sight you want to analyze. A Line of Sight pane is displayed below the map in the main window and a Lines of Sight layer is added to the Map Layers pane.
button on the toolbar and then draw a
line on the map that represents the origin and end of the Line of
Sight you want to analyze. A Line of Sight pane is displayed below the map in the main window and a Lines of Sight layer is added to the Map Layers pane. -
To change the length or direction of the Line of Sight, click to select it and drag the point at either end of the line to the new position. The Line of Sight is automatically updated.
-
To delete a Line of Sight you can perform one of the following actions:
-
Select the Line of Sight in the Map Layers pane and press the Delete key on your keyboard.
-
Select the Line of Sight in the Map Layers pane, right-click and select Delete Layer from the pop-up menu.
-
Click the
 button in the Line of Sight tab to dismiss
the Line of Sight and remove the corresponding layer.
button in the Line of Sight tab to dismiss
the Line of Sight and remove the corresponding layer.
-
-
Set the properties for the Lines of Sight layer in the Map Style property sheet.The following figure shows the Map Style property sheet for a Line of Sight.
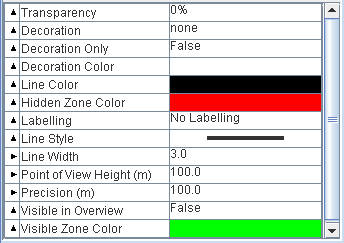 Lines of Sight Layer properties