A brief description of the HL algorithm
This algorithm works in four steps:
- Step 1: Leveling
-
The nodes are partitioned into groups. Each group of nodes forms a level. The objective is to group the nodes in such a way that the links always point from a level with smaller index to a level with larger index.
- Step 2: Crossing reduction
-
The nodes are sorted within each level. The algorithm tries to keep the number of link crossings small when, for each level, the nodes are placed in this order on a line (see Level and position indexes). This ordering results in the relative position index of each node within its level.
- Step 3: Node positioning
-
From the level indexes and position indexes, balanced coordinates for the nodes are calculated. For instance, for a layout where the link flow is from top to bottom, the nodes are placed along horizontal lines such that all nodes belonging to the same level have (approximately) the same y-coordinate. The nodes of a level with a smaller index have a smaller y-coordinate than the nodes of a level with a higher index. Within a level, the nodes with a smaller position index have a smaller x-coordinate than the nodes with a higher position index.
- Step 4: Link routing
-
The shapes of the links are calculated such that the links bypass the nodes at the level lines. In many cases, it requires that a bend point is created whenever a link needs to cross a level line. In a top-to-bottom layout, these bend points have the same y-coordinate as the level line they cross. (These bend points also obtain a position index).
Level and position indexes shows how the
Hierarchical Layout algorithm uses the level and position indexes
to draw the graph.
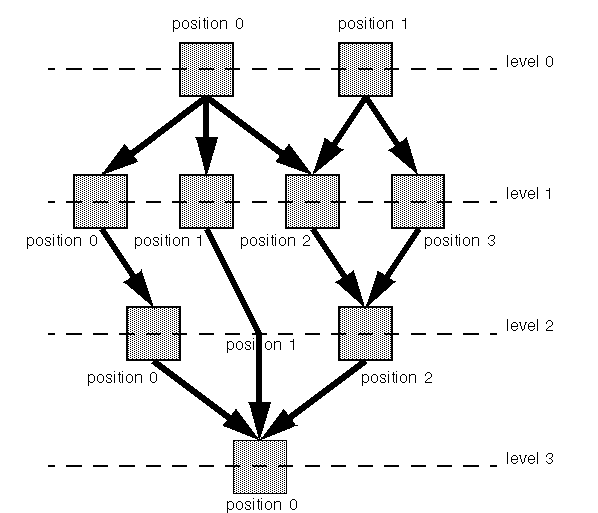
Level and position indexes
You can set parameters for the steps of
the layout algorithm in several ways. For instance, you can
specify the level index that the algorithm must choose for a node
in Step 1 or the relative node position within the level in Step
2. You can also specify the justification of the nodes within a
level and the style of the link shapes.
Example of HL
In CSS
The following example is a
specification that uses the Hierarchical Layout algorithm.
Since the Hierarchical Layout places nodes and links, it is
usually not necessary to specify an additional link layout in
CSS.
The specification can be loaded as a style file into an
application that uses the IlvDiagrammer class (see Graph Layout in
Rogue Wave JViews
Diagrammer).
SDM {
    GraphLayout : "true";
    LinkLayout  : "false";
}

GraphLayout {
    enabled             : "true";
    graphLayout         : "Hierarchical";
    flowDirection       : "Bottom";
    globalLinkStyle     : "POLYLINE_STYLE";
    connectorStyle      : "CLIPPED_PINS";
    horizontalNodeOffset: "20";
    verticalNodeOffset  : "20";
}
In some situations, a separate link
layout renderer may be required:
- if the links must be rerouted during interactions, for example, when nodes are moved manually;
- if the graph contains nested subgraphs, because the Hierarchical Layout does not handle intergraph links.
In these cases, it is recommended to
use the “hierarchical link layout”. The hierarchical link
layout is not a separate layout algorithm. It is merely the
feature of the link layout renderer to reuse the Hierarchical
Layout as a link layout. The following CSS sample specifies
the Hierarchical Layout algorithm as node and link layout
renderer:
SDM {
    GraphLayout : "true";
    LinkLayout  : "true";
}

GraphLayout {
    enabled             : "true";
    graphLayout         : "Hierarchical";
    flowDirection       : "Bottom";
    globalLinkStyle     : "ORTHOGONAL_STYLE";
    connectorStyle      : "EVENLY_SPACED_PINS";
}

LinkLayout {
    hierarchical: "true";
}
It is also possible to use the standard link layout (class
IlvLinkLayout
) in the link layout renderer (the
hierarchical
parameter is set to
"false"
). However in this case, the link layout determines the shapes
of the links. The explanations pertaining to the shape of the
links in Hierarchical Layout are valid only if the link layout
is disabled.
In Java
In Java™ , below is a code
sample that uses the IlvHierarchicalLayout class. This code
sample shows how to perform a Hierarchical Layout on a grapher
directly without using a diagram component or any style sheet:
...
import ilog.views.*;
import ilog.views.graphlayout.*;
import ilog.views.graphlayout.hierarchical.*;
 ...
IlvGrapher grapher = new IlvGrapher();
IlvManagerView view = new IlvManagerView(grapher);

 ... /* Fill in the grapher with nodes and links here */

IlvHierarchicalLayout layout = new IlvHierarchicalLayout();
layout.attach(grapher);
try {
        IlvGraphLayoutReport layoutReport = layout.performLayout();

        int code = layoutReport.getCode();

        System.out.println("Layout completed (" +
          layoutReport.codeToString(code) + ")");
}
catch (IlvGraphLayoutException e) {
        System.err.println(e.getMessage());
}