The tooltip interactor allows you to show
customized tooltips when moving the mouse over graphic objects.
Using Hitmap technology, the tooltip can be constructed and
displayed on the client side without a round-trip to the server.
JViews provides a JavaServer™ Faces (JSF)
component for this interactor. To use the tooltip interactor you
must first insert the tooltip interactor tag into your JSF page.
To define one object, use the following tag:
<jvf:tooltipInteractor id="tooltipInteractor"/>
You can use the interactor in a
<jvf:view>
view as follows:
<jvf:view id="viewID" interactorId="tooltipInteractor" />
You can use the interactor in a
<jvdf:mapView>
view as follows:
<jvmf:mapView id="mapId" interactorId="tooltipInteractor" />
The tooltips are visible when you move your
mouse over the graphic objects.
The tooltip interactor works with both a
<jvf:view>
and a
<jvmf:mapView>
.
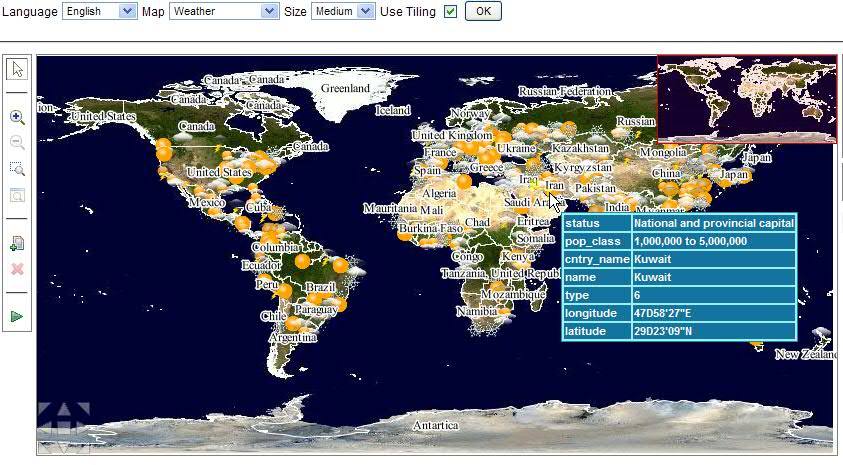
Example map showing tooltip
The method described in the previous section shows you how to use
the tooltip interactor with a
<jvf:view>
and a
<jvmf:mapView>
. However, you might want to have both the pan interactor and the
tooltip interactor working at the same time. The interactor group
is designed for this purpose.
You can make two interactors work together
as follows:
<jvf:tooltipInteractor id="tooltipInteractor"/>
 <jvf:panInteractor id="panInteractor" />
 <jv:interactorGroup id="panAndTooltip" interactors="panInteractor tooltipInteractor"/>
 <jvmf:mapView id="mapID" interactorId="panAndTooltip" hitmapLayers="Symbols" ... />
As shown in the previous example, for JViews Maps you must use the
attribute
hitmapLayers
to determine which layers will generate the hitmap data and the
hitmap information.
For more information see <installdir> /jviews-maps810/samples/jsf-maps-tiled/index.html.
Using the tooltip template
The tooltip template allows easier tooltip
styling with enhanced performance. To use the tooltip template,
you must specify the value of the template attribute for the
tooltip interactor, as shown in the following example.
<jvf:tooltipInteractor id="tooltipInteractor" template="tooltip_callback"/>
In order to work with the tooltip template feature, the tooltip
data for the Hitmap information that you generated on the server
must be in a valid
JSON
format. For example:
jviews_hitInfos={
tooltip:[,
{'properties':'values','name':'node1'},
{'properties':'values','implementation':'workflow','name':'Graphics Framework','type':'workflow'},
{'properties':'values','name':'node2'},
{'properties':'values','name':'node4'}
]}
For more information about Hitmap information customization, see
Customizing Hitmap information.
There are two types of tooltip template:
the HTML template and the JavaScript callback.
Using the HTML template
To use the HTML template, you can create
the template as shown in the following example.
<jvf:tooltipInteractor id="tooltipInteractor"
    template="<div style='background:#333399;font-size:70%;font-weight:bold;color:white;'>properties=<%properties%></div>" />
In the preceding code example,
<%properties%>
corresponds to the key of your
JSON
object generated from the server. This will be replaced by the
value of the key of your
JSON
object when the tooltip is displayed.
Using the JavaScript callback
To use the JavaScript callback, you need
to write the JavaScript callback to show the tooltip which will
be invoked when the tooltip is displayed.
When writing your own JavaScript callback,
there are two parameters for you to use in your callback
function:
| Name | Description |
|---|---|
| view | The view object. |
| index | The index of the current graphic element. |
The following code is a JavaScript
callback sample which generates a dynamic tooltip.
<script type="text/javascript">
      function tooltip_callback(view, index) {
        var message = view.getHitInfos().tooltip[index]; //retrieve the tooltip message of current index
        var msg = '<table class=\'jviews_tooltip\'>';
        for(key in message){
            msg += '<tr class=\'jviews_tooltip_title\'><td>';
            msg += key;
            msg += '</td><td>' + message[key] + '</td></tr>';
        }
        msg += '</table>';
          return msg;
      }
</script>
After creating the JavaScript callback,
you can write the following code to invoke it with the tooltip
interactor:
<jvf:tooltipInteractor id="tooltipInteractor" template="tooltip_callback" />
For more information see <installdir> /jviews-maps810/samples/jsf-maps-tiled/index.html.