Manipulating renderers
Describes the attributes of graphic objects that will be displayed and the use of renderers to transform map features to graphic objects.

Explains how to attach properties to graphic objects for the purpose of rendering these objects.
Explains what renderers are and how to use them.
Shows how to write a new renderer that displays colored polylines from the numeric value of an attribute whose name is known.
Describes how to make a renderer persistent.
Describes how to extend existing renderers.
Describes how to use CSS for customizing the rendering process.
Describes styling with predefined renderers and data sources.
Describes renderers that offer geodetic computations.
Overview
Attaching attributes to graphic objects
In
JViews Maps, you can attach properties to
IlvGraphic objects using the class
IlvNamedProperty of the
ilog.views package, thereby saving the properties in an
.ivl file together with the related object.
The
IlvFeatureAttributeProperty class, which stores all the attributes of a map feature, inherits from the
IlvNamedProperty class and can therefore be attached to any graphic object.
The following code example attaches an IlvFeatureAttributeProperty object to an object of the IlvGraphic class:
IlvFeatureAttributeProperty attributes = feature.getAttributes();
graphic.setNamedProperty(attributes.copy());
Note that in this example, a copy of the attribute property is made. The reason for this is that map features, along with their geometry and attributes, are volatile and get lost when another map feature is read. For more information about map feature volatility, see
The IlvMapFeatureIterator interface.
To access the attributes that have been attached to a graphic object, you can use the following code:
IlvFeatureAttributeProperty attributes = (IlvFeatureAttributeProperty)
graphic.getNamedProperty(IlvFeatureAttributeProperty.NAME);
To save information specific to an application that cannot be saved using the predefined named properties supplied in the
ilog.views.maps package, you can write specially named properties as explained in
Advanced Features of JViews Framework.
Overview of renderers
A renderer is an object that is used to transform a map feature into a graphic object of the class IlvGraphic or one of its subclasses.
A renderer must implement the
IlvFeatureRenderer interface, which is supplied in the
ilog.views.maps package. To transform a given map feature into a graphic object, you use its
makeGraphic method:
IlvGraphic makeGraphic(IlvMapFeature feature,
IlvCoordinateTransformation tr);
The second argument,
tr, allows you to specify a coordinate transformation. A typical way of constructing such a transformation is to call
IlvCoordinateTransformation.CreateTransformation with
feature.getCoordinateSystem as its first parameter (the Source coordinate system) and the coordinate system set on the Manager (through
IlvCoordinateSystemProperty) as second parameter (the Target coordinate system). For information about coordinate systems and coordinate transformations, see
Converting coordinates between coordinate systems.
JViews Maps includes a set of default renderers for each one of the geometry types available in the library. These renderers can be found in the package
ilog.views.maps.rendering. The
IlvMapPointRenderer, for example, transforms a map feature whose geometry is a point into an object of the type
IlvMapMarker. The library also provides a global default renderer of the type
IlvDefaultFeatureRenderer, which you can use to translate any map feature whose geometry is one of the predefined geometries. This renderer is in the
ilog.views.maps package.
The following code example shows how to transform a map feature whose geometry is of the type IlvMapLineString into green polylines with a thickness of four pixels if the scale is greater than 1/1,000,000. These polylines could be, for example, the segments of a country’s border.
IlvMapLineRenderingStyle style = new IlvMapLineRenderingStyle(); style.setForeground(Color.green);
style.setLineWidth(4);
style.setScale(1f/1000000f);
IlvDefaultCurveRenderer renderer = new IlvDefaultCurveRenderer(); renderer.setLineRenderingStyle(style);
try {
// Identity transformation.
IlvCoordinateTransformation identity = IlvCoordinateTransformation.CreateTransformation(null, null);
IlvGraphic graphic = renderer.makeGraphic(feature, identity);
// Adding the graphic object into a manager.
manager.addObject(graphic, layerIndex, true);
} catch (IlvMapRenderException e) {
// Might occur if the geometry is not a curve.
System.out.println("This renderer can’t translate the map feature");
System.out.println(e.getMessage());
} catch (IlvCoordinateTransformationException te) {
// Might occur if the coordinate transformation could not be
// performed.
System.out.println("This renderer could not transform the geometry");
System.out.println(te.getMessage());
}
The complete source code of this example can be found in the following file:
Creating a colored line renderer
The complete source code example for this renderer can be found in the following file:
Suppose that you want to display contour lines of different elevations with different colors. A simple solution would consist of indexing a color using the elevation value by means of a java.awt.image.ColorModel. More generally, it would be useful to have a renderer class that applies a color to graphic objects, such as lines, polygons, or text, by using any of the attributes associated with a map feature.
The
makeGraphic method in the
ColorLineRenderer class builds an
IlvPolyline graphic object from the interface
IlvMapMultiPointInterface. This interface is common to all geometries composed of a set of points.
public IlvGraphic makeGraphic(IlvMapFeature feature,
IlvCoordinateTransformation tr)
throws IlvMapRenderException, IlvCoordinateTransformationException
{
// Check that this geometry can be processed.
IlvMapMultiPointInterface multiPoint;
try {
multiPoint = (IlvMapMultiPointInterface)feature.getGeometry();
} catch (Exception e) {
throw new IlvMapRenderException("not a multipoint geometry");
}
// Check that something has to be done.
int pointCount = multiPoint.getPointCount();
if (pointCount == 0)
return null;
// Allocate polyline point array.
IlvPoint p[] = new IlvPoint[pointCount];
// Convert points.
for (int i = 0; i < pointCount ; i++) {
p[i] = new IlvPoint();
IlvProjectionUtil.ToViews(tr,
multiPoint.getPoint(i),
p[i]);
}
// Create the graphic object, without duplicating the p[] array.
IlvPolyline poly = new IlvPolyline(p, false);
[...]
The map feature coordinates must be converted to the manager coordinate system. This conversion implies a change of orientation of the y-axis since cartographic data coordinate systems have the positive portion of their y-axis oriented upward, whereas the manager has it oriented downward. It might also imply a coordinate transformation by changing the source coordinate system of the data into a target coordinate system. In our example, the
ToViews method both transforms the coordinates, if necessary, and corrects the orientation of the y-axis. Note that the
IlvCoordinateTransformation can be
identity by setting the source (
feature.getCoordinateSystem() ) and target coordinate systems to
null, especially if the source data is not georeferenced (that is, its projection is not known), or does not need to be transformed. For further information about coordinate systems, see
Handling spatial reference systems.
Once the graphic object is created, the attribute value for coloring the lines using a color model is retrieved, as shown below:
int colorIndex = 0;
// Get attribute list.
IlvFeatureAttributeProperty attributeList = feature.getAttributes();
if (attributeList != null) {
try {
IlvFeatureAttribute attribute = null;
attribute = attributeList.getAttribute(myAttributeName);
if (attribute instanceof IlvIntegerAttribute)
colorIndex = ((IlvIntegerAttribute)attribute).getValue();
else if (attribute instanceof IlvDoubleAttribute)
colorIndex = (int)((IlvDoubleAttribute)attribute).getValue();
} catch (IllegalArgumentException e) {
// No attribute found.
colorIndex = 0;
}
}
Color color = new Color(myColorModel.getRed(colorIndex),
myColorModel.getGreen(colorIndex),
myColorModel.getBlue(colorIndex));
// Sets the color of graphic.
poly.setForeground(color);
Making a renderer persistent
There are certain situations where you might want to save a renderer. When you work in load-on-demand mode, for example, only the parameters necessary for loading the graphic objects in the layer are saved, not the objects themselves. Load-on-demand is described in
Using load-on-demand.
The complete source code of this example can be found in the following file:
If the graphic objects are created using a specific renderer, you must save that renderer to render the objects in the same way the next time they are loaded. The class
IlvSDOLayer, for example, lets you specify a renderer (
setFeatureRenderer that will be saved with the layer.
The
ColorLineRenderer presented in the section
Creating a colored line renderer derives from the
IlvFeatureRenderer interface, which extends
IlvPersistentObject and can thus be saved.
/**
* Writes this to specified stream.
*/
public void write(IlvOutputStream stream)
throws java.io.IOException
{
stream.write("attributeName",myAttributeName);
if (myColorModel instanceof IlvPersistentObject)
stream.write("colorModel",(IlvPersistentObject)myColorModel);
else
System.err.println("Warning: colormodel not saved");
}
public ColorLineRenderer(IlvInputStream stream)
throws IlvReadFileException
{
myAttributeName = stream.readString("attributeName");
try {
myColorModel = (ColorModel)stream.readPersistentObject("colorModel");
} catch (IlvFieldNotFoundException e) {
// Get default colormodel
myColorModel = IlvIntervalColorModel.MakeElevationColorModel();
}
}
}
Extending an existing renderer
Most of the time, you do not have to create a totally new renderer. You can use one of the default renderers that are supplied in the package and tailor it to your needs.
This section shows how to extend an
IlvDefaultPointRenderer to add text of the type
IlvLabel next to the point of the feature being rendered. It also shows the use of
IlvMapRenderingStyle which are the classes used by the renderers in order to customize them. For instance, in this code example, the color of the labels generated by the renderer is obtained through the
IlvMapPointRenderingStyle of the
IlvDefaultPointRenderer.The complete source code for the example in this section can be found in the following file:
The text is stored in an attribute whose name is provided for the class MarkerTextRenderer. When this text exists, it is returned with the marker generated by the superclass of the renderer; otherwise only the marker is returned.
public IlvGraphic makeGraphic(IlvMapFeature feature,
IlvCoordinateTransformation tr)
throws IlvMapRenderException, IlvCoordinateTransformationException
{
// Let the super class create the marker.
IlvMarker marker = (IlvMarker)super.makeGraphic(feature, tr);
// Create label if needed.
IlvLabel label = null;
IlvFeatureAttributeProperty attributeList = feature.getAttributes();
if (attributeList != null) {
try {
IlvFeatureAttribute attribute = null;
attribute = attributeList.getAttribute(myAttributeName);
if (attribute != null)
label = new IlvLabel(marker.getPoint(), attribute.toString());
} catch (IllegalArgumentException e) {
label = null;
}
}
// Case no label: return marker.
if (label == null) {
return marker;
}
// Else generate a graphic set containing the marker as the label.
else {
// Make this label of the same color than the marker.
label.setForeground(getPointRenderingStyle().getMarkerColor());
IlvGraphicSet set = new IlvGraphicSet();
set.addObject(marker, false);
set.addObject(label, false);
return set;
}
}
Using CSS to customize the rendering process
Usually, renderers can be customized by means of their own Java™ API. For example, to obtain blue lines, you can use
IlvDefaultCurveRenderer and call the
setForeground method of its
IlvMapLineRenderingStyle. To customize a renderer easily and quickly, you can also use the
IlvMapCSSRenderer class, which is an
IlvDefaultFeatureRenderer (it can render any known
IlvMapGeometry).
NOTE This feature is difficult to use with map layers having their own style. It leads to a situation in which each object style can be defined in two ways.
For more information about
CSS, see
Using CSS Syntax in the Style Sheet, in
Rogue Wave® JViews Diagrammer, Developing with the SDK.
Cascading style sheets
For its customization, the IlvMapCSSRenderer class uses cascading style sheets, or CSS files. The customization is done so that for the same Java code you can have different style sheets, that is, different rendering aspects.
Basically, a style sheet is a set of rules. For more details on the structure of the CSS, refer to Using CSS Syntax in the Style Sheet, in Rogue Wave® JViews Diagrammer, Developing with the SDK.
The complete source code of this example can be found in the following files:
Here is how to use the
IlvMapCSSRenderer class. Imagine, for example, that you have a shapefile data file,
roads.shp, and you need to render the roads in red. Here is the simplest way to do it by means of a CSS:
IlvMapCSSRenderer cssRenderer =
new IlvMapCSSRenderer(null, //use as default renderer
"roads",
new String[] { "simple.css"});
IlvMapLoader loader = new IlvMapLoader(manager);
IlvMapFeatureIterator iterator = loader.makeFeatureIterator("roads.shp");
loader.load(iterator, cssRenderer);
and the simple.css file would be:
#roadsLinesStyle {
class : 'ilog.views.maps.rendering.IlvMapLineRenderingStyle';
foreground : red;
}
roads {
class : 'ilog.views.maps.rendering.IlvDefaultCurveRenderer';
lineRenderingStyle : @=roadsLinesStyle;
}
Later in this section, all the content of the corsica.css file contained in the CSS demo (<installdir>/jviews-maps/samples/css/data) is examined and explained.
Customizing the CSS renderers
The following extracts of CSS code show how the user can customize the CSS renderer.
Set the debug mask to 0, so that no debug information will be printed. The maximum debug information is obtained by setting the debug mask to 65535.
#IlvMapCSSRenderer {
styleSheetDebugMask : 0;
}
Customize the rendering of the
airports.shp shapefile which contains Point geometries. Use an
IlvLabeledPointRenderer IlvLabeled.
#airportsPointStyle {
class : 'ilog.views.maps.rendering.IlvMapPointRenderingStyle';
markerSize : 8;
markerType : 'FilledDiamond|Square';
markerColor : #99ffee04;
}
#airPortsTextStyle {
class : 'ilog.views.maps.rendering.IlvMapTextRenderingStyle';
backgroundPaint : yellow;
framePaint : green;
innerMargin : 2;
maximumHeight :20;
minimumHeight : 15;
scale : 0.0000025;
antialiasing : true;
}
airports {
class : "ilog.views.maps.labelling.IlvLabeledPointRenderer";
attributeNames : nam;
pointRenderingStyle : @=airportsPointStyle;
textRenderingStyle : @=airPortsTextStyle;
}
Create an instance of
IlvLabeledPointRenderer, customize it and use it to render the shapefile. It is equivalent to the following Java code:
IlvMapPointRenderingStyle pStyle = new IlvMapPointRenderingStyle();
pStyle.setMarkerSize(8);
pStyle.setMarkerType(IlvMarker.IlvMarkerFilledDiamond |
IlvMarker.IlvMarkerSquare);
pStyle.setMarkerColor(new java.awt.Color(255, 238, 4, 153));
// The #99ffee04 color notation has the same syntax as HTML,
// the first 2 digits after the # represent the alpha channel.
IlvMapTextRenderingStyle tStyle = new IlvMapTextRenderingStyle();
tStyle.setBackgroundPaint(Color.yellow);
tStyle.setFramePaint(Color.green);
tStyle.setInnerMargin(2);
tStyle.setMaximumHeight(20);
tStyle.setMinimumHeight(15);
tStyle.setScale(0.0000025);
tStyle.setAntialiasing(true);
IlvLabeledPointRenderer labelRender =
new IlvLabeledPointRenderer();
labelRenderer.setAttributeNames (new String[] {"nam"});
labelRenderer.setPointRenderingStyle(pStyle);
labelRenderer.setTextRenderingStyle(tStyle);
#coastlinesStyle {
class : 'ilog.views.maps.rendering.IlvMapLineRenderingStyle';
foreground : black;
lineWidthZoomed : true;
lineWidth : 2;
lineStyle : 4.2,4.3;
lineJoin : JOIN_BEVEL;
endCap : Cap_Round;
}
coastlines {
class : 'ilog.views.maps.rendering.IlvDefaultCurveRenderer';
lineRenderingStyle : @=coastlinesStyle;
}
1. In the previous code extract the class keyword was used to tell the renderer to instantiate the corresponding class and to use it. Here an ilog.views.maps.rendering.IlvMapLineRenderingStyle class is instantiated to customize an instance of the ilog.views.maps.rendering.IlvDefaultCurveRenderer class.
2. You can assign a float array to the lineStyle keyword, as well as some predefined values such as Dash, Dot, and so on. Moreover, values assigned to the LineStyle, lineJoin and endCap are not case sensitive.
Create an
IlvLabeledPointRenderer to render the
cities.shp shapefile that contains Point geometries:
#citiesPointStyle {
class : ilog.views.maps.rendering.IlvMapPointRenderingStyle ;
markerSize : 3;
markerType : FilledCircle;
markerColor : blue
}
#col1 {
class : 'java.awt.Color(red, green, blue)' ;
red : 0;
green : 0;
blue : 200;
}
#col2 {
class : 'java.awt.Color(red, green, blue, transparency)' ;
red : 150;
green : 200;
blue : 255;
transparency : 180;
}
#citiesLabel {
class : ilog.views.maps.rendering.IlvMapTextRenderingStyle ;
backgroundPaint : @=col2;
labelFillColor : black;
framePaint : @=col1;
innerMargin : 2;
maximumHeight :15;
minimumHeight : 10;
antialiased : true;
scale : 0.0000025;
}
cities {
class : ilog.views.maps.labelling.IlvLabeledPointRenderer;
attributeNames : NAME,txt;
rejectedValues : UNK;
pointRenderingStyle : @=citiesPointStyle;
textRenderingStyle : @=citiesLabel;
}
Notice here the syntax of the #col1 node. This shows how you can instantiate any kind of objects using the CSS. You just have to provide the class keyword in the node scope and link it to the definition of the constructor which is given with all the necessary parameters: class: 'java.awt.Color(red, green, blue)'.
You can see here that an AWT Color with its three channels is constructed: red, green, and blue. To construct the Color, you have to provide the values of each parameter given in the list. For example, here it is 0 for red, 0 for green, and 200 for blue.
Create an
IlvRailroadRenderer to render the
roads.shp shapefile that contains Line geometries. The
IlvRailroadRenderer is a renderer provided with its source code in the CSS demo. It is designed to render line geometries as roads or railroads. Note that, using the CSS, you can even customize your own renderer:
#col3 {
class : 'java.awt.Color(red, green, blue, transparency)' ;
red : 220;
green : 10;
blue : 10;
transparency : 100;
}
#roadsAttributes {
class : 'ilog.views.maps.graphic.IlvRailroadAttributes';
drawingTies : false;
background : @=col3;
railColor : #66ff0000;
railSpacing : 1;
maximumRailSpacing : 1;
scale : 0.000000025;
}
roads {
class : 'ilog.views.maps.rendering.IlvRailroadRenderer';
attributes : @=roadsAttributes;
}
Create an
IlvDefaultAreaRenderer to render the
builtareas.shp shapefile that contains Polygon geometries:
#pattern1 {
class : 'ilog.views.util.java2d.IlvPattern(type, foreground, background)';
type: THICK_DIAGONAL_GRID;
foreground: gray;
background: wheat;
}
#builtareasLineStyle {
class : 'ilog.views.maps.rendering.IlvMapLineRenderingStyle';
foreground : maroon;
lineWidthZoomed : true;
lineWidth : 2;
lineJoin : join_Miter;
endCap : CAP_Round;
}
#builtareasAreaStyle {
class : 'ilog.views.maps.rendering.IlvMapAreaRenderingStyle';
fillingObject : true;
fillPattern : @=pattern1;
drawingStroke : true;
lineRenderingStyle : @=builtareasLineStyle;
}
builtareas {
class : 'ilog.views.maps.rendering.IlvDefaultAreaRenderer';
usingGeneralPath : true;
areaRenderingStyle : @=builtareasAreaStyle;
}
You can see here how to create an instance of IlvPattern and use it for the rendering process. The Java code corresponding to this CSS part of code is:
IlvPattern pattern1 =
new IlvPattern(IlvPattern.THICK_DIAGONAL_GRID,
Color.gray,
new Color(245,222,179));
IlvMapLineRenderingStyle builtareasLineStyle = new
IlvMapLineRenderingStyle();
builtareasLineStyle.setForeground(new Color(128, 0, 0));
builtareasLineStyle.setLineWidthZoomed(true);
builtareasLineStyle.setLineWidth(2);
builtareasLineStyle.setLineJoin(BasicStroke.JOIN_MITER);
builtareasLineStyle.setEndCap(BasicStroke.CAP_ROUND);
IlvMapAreaRenderingStyle builtareasAreaStyle = new
IlvMapAreaRenderingStyle();
builtareasAreaStyle.setFillingObject(true);
builtareasAreaStyle.setFillPattern(pattern1);
builtareasAreaStyle.setDrawingStroke(true);
builtareasAreaStyle.setLineRenderingStyle(builtareasLineStyle);
IlvDefaultAreaRenderer builtareas = new IlvDefaultAreaRenderer();
builtareas.setUsingGeneralPath(true);
builtareas.setAreaRenderingStyle(builtareasAreaStyle);
Create an
IlvRailroadRenderer to render the railroads
.shp shapefile that contains Line geometries:
#railRoadStyle {
class : 'ilog.views.maps.graphic.IlvRailroadAttributes';
railSpacing : 1;
scale : 0.00000025;
maximumRailSpacing : 1;
tieWidth : 3;
maximumTieWidth : 3;
tieSpacing : 4;
slantingLimit : 15;
railColor : green;
tieColor : #ff40ff40;
}
railroads {
class : 'ilog.views.maps.rendering.IlvRailroadRenderer';
attributes : @=railRoadStyle;
dummy[0] : "@#col1";
dummy[1] : "@#col2";
dummy[2] : "@#col3";
}
Another interesting aspect of this part of the CSS code is the manipulation of indexed properties, called dummy here. The IlvRailroadRenderer class defines a dummy attribute member, which is an array of String ( String[] ).
To customize this array by using the CSS, you need to:
1. Define the get/set methods according to the JavaBeans specifications.
Here is the part of the code of IlvRailroadRenderer that declares these methods:
public Color getDummy(int i)
{
return _dummy[i];
}
public Color[] getDummy()
{
return _dummy;
}
public void setDummy(Color[] val)
{
_dummy = val;
}
public void setDummy(int i, Color val)
{
_dummy[i] = val;
}
The complete source code of this example can be found in the following file:
NOTE In our example, the number of dummy colors is limited to 3.
2. Define the descriptor in the BeanInfo class, IlvRailroadRendererbeanInfo:
public class IlvRailroadRendererBeanInfo
extends SimpleBeanInfo
{
private final static Class beanClass = IlvRailroadRenderer.class;
public PropertyDescriptor[] getPropertyDescriptors()
{
try {
PropertyDescriptor[] properties = {
new PropertyDescriptor("attributes", beanClass),
new IndexedPropertyDescriptor("dummy", beanClass)
// The dummy indexed property.
};
return properties;
} catch (IntrospectionException e) {
throw new Error(e.toString());
}
}
}
The complete source code of this example can be found in the following file:
3. Define indexed properties in your CSS file by using the @# syntax.
NOTE You can define a unique CSS file for all your CSS renderers. But each time you instantiate the CSS renderer, the long CSS file is parsed, and depending on the size of the CSS file, it can be time consuming. In this case, you can cut your CSS file into smaller CSS files to avoid the performance drop.
For more information about CSS, see Using CSS Syntax in the Style Sheet in Rogue Wave® JViews Diagrammer, Developing with the SDK.
Renderers and styling
Some predefined renderers produce
IlvGraphic objects, which are instances of the
IlvMapGraphic class. These renderers include
IlvMapAreaRenderer,
IlvMapPointRenderer,
IlvMapCurveRenderer and
IlvMapTextRenderer. The graphic objects produced by these renders can be styled by means of an
IlvMapStyle object. The predefined data sources provided by
JViews Maps use these renderers and make it possible to change the style of a layer without reloading the entire map.
The following code creates an
IlvShapeDataSource and sets an
IlvMapAreaRenderer to render the feature read by the data source. The fill color is set to red. A button is created whose action sets the color of the map to blue simply by changing the
Paint attribute of the layer.
IlvShapeDataSource ds = new IlvShapeDataSource(shapeFile);
ds.setManager(view.getManager());
IlvMapAreaRenderer renderer = new IlvMapAreaRenderer(false, false);
IlvGraphicPathStyle style = new IlvGraphicPathStyle();
ds.getInsertionLayer().setStyle(style);
style.setFilling(true);
style.setPaint(Color.red);
ds.setFeatureRenderer(renderer);
JButton b = new JButton();
b.addActionListener(new ActionListener() {
public void actionPerformed(ActionEvent e) {
IlvGraphicPathStyle style = ( (IlvGraphicPathStyle)ds.getInsertionLayer().getStyle();
style.setPaint(Color.blue);
view.repaint();
}
});
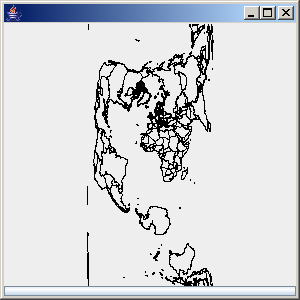
Rendering with a geodetic computation
The
IlvMapAreaRenderer and
IlvMapCurveRenderer provide a geodetic computation option. Geodetic computation includes date line wrapping and reprojection of features that go outside of the projection limits.
To create a renderer that performs geodetic computations, just pass true to the specified argument:
IlvShapeDataSource ds = new IlvShapeDataSource(shapeFile);
ds.setManager(view.getManager());
// perform geodetic computations
IlvMapAreaRenderer renderer = new IlvMapAreaRenderer(false, true);
ds.setFeatureRenderer(renderer);
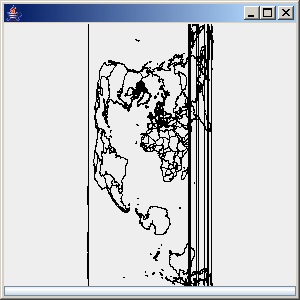
The figures show geodetic computation with and without date line wrapping:
Geodetic computation with date line wrapping
Geodetic computation without date line wrapping
Copyright © 2018, Rogue Wave Software, Inc. All Rights Reserved.