Exploiting advanced graphics features
Explains how to best use the capabilities of advanced graphics in symbols.

Presents the graphic formats that the Symbol Editor is able to handle.
Explains how to integrate an SVG image into a symbol.
Explains how to transform an imported SVG image into a JViews symbol.
Explains the principle of layers in a symbol and how to use them to control the layout of the symbol objects.
Shows how to make a graphic dynamic.
Supported graphic formats
In
Getting started with the Symbol Editor, you learned how to manipulate graphic objects, parameters and conditions. In this section, you will see how to apply these techniques to symbols containing imported images.
The Symbol Editor can import the following file types:
PNG
JPG
GIF
SVG
IVL
PNG, JPG, and GIF format files are static images. This means that their appearance cannot be edited directly using the Symbol Editor. However, static images have a smaller memory footprint. You use static images to create light symbols. For more information, see
Designing for performance.
Both IVL and SVG files contain vector graphics. Using the Symbol Editor, you can edit and add conditions to each object contained in an imported vector graphic.
Importing a vector graphic
Vector graphics are added to a symbol in the same way as any other object.
To import an SVG image:
1. In the Symbol Editor, create a new symbol.
2. Click the Add Image button in the toolbar.
The Choose Image File dialog box opens.
3. 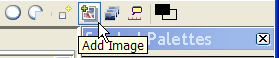
The Add Image button
4. Navigate to the following directory:
<installdir>/jviews-diagrammer/bin/SymbolEditor/data/examples.
5. Select Scalable Vector Graphics Files in the Files of Type list.
6. Select progressbar.svg and click Open.
The Adding Vector Graphics dialog box opens.
7. Click OK.
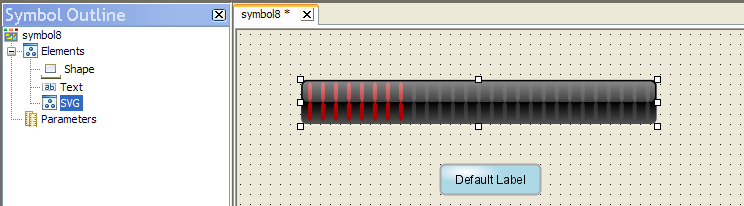
The progressbar image is added to your symbol.
A Symbol containing an SVG image
As shown in the figure above, the imported image is named SVG in the Symbol Outline pane. If more than one SVG image is added to the symbol, additional graphics are named SVG2, SVG3…SVGn automatically.
NOTE When an SVG image is added to a symbol, the Image tab is added to the Styling Customizer. This tab is used to edit the width and height of the image manually. It also contains the URL to the imported image file.
An imported image is placed in the top layer of the symbol hierarchy. However, an image can be used as the base object for the symbol.
To use the imported image as the base object of the symbol:
1. In the symbol you have just created, change the name of the imported image from SVG to progressbar.
2. Delete the Shape and Text objects from your symbol.
For more information, see
Deleting an object. The progressbar SVG image is now the base object.
4. Save the new symbol as svgprogressbar in the progressbars category of the bampalette.
Converting SVG images to symbols
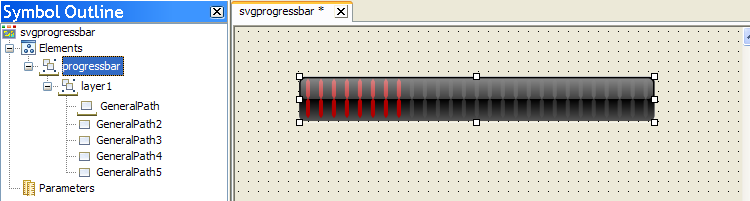
When you ungroup an SVG image, the Symbol Editor gives you access to all the objects contained in the graphic.
To ungroup the svgprogressbar symbol created in
Importing a vector graphic:
1. Open the svgprogressbar symbol.
2. Click the progressbar object.
3. Select Edit>Ungroup.
An ungrouped SVG image
As shown in the figure above, the Symbol Outline pane shows all the objects contained in progressbar. When an SVG image is ungrouped, the Symbol Editor gives each object a name automatically. An ungrouped image is no longer in SVG or IVL format, it is a standard Rogue Wave® JViews symbol; the Image tab is no longer displayed in the Styling Customizer when the SVG root object is selected.
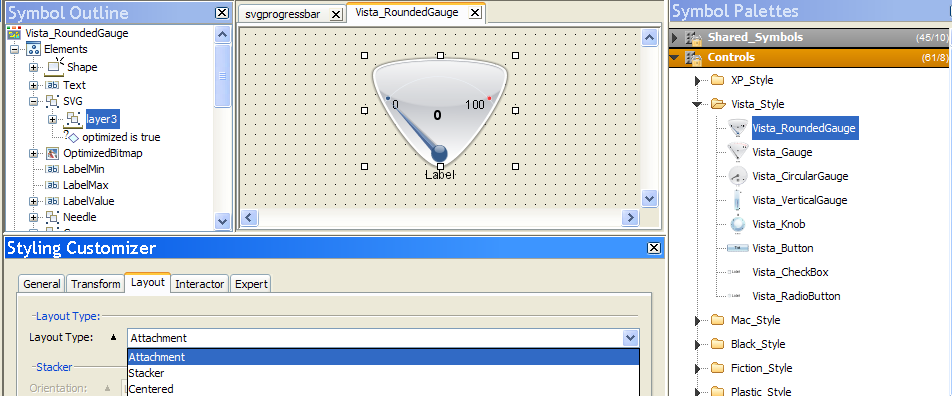
Control of group layout
As shown in figure
An ungrouped SVG image, an ungrouped SVG file has multiple layers. Each layer is translated as a group of objects with a base object in the Symbol Editor. When a layer base object is selected, the Layout tab is displayed in the Styling Customizer.
The layout pane
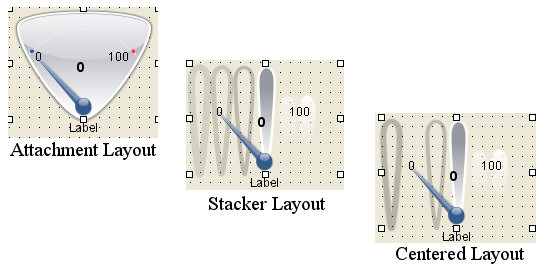
You use the different layout options to control the distribution and arrangement of the objects inside the selected layer. The default layout type is an Attachment layout. The following figure shows how object distribution changes for different layout types.
Distribution differences according to layout types
Adding intelligence to an advanced graphic
The svgprogressbar symbol created in
Converting SVG images to symbols is essentially the same as the basicprogressbar created in
Changing symbol layers. That is, a collection of shapes where one object is expanded to display a change in real world events. The difference is that the svgprogressbar shown in figure
An ungrouped SVG image is visually more pleasing than the basicprogressbar shown in figure
The region symbol. As you will now see, it is much faster to add intelligence to a symbol made with advanced graphics.
To add intelligence to an advanced graphic symbol, you need to:
Choose the object in the graphic to be transformed.
Create the parameters necessary for transformation.
Bind the parameters to the object.
Add conditions if necessary.
The svgprogressbar symbol contains 5 different objects layered one on top of the other. The GeneralPath3 object, as shown in figure
An ungrouped SVG image, is a red bar.
To transform this object:
1. In the Symbol Editor, select the GeneralPath3 object.
2. Create the following parameters:
Parameters for the svgprogressbar symbol
Name | Type | Allowed Value | Allowed Value Name | Default Value |
maxwidth | Integer | 100 | max | max |
minwidth | Integer | 0 | min | min |
problem | Integer | 35 | prob | prob |
progress | float | | | 0.1 |
3. Bind the problem, minwidth and maxwidth parameters to the width attribute of the GeneralPath3 object.
Pay attention to set the Value Max parameter to 345, that is, the maximum width of the bar in pixels.
4. 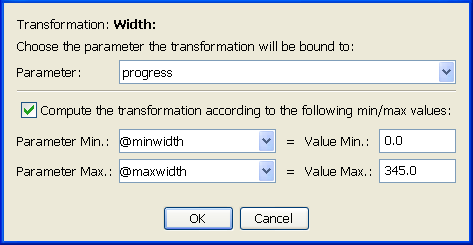
Transformation parameters
NOTE When you test GeneralPath3 and progress is set to 100, the bar width is 345 pixels.
Symbol graphics created by graphic artists using standard graphics packages have a finer look and feel. Importing advanced graphics into the Symbol Editor means symbols are created faster by the Symbol Editor. To add intelligence to a symbol based on SVG images, use exactly the same methods as you do for a basic symbol. See
Planning a project for the Symbol Editor to see the recommended workflow for creating symbols.
Copyright © 2018, Rogue Wave Software, Inc. All Rights Reserved.