Working with symbols
Shows you how to create a progress bar that will be used for a basic Business Activity Monitoring (BAM) application. It is used to monitor Key Performance Indicators for different regions.

Explains how to create a symbol and describes its basic elements as they appear in the Symbol Editor.
Lists the interface elements of the Styling Customizer pane and their purpose.
Explains how to add an object to the base elements of a symbol.
Explains the different ways to select an object in a symbol.
Explains how to rename and change the size of a symbol object.
Explains how to delete the base object of a symbol in order to use another object as the base object.
Making a new symbol
Before creating symbols, you need to know what you are creating them for. The use case for project planning is explained in
Planning a project for the Symbol Editor. A full explanation of the BAM project is explained in
The BAM Dashboard example.
You can create a new symbol in one of three ways:
1. Click File > New.
2. Click the New Symbol at the upper left of the Symbol Editor window.
3. 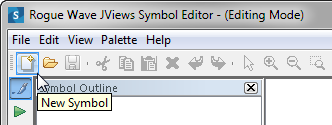
The New Symbol button
4. Press Ctrl+N.
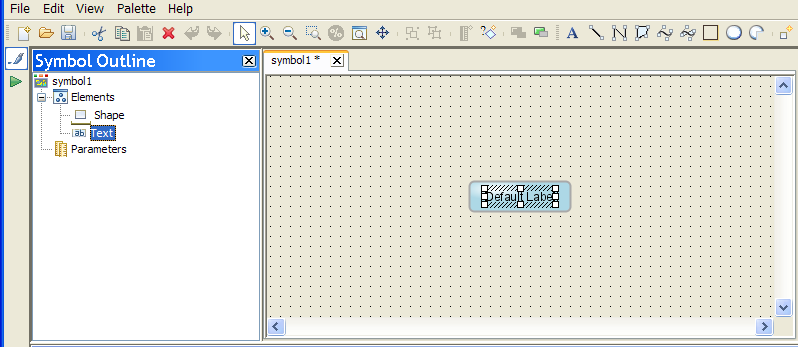
The default symbol is displayed in the drawing pane.
The default symbol
The default symbol shown in the figure
The default symbol contains two objects: the Shape object and the Text object. The handles around the Text object indicate that it is selected.
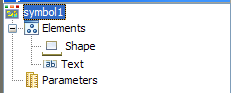
The position and coordinates of objects in a symbol are relative to the base object. The base object is the object on which the coordinates and position of all other objects in the symbol are calculated. The base object in a symbol is indicated in the Symbol Outline pane with a red underline.
The base object indicator
When a symbol is opened in the Symbol Editor, the actions available are indicated by the active buttons in the menu bar. The objects contained in the symbol are displayed in the Symbol Outline pane on the left of the Symbol Editor. Customization options for the selected object are displayed in the Styling Customizer pane at the bottom of the Symbol Editor.
NOTE You can create a new symbol from an existing one by double-clicking the latter in the Symbol Palettes pane.
Understanding the Styling Customizer
You can customize object properties and their values by using the Styling Customizer. The properties are subdivided into categories by tabs. The Styling Customizer for the current object selection is displayed in the lower pane of the Symbol Editor.
For each property of the currently selected object, the Styling Customizer displays one of the following, according to the type of value concerned:
A check box to select or clear
A list of valid values or items for you to choose from
A step scale for numerical values
A text field for you to enter text
Buttons for you to add or remove values or lines of text
An Ellipsis button for all properties that need to be edited using a dialog box. For example, when you change the paint and stroke.
A choice of the following systems for color settings:
JViews color disk
RGB (Red, Green Blue)
HSB (Hue, Saturation, Brightness)
Swatches
Adding an object
You will now create the first object for the basic progress bar. This progress bar will consist of a single rectangle object that changes width and color to show project advancement.
To add a rectangle object to your symbol:
1. In the toolbar, click Rectangle.
2. Hold down the left button of the mouse and drag the mouse over the area in the drawing pane where you want to place the object.
The new rectangle is shown in the drawing pane.
Adding a rectangle object
Selecting an object
You can select an object in a symbol in two different ways:
1. Select the object from the Symbol Outline pane.
2. In Select mode, click the object in the drawing pane.
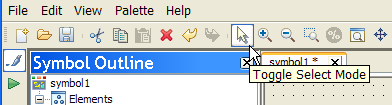
By default, the Symbol Editor starts in select mode. If you have changed to another mode, such as zoom or pan, click Toggle Select Mode as shown in the following figure to change to select mode.
Set Symbol Editor to select mode.
TIP You can select multiple objects by holding down the Ctrl or Shift keys while selecting the objects.
Performing basic object customization
As well as being added to the drawing pane, new objects are added to the object list in the Symbol Outline pane. By default, they are given the name of their object type. For example, the rectangle object created in
Adding an object is called Rectangle.
To change the size and name of an object:
1. Select the Rectangle object.
2. Click the Transform tab in the Styling Customizer.
3. Type 120 in the Width field and press Enter.
The rectangle resizes to the new width.
4. Type 30 in the Height field and press Enter.
The rectangle resizes to the new height.
5. Click the General tab.
6. Type progressbar in the Name field and press Enter.
The object name changes in the Symbol Outline pane.
1. All object, palette and category names must be single words containing only alphanumeric characters.
2. In the Symbol Editor, all measurements are in pixels.
Deleting an object
You can delete an object in one of three ways:
a. Select the object.
b. In the toolbar, click Delete Selection.
3. Right-click the object and click Delete on the pop-up menu.
4. Select the object and press the Delete key.
The position and coordinates of an object in a symbol are relative to the base object. You cannot leave the drawing pane empty, there must be at least one base object present. The base object is marked in the Symbol Outline pane with a red underline.
If you delete the existing base object, a dialog box appears to warn you that you are about to change the base object of the symbol. You will see this when you delete objects from the symbol you created in
Adding an object, so
progressbar becomes the base object.
To make the progressbar become the base object:
1. Select the Text object.
2. Press the Delete key.
3. Right-click the Shape object and click Delete from the pop-up menu.
The Confirm New Base Element dialog box opens.
4. Click Yes.
The progressbar is now the base object for this symbol.
Copyright © 2018, Rogue Wave Software, Inc. All Rights Reserved.