JViews TGO provides a
base renderer factory class, IltNEImageBaseRendererFactory, that simply
requires an image from which it will automatically compute all the
representations that a network element can have according to the
state it is in (out of service, in service carrying traffic, in
service carrying no traffic, or not installed) or the alarms it
raises. See States.
How to create a new type of network element from an image (using the API)
To create a new type of network element
using an image:
- Create a new type of network element with the following code:
IltNetworkElement.Type myNewType = new IltNetworkElement.Type(YOUR_NEW_TYPE_NAME); - Create the image corresponding to the base style Carrying Traffic without any alarm and instantiate an IltNEImageBaseRendererFactory using this image:
IltNEImageBaseRendererFactory factory = new
IltNEImageBaseRendererFactory(image, YOUR_IMAGE_PARAMETERS);
- Map the factory with the new type using SetValue:
IltSettings.SetValue("NetworkElement.Type.YOUR_NEW_TYPE_NAME.Renderer",facto
ry);
How to create a new type of network element from an image (using CSS)
You can create new network element types
using global CSS settings as shown in the following example.
setting."ilog.tgo.model.IltNetworkElement"{
  types[0]: @+neType0;
}
Subobject#neType0 {
  class: 'ilog.tgo.model.IltNetworkElement.Type';
  name: "YOUR_NEW_TYPE_NAME";
}
See Using global settings for more information.
How to customize a network element renderer (using CSS)
You can customize the renderer for the network element type using
global CSS settings. To do so, you need to specify the full path
to the object to be customized, as well as the value of its
name
attribute in order to match the right type of object in the
system. The CSS property to customize is
renderer
as shown in the following example.
setting."ilog.tgo.model.IltNetworkElement.Type"[name=YOUR_NEW_TYPE_NAME] {
   renderer: @+neRendererFactory0;
}
Subobject#neRendererFactory0 {
   class: 'MyNERendererFactory';
}
In this example, the name of the renderer factory class that is
included in the search path is
MyNERendererFactory
.
Starting from an original image of type
java.awt.Image
corresponding to the Carrying Traffic base style without any
alarm, JViews TGO
automatically processes the range of representations
corresponding to other states and alarms.
Suppose that you want to define a new
network element with the following representation for the base
style Carrying Traffic with no alarms.

Sample new network element
To define this new network element representation, all you have
to do is instantiate an IltNEImageBaseRendererFactory and provide
the bitmap image as an argument to its constructor. JViews TGO automatically
computes the various representations that this network element
can have according to its associated state and alarms.
The IltNEImageBaseRendererFactory has three
constructors:
- The first constructor has four arguments and enables you to customize the way the different representations are computed.The first parameter is of type
java.awt.Image. It is the original image used to compute all other representations.The first and the secondintare thresholds indicating which part of the original image should be considered as details and drawn in the dark color. The thirdintis the gray level that should be mapped to the normal alarm color. - The second constructor has the same parameters as the first one and an additional boolean parameter that indicates whether an additional dotted border should be drawn around the base.
- The third constructor has only one argument, which is the
java.awt.Imagethat should be used to compute the different representations of the new type. It calls the constructor with four arguments, with the image and 200 as the threshold for bright colors, 50 as the threshold for dark colors, and 128 as the gray level to be mapped to the normal alarm color.
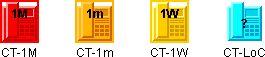
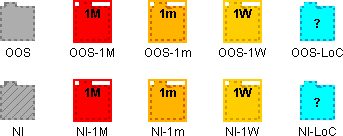
The following figure presents the four
base styles (rows) with their various representations
corresponding to alarms of different severity and loss of
connectivity (columns).

Sample Instantiations of New Network
Elements
How to create a new type of network element using one image per base style
Another way to represent a type with an
image is to specify a source image and an alarm color level
parameter for every required base style, directly in CSS. No
other base style property or renderer parameter is needed, as a
complete image is provided for every required base style.
To create a new type of network element
using an image per base style:
- Create a new type of network elementUsing the API:
IltNetworkElement.Type myNewType = new
IltNetworkElement.Type(YOUR_NEW_TYPE_NAME);
or, using global CSS settings:setting."ilog.tgo.model.IltNetworkElement" { types[0]: @+neType0; } Subobject#neType0 { class: 'ilog.tgo.model.IltNetworkElement.Type'; name: YOUR_NEW_TYPE_NAME; } - Map an IltNEDirectImageBaseRendererFactory to the new typeUsing the API SetValue:
IltSettings.SetValue("NetworkElement.Type.YOUR_NEW_TYPE_NAME.Renderer", new
IltNEDirectImageBaseRendererFactory());
or, using global CSS settings:setting."ilog.tgo.model.IltNetworkElement.Type"[name=YOUR_NEW_TYPE_NAME] { renderer: @+neRendererFactory; } Subobject#neRendererFactory { class: 'ilog.tgo.graphic.renderer.IltNEDirectImageBaseRendererFactory'; } - Define an image and an alarm color or gray-level parameter in CSS for each required base style
object."ilog.tgo.model.IltNetworkElement"["type"=YOUR_NEW_TYPE_NAME]["object
State.Bellcore.State"=EnabledActive] {
  sourceImage: '@|image("newType_enabledActive.png")';
  alarmColorLevel: 128;
}
object."ilog.tgo.model.IltNetworkElement"["type"=YOUR_NEW_TYPE_NAME]["object
State.Bellcore.State"=DisabledActive] {
  sourceImage: '@|image("newType_disabledActive.png")';
  alarmColorLevel: 140;
}
How to define a network element type from an image
If the base style is Carrying Traffic
no alarms, the representation is the original image.
Sample original image
In all other cases, the representation is automatically computed
by JViews TGO, as
follows:
- Carrying Traffic with alarms: A color scale corresponding to the alarm color is applied to the original image. This color scale uses three colors: a bright alarm color, a normal alarm color, and a dark alarm color.For example, for a major alarm JViews TGO uses the colors bright red, red, and dark red. The color scale is applied to the original image by first converting it to a normalized gray-scale image (that is, gray levels in the range 0..255). Then, the normalized gray-scale image is colored by mapping each gray level to a color level. The brighter gray is mapped to the bright alarm color, the darker gray is mapped to the dark alarm color, and the gray level corresponding to the third integer in the factory constructor is mapped to the normal alarm color (if this integer is not explicitly given, the default value used is 128). Any other gray level different from the brighter one, the darker one, or the one given in the factory constructor is mapped to the appropriate color in a continuous manner.
Sample with Color
- No Traffic (with or without alarms): The original image, which is supposed to be a relief image (according to the JViews TGO look-and-feel), is transformed to a flat image. The flat image is composed of only two colors: in the absence of alarms, one gray and one darker gray, otherwise one alarm color and one dark alarm color. Using only two colors ensures a flat visual aspect. To follow the JViews TGO look-and-feel, the whole object should be represented in the normal color with its border in the dark color, plus possibly some details of the inside of the object also in the dark color. For example, the figure shows that the border is in the dark color as well as the outline of the small screen and the receiver of the telephone. To indicate which details of the original image you want in the dark color and which you do not, you must use the first two integers of the factory constructor. The first integer indicates a threshold above which the bright colors of the original image should be considered as details and drawn in the dark color; if this integer is not explicitly given, the default value used will be 200. For example, Sample Dark and Light Colors shows examples where the threshold assumed is 200 (in the range 0..255). In this way, the left border of the receiver and the lower right border of the screen are drawn in the dark color. The second integer is a threshold indicating which of the dark colors of the original image should be considered as details and also drawn in the dark color; if this integer is not explicitly provided, the default value will be 50. For example, in Sample Dark and Light Colors we indicate that this threshold is 11 (in the range 0..255). This causes the lower right border of the receiver and the upper left border of the screen to be drawn in the dark color.

Sample Dark and Light Colors
- Out of Service and Not Installed (with or without alarms): According to the Rogue Wave® JViews TGO look-and-feel, the object should be represented with only two colors, a dashed border and a pattern inside, but no other details. JViews TGO uses the transparency, if any, to determine the border of the image. When there is no transparency, the rectangle of the image is considered to be the border. Then, the interior is filled with the appropriate pattern and the border is drawn as a dashed line. JViews TGO does not need any extra parameters (threshold or gray level as mentioned above) to compute these representations correctly.
Sample Representations
Note that JViews TGO
provides the
imagecolortuner
application to help you find the best values for the thresholds
and the gray level. For details, see Using the imagecolortuner application to
configure the renderer factory.
For the IltNEImageBaseRendererFactory class to
process the supported image types (GIF, PNG and JPG) correctly,
the only constraint on the image itself is that the number of
colors,
C
, be as follows:
2 <= C <= 256
The IltNEImageBaseRendererFactory class
preserves transparency, so transparency is not considered a
color. Consequently, IltNEImageBaseRendererFactory
does not color the transparent pixels of the image. For example,
an image that contains the color black as the foreground color,
and transparency as the background, will not have the regular
coloring scheme applied as it fails to meet the constraint on the
number of colors.