Shows you how to read in a file containing alarms, which are
instances of a custom business class. Custom business classes are
dynamic classes that you define for yourself, as opposed to those
that are predefined in JViews
TGO. They can be used to represent any type of business object.
The data for this part of the tutorial is
in the file:
A custom style sheet is used to create an
attractive display of the instances of the alarm class. For
example, the style sheet defines the labels used in the table
column headers, the background color of the table cells, and
whether to use an icon instead of a string value.
A style sheet is read in from a CSS file.
In the example, the alarm configuration is defined in the file:
This CSS file is imported by the style
sheet (CSS) file of each graphic component interested in the alarm
business class. This is illustrated in the file
<installdir>/tutorials/gettingStarted/data/table.css
by the following line:
@import "alarm.css"
Then the style sheet of the graphic component is loaded with the
method
setStyleSheets
, as shown in Configuring the network component.
This part of the code is referred to as
Step 5:
void step5(Container container) throws Exception{
To do Step 5:
-
Read in the file
alarms.xmlthat contains the declaration of the custom dynamic classAlarm, and a number of its instances.mainDataSource.parse("alarms.xml");NoteYou read the data into the same data source as used for all the previous data. The custom class declarations can also be read at startup time by declaring them in the deployment descriptor.TheAlarmclass is described as follows in the XML data file:<classes> <class> <name>Alarm</name> <attribute> <name>identifier</name> <javaClass>java.lang.String</javaClass> </attribute> <attribute> <name>perceivedSeverity</name> <javaClass>java.lang.Integer</javaClass> </attribute> <attribute> <name>acknowledged</name> <javaClass>java.lang.Boolean</javaClass> </attribute> <attribute> <name>creationTime</name> <javaClass>java.util.Date</javaClass> </attribute> </class> </classes>Each attribute takes its type from its Java™ class type, such asjava.lang.Stringfor theidattribute.Instances of theAlarmclass are defined by giving specific values to the attributes of the class. For example:<addObject id="alarm1"> <class>Alarm</class> <parent>London</parent> <attribute name="identifier">Alarm 1</attribute> <attribute name="perceivedSeverity">5</attribute> <attribute name="acknowledged">true</attribute> <attribute name="creationTime">2001-12-12T15:42:17</attribute> </addObject>
The parent of the alarm instance, which is the object on which the alarm is set, is also given. -
Create a new table.
alarmTableComponent = new IlpTable();
The name of the new instance of IlpTable isalarmTableComponent. This table will be used to display the alarms. -
Get the
Alarmclass.final IlpClass alarmClass = context.getClassManager().getClass("Alarm");The class manager is defined by the interface IlpClassManager. It handles a hierarchy of business classes. See Business class manager API in the Business Objects and Data Sources documentation for details. The application context allows you to retrieve the class manager service.The method getClass returns the specified class. -
Connect the data source to the table component and filter the objects to be put into the table.This table will be used to display instances of the
Alarmclass only.alarmTableComponent.setDataSource(mainDataSource, alarmClass);
The data source that will supply the alarms is set asmainDataSource. The class of business objects to be displayed from this data source is specified asalarmClass. -
Create a tabbed pane at the bottom of the window and add both tables to it.
initTableTab(container, alarmTableComponent);
This method takes bothtableComponentandalarmTableComponentand places them in a tabbed pane. It is written in pure Swing code. -
Create a filter for the tree, so that it shows critical and major alarms only.The IlpFilter interface is implemented as
treeAlarmFilter. The methodacceptis used to test the acceptability of the objects offered to this filter. The method returnstrueif the filter accepts an object.IlpFilter treeAlarmFilter = new IlpFilter(){ public boolean accept (Object object){ IlpObject ilpObject = (IlpObject)object; if (ilpObject.getIlpClass().equals(alarmClass)) { IlpAttribute perceivedSeverityAttr = alarmClass.getAttribute("perceivedSeverity");Object severityValue =ilpObject.getAttributeValue(perceivedSeverityAttr);return (new Integer(3).compareTo(alarmClass)<0); } return true; } };The filter is refined to test the severity of the alarms. TheAlarmclass has the attributesperceivedSeverityandacknowledged. Only alarms with a severity greater than 3 and with theacknowledgedattribute set tofalsewill be included in the table.Then, the filter is set on the tree component:treeComponent.setFilter(treeAlarmFilter); }
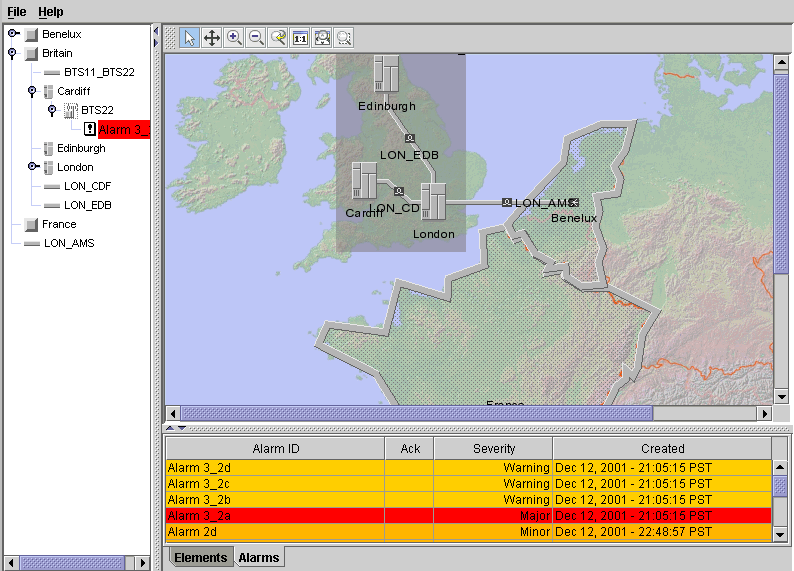
The sample should now look as shown in the
following figure.