The corresponding code is supplied in the codefragments/composite/src/Composite.java
source file of the installed product. For details, see <installdir> /jviews-framework810/codefragments/composite/index.html.
Stage 1 - Starting the composite graphic
To create a composite graphic object:
-
Import the composite graphics package:
import ilog.views.graphic.composite.* ;
-
Create a composite graphic object.
IlvCompositeGraphic composite = new IlvCompositeGraphic();
Stage 2 - Creating an attachment layout
The attachment layout enables you to
attach the child graphics to the first one by choosing symbolic
points of their bounding boxes.
To create the attachment layout:
-
Import the layout package:
import ilog.views.graphic.composite.layout.*;
-
Create the attachment layout.
IlvAttachmentLayout layout = new IlvAttachmentLayout();
composite.setLayout(layout);
Stage 3 - Creating the first child graphic
The first child graphic of the IlvCompositeGraphic object will be the
reference for positioning other child graphics. In this example,
the first child graphic is an IlvRectangle object.
To create the first child object:
-
Create a rectangle object:
IlvRectangle rectangle = new IlvRectangle(new IlvRect(0,0,40,40),true,true);
composite.setChildren(0,rectangle)
The first child is at position 0. The
attachment layout uses this first child to attach the other
children (sibling graphics) of the composite graphic.
Stage 4 - Attaching a child graphic
A label can be attached as a child
graphic.
There are nine different attachment
locations available, as illustrated in the following figure.
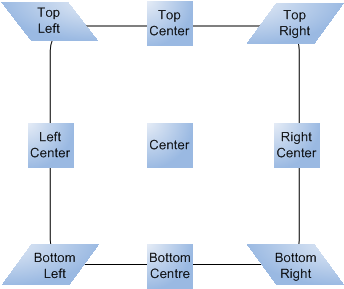
Attachment Locations
To label your composite graphic:
-
Attach an additional child graphic to the first one.
IlvText text = new IlvText(); text.setLabel("Composite Graphic"); composite.setChildren(1,text); -
Place the label below the rectangle:
composite.setConstraints(1,
new IlvAttachmentConstraint(IlvAttachmentLocation.TopCenter,
IlvAttachmentLocation.BottomCenter));
Here, the top center of the text (an IlvText) is anchored to the bottom center
of the first child graphic which is, in this example, an IlvRectangle object.
If you run your example now, you can see
the following composite, in which the “Composite Graphic” label
is attached to the blue rectangle with horizontal symmetry:
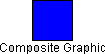
Composite graphics with attachments
Stage 5 - Using a stacker layout
As well as using the Attachment Layout to
position two objects with respect to each other within the
composite graphic object, you can use the Stacker Layout to
align objects.
To use the Stacker Layout to align three
icons:
-
Create one more composite graphic named
rectanglesto hold the three small rectangles. Its role will be to align these rectangles horizontally.IlvCompositeGraphic rectangles = new IlvCompositeGraphic();
-
Create a stacker layout and pass it to the Composite Graphic object.
IlvStackerLayout stacker = new IlvStackerLayout(SwingConstants.RIGHT,SwingConstants.BOTTOM,3);
rectangles.setLayout(stacker);
-
Create the three rectangles and set them as child graphics of the
rectanglescomposite graphic.IlvRectangle r1 = new IlvRectangle(new IlvRect(0,0,5,5),true,true); r1.setBackground(Color.red); rectangles.setChildren(0,r1); IlvRectangle r2 = new IlvRectangle(new IlvRect(0,0,5,5),true,true); r2.setBackground(Color.yellow); rectangles.setChildren(1,r2); IlvRectangle r3 = new IlvRectangle(new IlvRect(0,0,5,5),true,true); r3.setBackground(Color.green); rectangles.setChildren(2,r3);
-
Make the
rectanglescomposite graphic as a child graphic of the main composite graphic built in the previous stages.composite.setChildren(2,rectangles); composite.setConstraints(2,new IlvAttachmentConstraint(IlvAttachmentLocation.BottomLeft,IlvAttachmentLocation.TopRight));
At the end of this stage, you should
obtain the following result:

Stacker Layout
Stage 6 - Using a centered layout
Unlike center attachment (see Attachment Locations), Centered Layout has
the specific feature of handling two graphics, the outer graphic and the inner graphic. More precisely, in
Centered Layout, the composite is a container that lays out two
children: the first, at index position 0, is the outer graphic,
the second one, at index position 1, is the inner graphic. The
outer graphic will be resized by the composite in such way that
the inner graphic remains at the center of the outer graphic.
This example creates a Balloon made of a
yellow ellipse containing the text “Balloon” and adds it as a
new child of the composite graphic built in the previous stages.
Balloon is a new composite graphic that uses Centered Layout to
position the text and the ellipse with respect to each other. In
the following steps, you create the composite graphic as a new
object (the Balloon), the outer graphic (the ellipse), the inner
graphic (the text), then you attach the Balloon to the main
composite graphic.
To create the balloon and center the
text:
-
Create the Balloon composite graphic with Centered Layout:
IlvCompositeGraphic balloon = new IlvCompositeGraphic();
IlvCenteredLayout centered = new IlvCenteredLayout(new Insets(5,5,5,5));
balloon.setLayout(centered);
-
Create the outer graphic as an instance of IlvEllipse:The outer graphic is always the first child, at position 0, of the composite graphic with Centered Layout. This child is resized by the composite to the size of the inner graphic extended by the inset given to the Centered Layout ((5,5,5,5)) at step 1.
IlvEllipse ellipse = new IlvEllipse();
ellipse.setFillOn(true);
ellipse.setBackground(Color.yellow);
balloon.setChildren(0,ellipse);
-
Create the inner graphic as an instance of IlvText:The inner graphic is always the second child, at position 1, of the composite graphic with Centered Layout.
IlvText balloonText = new IlvText(new IlvPoint(0,0),"Balloon");
balloon.setChildren(1,balloonText);
-
Attach the Balloon to the main composite graphic using IlvAttachmentConstraint:
composite.setChildren(3,balloon);
composite.setConstraints(3,new IlvAttachmentConstraint(IlvAttachmentLocation.BottomCenter,IlvAttachmentLocation.TopLeft));
At the end of this stage, you should obtain the composite
graphic illustrated in Centered Layout:
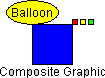
Centered Layout