Using the GUI beans
Describes the JavaBeans™ for GUIs with maps.

Describes the Map Overview bean available for GUIs with maps.
Describes the Area of Interest panel bean available for GUIs with maps.
Describes the Scale Bar bean available for GUIs with maps.
Describes the Scale Control Bar bean available for GUIs with maps.
Describes the Zoom Control panel bean available for GUIs with maps.
Describes the Legend panel bean available for GUIs with maps.
Describes the Coordinate System Editor bean available for GUIs with maps.
Describes the Display Preferences Editor bean available for GUIs with maps.
Describes the Coordinate Viewer bean available for GUIs with maps.
Describes the Map Layer Tree beans and property editors
Describes the Toolbar bean available for GUIs with maps.
Describes the Multithread Monitor bean available for GUIs with maps.
Describes the Coordinate Panel Factory bean available for GUIs with maps.
Describes the Compass bean available for GUIs with maps.
Explains how to use the Annotations Toolbar bean available for GUIs with maps.
Describes the Symbology Tree View bean and how to use it.
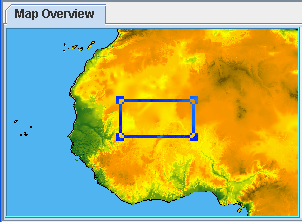
Map Overview
The Map Overview bean is represented by the
IlvJOverview class. The Map Overview bean displays a representation of a target manager view and enables users to navigate to an area of the view that is of particular interest.
An example of the Map Overview panel is shown in
Overview panel.
The source code for the Map Builder demonstration, which contains all of the code described in this section, can be found at
<installdir> /jviews-maps/samples/mapbuilder/index.htmlOverview panel
Including the bean in an application
To include the Map Overview bean in your application, write the following lines of code:
IlvJOverview overview = new IlvJOverview();
overview.setView(view);
Adding the bean to a Swing component
Then add it into a swing component:
panel.add(overview, BorderLayout.CENTER);
You should also make sure that the size of your overview remains the same regardless of any Swing layout constraints applied. To do so, use lines like:
overview.setSize(200, 100);
overview.setPreferredSize(overview.getSize());
overview.setMinimumSize(overview.getSize());
Customizing interactions and capabilities
You can customize the way users interact with the overview, and with the capabilities of the control rectangle as follows:
To change the way the interactor is drawn:
overview.setDrawingStyle(IlvManagerMagViewInteractor.Wire);
overview.setLineWidth(3);
overview.setResizeHandleSize(6);
To allow users to resize the overview:
overview.setResizingAllowed(true);
To make sure the visible area of the view always remains inside the overview window:
overview.setAutoTranslating(true);
To maintain a constant zoom ratio between the overview and the view:
overview.setAutoZooming(true);
You can improve the performance of your application by limiting the overview refresh rate:
overview.getOverviewView().setRepaintSkipThreshold(500);
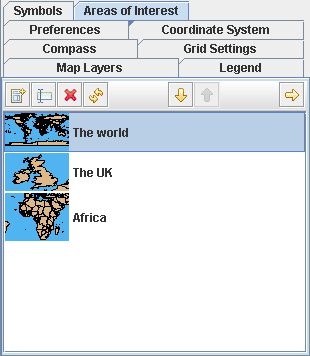
Area of Interest panel
The Area of Interest panel bean is represented by the
IlvJAreaOfInterestPanel class. The Area of Interest panel bean enables users to select and display frequently used areas of a map.
An example of the Area of Interest panel is shown in
Area of Interest panel.
Area of Interest panel
Including the bean in an application
To include the Area of Interest panel bean in your application, write the following line of code:
IlvJAreaOfInterestPanel areaPanel = new IlvJAreaOfInterestPanel(view, true,
true, true);
The first boolean value indicates whether users can add areas of interest, the second boolean allows them to remove areas of interest, and the third boolean allows them to rename areas of interest.
Adding the bean to a Swing container
You then have to insert the bean into your swing user interface:
panel.add(areaPanel, BorderLayout.CENTER);
The Area of Interest panel bean then attaches itself and listens to the
IlvAreasOfInterestProperty property of the manager of the view. Whenever an area is added to the underlying
IlvAreaOfInterestVector, its name and preview icon are displayed on the Area of Interest panel bean.
Managing the Area of Interest and preview images
This panel also provides interesting static utility methods to manage the preview images and the creation of the area of interest.
To create an area for everything visible on the view (this is the method usually called when clicking the New Area of Interest button), you can insert the following lines of code in your application:
IlvAreaOfInterest
currentArea=IlvJAreaOfInterestPanel.createLocationFromView(view,64,false);
currentArea.setName("Current Area");
If you want the users to provide the area name themselves (by means of a dialog box) use:
IlvAreaOfInterest
currentArea=IlvJAreaOfInterestPanel.createLocationFromView(view,64,true);
This bean also provides a method that updates the area of interest preview icon with what would be visible with the current map settings and contents:
IlvJAreaOfInterestPanel.refreshPreview(view,area,maxDimension);
For example:
To create an area for Europe bounds:
IlvRect rectangle=new
IlvRect((float)Math.toRadians(15),(float)Math.toRadians(35),(float)Math.toRa
dians(45),(float)Math.toRadians(25));
IlvAreaOfInterest europe=new IlvAreaOfInterest("Europe",rectangle,0,null);
To update its preview image:
IlvJAreaOfInterestPanel.refreshPreview(view,europe,64);
You would then have to add the area to the property of the manager for proper management by the Area of Interest bean:
IlvAreaOfInterestVector
areas=IlvAreasOfInterestProperty.GetAreasOfInterest(view.getManager());
areas.addElement(europe);
Scale Bar
The Scale Bar bean is represented by the
IlvJAutomaticScaleBar class. This bean enables users to estimate distances using the displayed scale bar.
An example of the Scale Bar is shown in
Scale Bar.
Scale Bar
Including the bean in an application
To include the Scale Bar bean in your application, write the following lines of code:
IlvJAutomaticScaleBar graphicScale = new IlvJAutomaticScaleBar();
graphicScale.setView(view);
Adding the bean to a Swing container
You can then add this bean into your Swing hierarchy.
panel.add(graphicScale, BorderLayout.SOUTH);
The Scale Bar bean then attaches itself and listens to the
IlvDisplayPreferencesProperty property of the manager of the view. Whenever the underlying
IlvDisplayPreferences are changed (see
Display Preferences Editor), the units used to display distances change.
You can also force the scale bar bean to use specific units, regardless of the
IlvDisplayPreferencesProperty settings, by calling the
setFarUnit and
setNearUnit methods in your application code.
Changing the appearance of the scale bar
The following controls change the appearance of the scale bar:
To set the margins between the scale bar and the border of the component:
To set the text spacing between the scale text and the scale bar:
graphicScale.setMarginHeight(2);
graphicScale.setMarginWidth(2);
graphicScale.setTextSpacing(2);
To set the style used to draw the scale bar (double or single scale – alternate colors or not):
graphicScale.setScaleStyle(IlvScaleBar.DOUBLE_DASH_SCALE_EVEN);
To change the way labels are displayed:
graphicScale.setScaleTextMode(IlvScaleBar.THREE_LABELS);
To set the height of the scale bar:
graphicScale.setScaleHeight(10);
Scale Control Bar
The Scale Control Bar bean is represented by the
IlvJMapScaleControl class. This bean enables users to see the scale of the map. The
button also enables users to control the scale interactively by entering a new setting.
An example of the Scale Control Bar is shown in
Scale Control Bar.
Scale Control Bar
Including the bean in an application
To include the Scale Control Bar bean in your application, write the following lines of code:
IlvJMapScaleControl scaleControl = new IlvJMapScaleControl();
scaleControl.setView(view);
Adding the bean to a Swing container
You can then add this bean in your Swing hierarchy.
panel.add(scaleControl, BorderLayout.SOUTH);
The Scale Control Bar bean then attaches itself and listens for scale changes for the view in order to update the displayed scale.
Customizing the appearance and behavior
You can prevent users from entering changes to the map scale by means of this bean (this makes the Control Scale button disappear) using:
scaleControl.setAllowScaleEdition(false);
If the way the scale is presented is not appropriate for your needs, many tools are provided to change the prefix (“1/”), suffix, or even the number formatter:
scaleControl.setPrefix(null);
scaleControl.setSuffix("th");
scaleControl.setScaleFormat(new DecimalFormat());
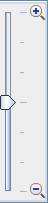
Zoom Control panel
The Zoom Control panel bean is represented by the
IlvJAdvancedZoomControl class. This bean enables users to zoom in and zoom out on a map at a rate determined by the displacement of the pointer.
An example of the Zoom Control panel is shown in
Zoom Control panel.
Zoom Control panel
Including the bean in an application
To include the Zoom Control panel in your application, write the following lines of code:
IlvJAdvancedZoomControl zoomer = new IlvJAdvancedZoomControl();
zoomer.setView(view);
Adding the bean to a Swing container
You can then add this bean to a Swing container:
panel.add(zoomer, BorderLayout.WEST);
Customizing the appearance and behavior
This bean can be presented in horizontal or vertical layout, using:
zoomer.setOrientation(SwingConstants.VERTICAL);
By default, this bean zooms in or out of the view at a maximum rate of 6% every 40ms. You can change these default values to better suit your needs using, for example:
zoomer.setMaxZoomingRatio(1.1);
zoomer.setZoomDelay(100);
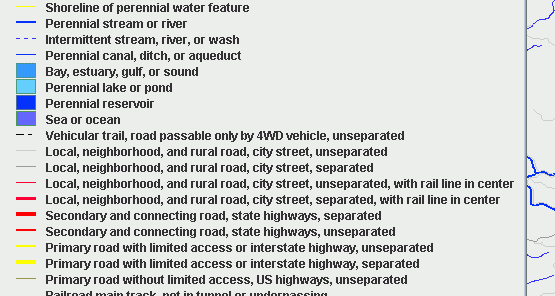
Legend panel
The Legend panel bean is represented by the
IlvMapLegendPanel class. This bean enables users to create a legend to define map elements.
An example of the Legend panel bean is shown in
Legend panel bean.
Legend panel bean
Including the bean in an application
To include the Legend panel bean in your application, write the following lines of code:
IlvMapLegendPanel legend = new IlvMapLegendPanel();
legend.setView(view);
Adding the bean to a Swing container
You can then add this bean into the Swing hierarchy of your application:
panel.add(legend, BorderLayout.EAST);
The Legend panel bean then attaches itself and listens to the
IlvMapLayerTreeProperty property of the manager of the view. Whenever a layer is changed in the underlying
IlvMapLayerTreeModel, the legend updates itself.
Customizing the appearance and behavior
If you do not want an automatic JScrollPane around your legend, you can use:
IlvMapLegend legend = new IlvMapLegend ();
legend.setView(view);
The Legend panel uses the properties of map
layers to retrieve the
IlvMapStyle.CATEGORY and
IlvMapStyle.LEGEND_GROUP string properties (for details of these properties, see
Common styling properties).
By default (when these values are null), each map layer has its own line in the legend. The user can override this by setting identical values in the Category or Legend Group fields.
Layers are ordered according to their legend group (all layers with the same legend group are displayed together, inside the same frame).
When
layers share the same legend group and category, they are displayed on a single legend line – possibly with more than one legend caption to display all the different aspects this legend item can have.
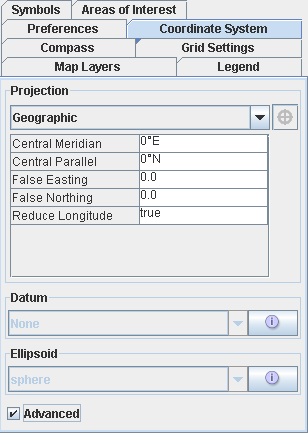
Coordinate System Editor
The Coordinate System Editor bean is represented by the
IlvJCoordinateSystemEditorPanel class. This bean enables users to set the coordinate system used to display a map view.
An example of the Coordinate System Editor is shown in
Coordinate System Editor.
Coordinate System Editor
Including the bean in an application
To include the Coordinate System Editor in your application, you first need to create the panel:
IlvJCoordinateSystemEditorPanel csPanel = new
IlvJCoordinateSystemEditorPanel();
To display the current coordinate system of the view in the bean, retrieve the
IlvCoordinateSystemProperty property:
csPanel.setCoordinateSystem(IlvCoordinateSystemProperty.GetCoordinateSystem(vie
w.getManager()));
Then, you should add a listener to the bean that updates the coordinate system of the view when the bean changes, retrieving the new value selected by the user:
csPanel.addCoordinateSystemChangeListener(new PropertyChangeListener() {
public void propertyChange(PropertyChangeEvent evt) {
view.getManager().setNamedProperty(new
IlvCoordinateSystemProperty(csPanel.getCoordinateSystem()));
}
});
Adding the bean to a Swing hierarchy
You can then add this bean to your Swing hierarchy.
panel.add(dataSourcePanel, BorderLayout.CENTER);
Customizing the appearance and behavior
To configure the Coordinate System Editor as a simple projection choice combo-box, you can disable the Advanced Property panels. For example:
csPanel.setAdvancedPanelsVisible(false);
csPanel.setAdvancedCheckBoxVisible(false);
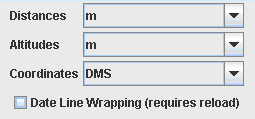
Display Preferences Editor
The Display Preferences Editor bean is represented by the
IlvJDisplayPreferencesEditorPanel class. This bean enables users to set a map view to the units of their choice.
An example of the Display Preferences Editor is shown in
Display Preferences Editor.
Display Preferences Editor
Including the bean in an application
To include the Display Preferences Editor bean in your application, you first need to create the panel:
IlvJDisplayPreferencesEditorPanel prefsPanel = new
IlvJDisplayPreferencesEditorPanel();
Set the current preference properties of the view in the bean:
prefsPanel.setDisplayPreferences(IlvDisplayPreferencesProperty.GetDisplayPreferences(view.getManager()));
Then, you can add a listener on the bean that changes the view preferences when the user changes a preference:
prefsPanel.addDisplayPreferencesChangeListener(new PropertyChangeListener() {
public void propertyChange(PropertyChangeEvent e) {
IlvDisplayPreferences system = (IlvDisplayPreferences) e.getNewValue();
view.getManager().setNamedProperty(new
IlvDisplayPreferencesProperty(system));
}
});
Adding the bean to a Swing hierarchy
You can then add this bean to your Swing hierarchy.
panel.add(prefsPanel, BorderLayout.WEST);
Using the API to define bean items
You can also use the API to define the distance or altitude units, date line wrapping or the coordinate formatter selected in the bean with the
setAltitudeUnit setDistanceUnit,
setUsingGeodeticComputation or
setCoordinateFormatter methods.
The Coordinate Viewer
The Coordinate Viewer bean is represented by the
IlvJMouseCoordinateViewer class. This bean displays the current coordinates of the mouse when it is moved over a map view.
An example of the Coordinate Viewer is shown in
Coordinate Viewer.
Coordinate Viewer
Including the bean in an application
To include the Coordinate Viewer bean in your application, write the following lines of code:
IlvJMouseCoordinateViewer coordViewer = new IlvJMouseCoordinateViewer();
coordViewer.setView(view);
Adding the bean to a Swing hierarchy
You can then add this bean to your Swing hierarchy.
panel.add(coordViewer, BorderLayout.SOUTH);
The Coordinate Viewer bean then attaches a Mouse Motion Listener to the view and displays the information according to the properties of the manager:
The coordinates and altitude are then transformed into human readable strings using
IlvDisplayPreferencesProperty unit management and formatters.
Depending on the coordinate formatter, latitude/longitude/altitude may not be the only fields. For example, a UTM coordinate system displays the zone, zone number, easting and northing information. The Coordinate Viewer uses JLabel HTML capabilities to display the different parts of the coordinates as an HTML table.
Customizing the appearance
You can configure the appearance of the bean using, for example:
coordViewer.setHtmlTableProperties("border=1 cellpadding=0 cellspacing=0");
The Map Layer Tree
Describes the Map Layer Tree beans and property editors
Describes the Map Layer Tree panel bean available for GUIs with maps.
Describes the Dynamic Style Setting panel bean available for GUIs with maps.
Describes the Map Style Property Sheet bean available for GUIs with maps.
Describes the properties editors for beans available for GUIs with maps.
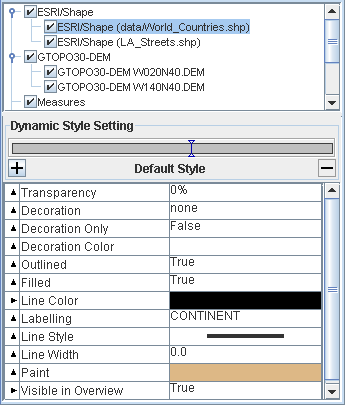
The Map Layer Tree bean
The Map Layer Tree panel bean is represented by the
IlvLayerTreePanel class. The Map Layer Tree bean displays the layer tree, the Map Style Property Sheet bean and a number of other beans that are accessed from this panel.
An example of the Map Layer Tree panel is shown in
Map Layer Tree panel.
Map Layer Tree panel
Including the bean in an application
To include the Map Layer Tree panel bean in your application, write the following lines of code:
IlvLayerTreePanel layerTreePanel = new IlvLayerTreePanel();
layerTreePanel.setView(view);
Adding the bean to a Swing container
You can then add this bean to your Swing hierarchy.
panel.add(layerTreePanel, BorderLayout.WEST);
The Map Layer Tree panel bean then attaches itself and listens to the
IlvMapLayerTreeProperty property of the specified manager. Whenever a layer is added or changed in the underlying
IlvMapLayerTreeModel, its name is added to the tree, and the layer style properties (such as colors or view visibilities) are made available for modification in the lower part of the panel.
The Map Layer Tree panel also attaches itself to the selection mechanism of the manager in order to select the layer when a graphical map object is selected.
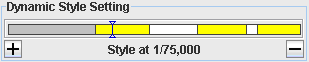
The Dynamic Style Setting panel bean
The Dynamic Style Setting panel bean is represented by the
IlvMapDynamicStylePanel class.
An example of the Dynamic Style Setting panel is shown in
Dynamic Style Setting panel.
Dynamic Style Setting panel
The Dynamic Style Setting panel displays the different styles a layer can have at different zoom factors. The gray bar furthest to the left is the default style (used for the finer/higher zoom levels of a map) – the other dynamic style settings are represented by alternating yellow and white bars. Users can also use the panel to set the map scale by clicking on the dynamic styles bar.
Accessing and updating the panel
You should not need to create a Dynamic Style Setting panel directly. You can access the Style Setting panel of the Map Layer Tree panel using the getThemePanel method.
This panel is attached to the
IlvMapStyleControllerProperty property of the manager (and its underlying
IlvMapStyleController ). It is updated when the user adds/deletes dynamic styles (using the
and
buttons, see
Dynamic Style Setting panel), or when you add dynamic styles with API calls such as:
IlvMapStyleController themeControl = IlvMapStyleControllerProperty.
GetMapStyleController(view.getManager());
themeControl.addTheme(0.001,mapLayer,"new style");
themeControl.getStyle(mapLayer,0.001).setVisibleInView(true);
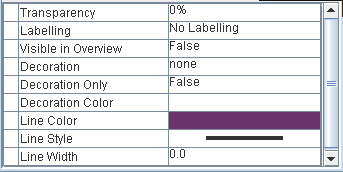
The Map Style Property Sheet bean
The Map Style Property Sheet bean is represented by the
IlvMapStylePropertySheet class.
An example of the Map Style Property Sheet is shown in
Map Style Property Sheet.
Map Style Property Sheet
When a
layer is selected, this property sheet is updated with a property list depending on the associated map style.
You do not need to create a Map Style Property Sheet directly. You can access the Map Style Property Sheet of the Map Layer Tree panel using the getMapStylePropertySheet method.
NOTE By using IlvMapStyleBeanInfo.setAdvancedMode(false), you can limit the list of properties displayed in the Map Style Property Sheet to a restricted list, depending on the class of the map style used.
Property editors
Most of the properties are integers, Booleans (true/false choices) or raw text. Some properties however need a more specific property editor.
JViews Maps does not call the constructor for any of the editors. It uses the standard Java™
BeanInfo mapping instead. For example, the
IlvMapStyle class has the property
alpha and the
IlvMapStyleBeanInfo class returns the list of editable properties and associates an
IlvAlphaPropertyEditor for that property. The
IlvMapStylePropertySheet class uses this information to create the correct editor (using Java reflection).
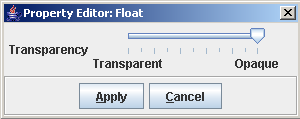
Alpha Property Editor
The Alpha Property Editor is represented by the
IlvAlphaPropertyEditor class.
An example of the Alpha Property Editor is shown in
Alpha Property Editor.
Alpha Property Editor
To include the Alpha Property Editor in a new bean, place the following lines in the associated BeanInfo class:
...
PropertyDescriptor alpha = new PropertyDescriptor("alpha",IlvMapStyle.class);
alpha.setPropertyEditorClass(IlvAlphaPropertyEditor.class);
...
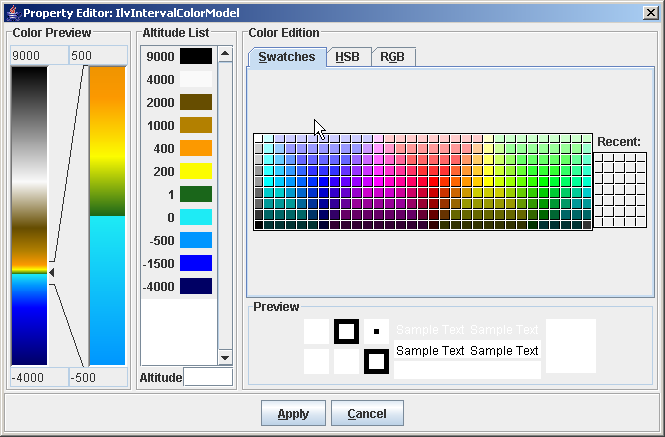
Color Model Property Editor
The Color Model Property Editor is represented by the
IlvColorModelPropertyEditor class. This property editor enables you to set, for example, the colors for different altitudes in a map that contains altitude data.
An example of the Color Model Property Editor is shown in
Color Model Property Editor.
Color Model Property Editor
The Color Model Property Editor is implemented in a similar way to the Alpha Property Editor and is used for
IlvRasterStyle map styles.
To include the Color Model Property Editor in a new bean, use the following lines in a BeanInfo class:
PropertyDescriptor colorModel = new
PropertyDescriptor("colorModel",IlvRasterStyle.class);
...
colorModel.setPropertyEditorClass(IlvColorModelPropertyEditor.class);
...
Color Property Editor
The Color Property Editor enables you to set the color of the map outlines. An example of the Color Property Editor is shown in
Color Property Editor.
Color Property Editor
The Color Property Editor bean is implemented in a similar way to the other editors and is used in the
IlvGeneralPathStyle and
IlvPolylineStyle map styles.
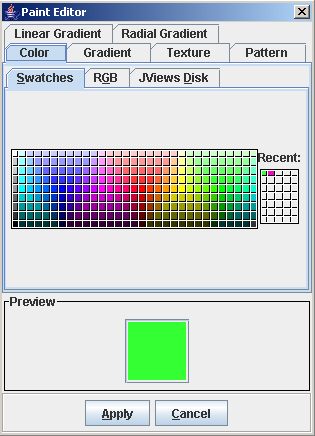
Paint Property Editor
The Paint Property Editor enables you to set the map fill color.
An example of the Paint Property Editor is shown in
Paint Property Editor.
Paint Property Editor
The Paint Property Editor bean is implemented in a similar way to the other editors and is used in the
IlvGeneralPathStyle and
IlvPolylineStyle map styles.
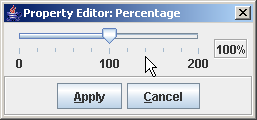
Percent Property Editor
The Percent Property Editor is represented by the
IlvPercentPropertyEditor class. This property editor enables you to set the brightness, saturation, and contrast of the displayed map.
An example of the Percent Property Editor is shown in
Percent Property Editor.
Percent Property Editor
The Percent Property Editor is implemented in a similar way to the other editors and is used in the
IlvRasterStyle map styles.
To include the Percent Property Editor in a new bean, use the following lines in a BeanInfo class:
...
The Toolbar
The Toolbar bean is represented by the
IlvJMapsManagerViewControlBar class. This is a subclass of the framework class
IlvJManagerViewControlBar.
An example of the Toolbar is shown in
Toolbar.
Toolbar
Including the bean in an application
To include the Toolbar bean in your application, write the following lines of code:
PropertyDescriptor brightness = new PropertyDescriptor("brightness",
IlvRasterStyle.class);
...
brightness.setPropertyEditorClass(IlvPercentPropertyEditor.class);
IlvJMapsManagerViewControlBar toolbar = new IlvJMapsManagerViewControlBar();
toolbar.setView(view);
Adding the bean to a Swing container
These lines create a standard Rogue Wave® JViews interactor toolbar that you need to integrate into your Swing GUI:
panel.add(toolbar, BorderLayout.NORTH);
Customizing the toolbar
For JViews Maps use, you may want to add more interactors or buttons to this toolbar.
Replacing an interactor
You can replace standard interactors with better-tailored interactors, such as the
IlvMapZoomInteractor, with lines of code such as:
IlvMapZoomInteractor zi = new IlvMapZoomInteractor();
// chose the way the rectangle is drawn when rotation exists
zi.setRotationAllowed(true);
// when zoom is selected, it stays, contrary to default JViews.
zi.setPermanent(true);
//to change from default zoom interactor
toolbar.setZoomViewInteractor(zi);
Adding a new interactor
You may want to add a completely new interactor:
IlvManagerViewInteractor interactor = …;
JToggleButton interactorButton = new JToggleButton(interactorIcon);
You have to add a listener to set or pop this interactor when the toggle button is selected:
interactorButton.addActionListener(new ActionListener() {
public void actionPerformed(ActionEvent e) {
if(interactorButton.isSelected()){
// set the interactor
view.setInteractor(interactor);
// and make sure the view has focus, in case the interactor manages
keyboard accelerators
view.requestFocus();
} else if (view.getInteractor()==interactor){
// pop the interactor
view.popInteractor();
}
}
});
You also need to pop this interactor when another one is selected:
InteractorListener interactorListener = new InteractorListener() {
public void interactorChanged(InteractorChangedEvent event) {
boolean isMyInteractor = (event.getNewValue() == interactor);
if (interactorButton.isSelected() != isMyInteractor) {
interactorButton.setSelected(isMyInteractor);
}
}
};
view.addInteractorListener(interactorListener);
Then, you can add the interactor button to the toolbar:
toolbar.add(interactorButton);
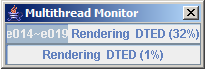
Multithread Monitor
The Multithread Monitor bean is represented by the
IlvThreadedActivityMonitorPanel class. This bean displays the completion status of tasks in progress.
An example of the Multithread Monitor is shown in
Multithread Monitor.
Multithread Monitor
To include the Multithread Monitor bean in your application, you first need to get the thread monitoring model for the manager:
IlvThreadedActivityMonitor mon =
IlvThreadedActivityMonitorProperty.GetThreadedActivityMonitor(manager);
Then you can create the bean:
IlvThreadedActivityMonitorPanel monitor = new
IlvThreadedActivityMonitorPanel(mon);
You can then add this bean to your Swing hierarchy.
panel.add(monitor, BorderLayout.SOUTH);
The bean attaches itself to the
IlvThreadedActivityMonitor of the manager. It can be updated whenever a new activity is registered or updated in this model by using lines such as:
mon.updateActivityProgress(myActivity,10,"Doing something...");
...
mon.unregisterThreadedActivity(myActivity);
Coordinate Panel Factory
The Coordinate Panel Factory bean is represented by the
IlvCoordinatePanelFactory class. This bean is used in the Symbol Definition Window and in the terrain analysis features, but can be used whenever the application needs the user to point to a single coordinate or a rectangular area.
An example of the Coordinate Panel Factory for the input of a rectangular set of coordinates
Coordinate Panel Factory
Including the bean in an application
To include the Coordinate Panel Factory bean in your application, you need a coordinate formatter (to determine how coordinates are displayed). You can, for example, retrieve the preferred coordinate formatter for the manager:
IlvDisplayPreferences
prefs=IlvDisplayPreferencesProperty.GetDisplayPreferences(manager);
IlvCoordinateFormatter formatter=prefs.getCoordinateFormatter();
Then you can create a bean to enter single point coordinates:
pointInputPanel = IlvCoordinatePanelFactory.createCoordPointInputPanel(view,
formatter);
Or you can create a panel to enter a rectangular zone:
rectInputPanel = IlvCoordinatePanelFactory.createCoordRectangleInputPanel
(view,formatter);
You may then have to set the initial values:
pointInputPanel.setLatLon(Math.toRadians(22.5),Math.toRadians(12));
And add a listener that is invoked when the user enters or selects coordinates:
PropertyChangeListener listener= ...;
pointInputPanel.addPropertyChangeListener(listener);
Compass
The Compass bean is represented by the
IlvJCompass class. This bean displays a compass indicating the geographic or cartographic north of the map.
An example of the Compass is shown in
Multithread Monitor.
Compass
Including the bean in an application
To include the Compass bean in your application, write the following lines of code:
IlvJCompass compass = new IlvJCompass();
compass.setView(view);
The Compass bean then listens to view transformation changes, and check the rotation value to display north direction.
Customizing the appearance
You can customize many parts displayed on the compass such as:
The appearance of the compass needle:
compass.setCartographicNeedleStyle(IlvCompass.NEEDLE_STYLE_CROSS);
The colors used:
compass.setCartographicBackground(Color.blue);
compass.setCartographicForeground(Color.gray);
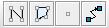
Using annotations
The Annotations Toolbar bean is represented by the
IlvMapAnnotationToolBar class. You can annotate maps using predefined annotations created by the Annotations Toolbar. The toolbar can be used interactively to add a point, polyline, or polygon annotation. An example of the Annotations Toolbar is shown in
Annotations toolbar.
Annotations toolbar
An annotation is a drawing made on the top of a map to describe or provide additional information about a specific zone of a map. Annotations are labeled and are projected with respect to the coordinate system of the map, which is stored in the manager as an
IlvCoordinateSystemProperty. In
JViews Maps, annotations are dedicated
IlvGraphic objects. Labels can be displayed to provide text information and are labeled using the
JViews Maps labeling mechanism.
The Annotations Toolbar bean is an extension of JToolBar.
To include the bean in an application:
1. To include the Annotations Toolbar bean in your application, write the following lines of code:
IlvMapAnnotationToolBar annotations =new IlvMapAnnotationToolBar();
annotations.setView(view);
The toolbar is ready for interactive creation of annotation objects. You can also add annotations to a map using the API. The objects used to display annotations are specialized
IlvGraphics.
2. You can customize certain properties of the Annotations Toolbar using the following code:
// Set the size of the buttons.
annotations.setButtonSize(new Dimension(25, 25));
// Prevent the toolbar being dragged elsewhere.
annotations.setFloatable(false);
3. If you want your annotations to be managed as nodes, in order to make it possible for you to create link annotations, you need to indicate it through:
annotations.setGrapherMode(true);
IlvPoint p = new IlvPoint(10, 50);
IlvMapAnnotationToolBar.MapMarker m = new
IlvMapAnnotationToolBar.MapMarker(p);
IlvMapAnnotationModel model =
IlvMapAnnotationProperty.GetMapAnnotationModel(manager);
IlvGraphicLayerDataSource dataSource = model.getDataSource(manager,
"TEST");
String name = "TEST" + " Annotation";
dataSource.getInsertionLayer().setName(name);
dataSource.add(m,
IlvCoordinateSystemProperty.GetCoordinateSystem(manager));
6. Set the style for the layer in which the annotation is to be inserted. The following piece of code also sets the label attribute so that the annotation is labeled accordingly:
if (dataSource.getInsertionLayer().getStyle() == null) {
IlvMapStyle style = new IlvPointStyle();
style.setAttributeInfo(IlvMapAnnotationModel.info);
style.setLabelAttribute(IlvMapAnnotationModel.info.getAttributeName(0));
dataSource.getInsertionLayer().setStyle(style);
}
IlvPointStyle ps =
(IlvPointStyle)dataSource.getInsertionLayer().getStyle();
m.setStyle(ps);
ps.setSize(5);
ps.setType(IlvMarker.IlvMarkerFilledDiamond);
ps.setForeground(Color.pink);
7. Attach the feature attribute property; the string A Label will be displayed as the annotation label:
String s = "A Label";
IlvFeatureAttributeProperty properties = new
IlvFeatureAttributeProperty(IlvMapAnnotationModel.info,
new IlvFeatureAttribute[] { new IlvStringAttribute(s)});
m.setNamedProperty(properties);
8. Start the data source to add the annotation to the manager. The labeler may also need to be started:
try {
manager.setInsertionLayer(dataSource.getInsertionLayer().getManagerLayer().
getIndex());
dataSource.start();
} catch (Exception e) {
e.printStackTrace();
}
IlvMapLabeler labeler = IlvMapLabelerProperty.GetMapLabeler(manager);
labeler.setView(view);
labeler.addLayer(dataSource.getInsertionLayer());
labeler.performLabeling();
The Symbology Tree View bean
Describes the Symbology Tree View bean and how to use it.
Describes the Symbology Tree View bean.
Explains how to add the Symbology Tree View bean to your application.
Provides code for symbology panel actions.
Describes embedding SDM model information inside a map file.
Overview
The Symbology Tree View bean is represented by the
IlvSymbologyTreeView class. This bean displays the symbol hierarchy of the current map.
The following figure shows an example of the symbol hierarchy.
Symbology Tree View
Adding the bean to an application
To include the Symbology Tree View bean in your application:
IlvSDMEngine engine = new IlvSDMEngine();
engine.setGrapher((IlvGrapher)view.getManager());
engine.setReferenceView(view);
2. Provide the Cascading Style Sheet for the SDM engine to use:
engine.setStyleSheets(new String[]{"myfile.css"});
3. Create a Symbology Tree View for the SDM engine:
IlvSymbologyTreeView symbPanel = new IlvSymbologyTreeView(engine);
4. Add this bean to your Swing hierarchy:
panel.add(symbPanel, BorderLayout.SOUTH);
Symbology panel actions
You can change the structure of your symbol model using the Symbology Tree View toolbar or a pop-up menu. You can add and remove symbols or groups, but also edit the symbols, groups or the symbology itself. To do this you must implement the
IlvSymbologyTreeViewActions interface and set it on the Symbology Panel:
symbPanel.setSymbologyTreeViewActions(new MySymbologyTreeViewActions());
The action class should provide the methods invoked by the Symbology Tree View User Interface in order to modify the symbology engine according to the requirements of your application. It should also provide any User Interface specific to editing symbols and groups.
The action classes are also responsible for managing symbol model persistence, symbol drag and drop and location picking on the map.
Making the model persistent
Making a symbol model persistent means providing a way to embed SDM model information inside a map file.
This can be done through the
IlvPersistentSDMNodeFactory interface and the
IlvPersistentSDMModelProperty manager property.
You should not use this feature if you intend to use
JViews Diagrammer Designer with your map, as it stores and sets up symbol model differently, in separated xml files. You should use an
IlvMapStyleSheetRenderer if you want to take advantage of this feature. If you do not, the manager layers that will be used to place your symbols may not be instances of the
IlvMapStyleSheetRenderer.IlvMapSymbolManagerLayer class, which means that the graphical representation of the symbols will be saved separately in the ivl file, causing its duplication when you read the map back.
The persistent SDM model property
This class is a named property that will be attached to a manager, and trigger the saving and reading of an engine model inside an IVL file.
Example of use:
IlvPersistentSDMModelProperty property =
IlvPersistentSDMModelProperty.GetPersistentSDMModel(engine,factory,listenToChanges);
This call will register the property on the engine’s manager. It will be saved (like every named property) when the manager gets saved, and will invoke an internal
IlvXMLConnector that will save the XML content of the engine model as a string.
At read time, this property requires the use a node factory to create SDM nodes in the engine model, detailed below.
If you use this call with listenToChanges set to true, you can register this property for an engine before reading the map IVL file. The listener attached will ensure that the factory and engine used when reading the property get replaced by the ones you specify before the data is read.
If you do not do this, internal XML data will be read, and you will have to attach the engine manually later.
The persistent SDM Node factory
The principal purpose of the
IlvPersistentSDMNodeFactory interface is to provide a way for model nodes to be created when you read the model data back in. Usually creating a symbol is dependent on some application so this interface also includes methods to manage that persistent context.
The following provides a simple code example which can help you to write your own factory.
public class SampleFactory implements IlvPersistentSDMNodeFactory {
static public class SampleContext extends IlvPersistentObject {
// some implementation of a persistent object ...
}
IlvPersistentObject _factoryPersistentContext;
public IlvPersistentObject getPersistentContext() {
// the persistent context should be created or updated at this point.
_factoryPersistentContext=new SampleContext();
_factoryPersistentContext.setSomeData(this.getSomeData());
return _factoryPersistentContext;
}
public boolean isPropertyIgnored(IlvSDMModel model, Object node, String name) {
// ignore the “data” property
if(“data”.equals(name)) return true;
return false;
}
public Object newSymbol(String tag) {
// we will create default SDM nodes
IlvDefaultSDMNode node=new IlvDefaultSDMNode(tag);
// configure the node, for example
node.setProperty("data", this.getSomeData());
return node;
}
public void setPersistentContext(IlvPersistentObject context) {
// the local information should be updated with what was stored in the context
this.setSomeData(context.getSomeData());
}
Copyright © 2018, Rogue Wave Software, Inc. All Rights Reserved.