Working with interactors
Shows you how to create different transformations using interactors.

Explains how to add a rotation interactor to a symbol.
Explains how to add a push interactor to a symbol.
Explains how to add a horizontal interactor to the symbol.
Explains how to coordinate state changes for several objects in a symbol.
Creating a rotation interactor
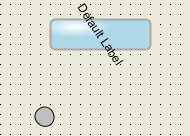
A rotation interactor is used to revolve a symbol object when the mouse hovers over an object in a symbol. The rotation interactor changes the value of the parameter to which it is bound. This change in parameter value is used to make a rotation transformation on the object bound to the parameter. For example, if you rotate the mouse over a dial symbol, the dial knob rotates with the mouse.
To add a rotation interactor to a symbol:
1. In the Symbol Editor, create a new symbol.
2. Import the nobvista.svg image from the <installdir>/jviews-diagrammer/bin/symboleditor/data/examples directory.
3. Delete the Text and Shape objects.
SVG is now the base object.
4. Ungroup the SVG object.
5. Create a Float parameter rotation.
6. Select the GeneralPath5 dial knob object.
7. 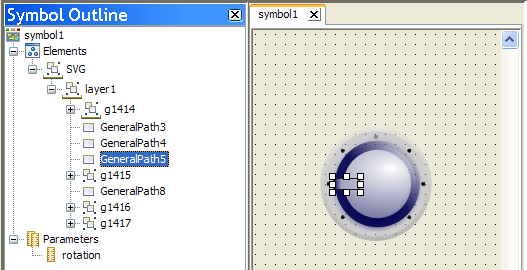
The GeneralPath5 object
8. In the Transform tab of the Styling Customizer, bind the Angle field to rotation.
9. In the Transform tab, select the Center Relative to Base Element checkbox.
10. Select the SVG object.
11. Click the Interactor tab.
12. Set the following values:
Interactor: Rotation
Parameter: rotation
Maximum: 360
Start Angle: 180
Finish Angle: 360
Center: Center
Center Relative to Base Element.
13. Test this symbol by clicking Preview.
14. 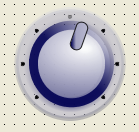
A rotation interactor
When you test this symbol, click the symbol and drag the mouse in circles. The dial now follows the movement of the mouse.
NOTE Objects with an associated interactor are indicated with a star
NOTE 
NOTE in the Symbol Outline pane.
Creating a push interactor
A push interactor is used to change the appearance of one or more objects when a mouse event occurs. By default, a Push interactor intercepts three mouse events: PRESSED, RELEASED, and CLICKED. When a mouse event occurs, the following values that represent the state of the object are passed to conditions
BUTTON_UP - Sent when the mouse is released, or when it is dragged out of the symbol
BUTTON_DOWN - Sent when the mouse is pressed and moves over the symbol
BUTTON_CLICKED - Sent when the mouse is released over the symbol
These events fulfill conditions attached to one or more objects in the symbol. An example is a button that changes color when clicked.
To add a push interactor to a symbol:
1. In the Symbol Editor, create a new symbol.
2. Create a String parameter click.
This parameter holds the string value of the mouse event.
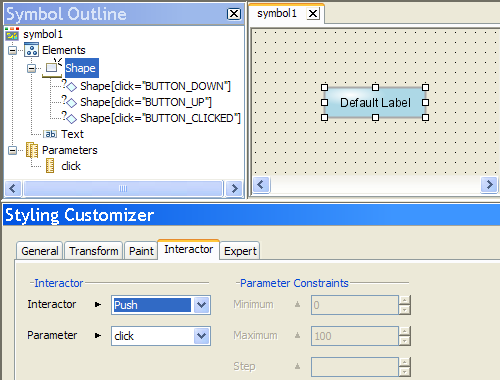
3. Select the Shape object.
4. In the Styling Customizer, select the Interactor tab.
5. From the Interactor list, select Push.
Three new conditions are created under the Shape object in the Symbol Outline pane.
6. 
Automatic parameters for a push interactor
7. In the Symbol Outline pane, select the BUTTON_DOWN condition.
8. In the Styling Customizer, select the Paint tab.
9. Click the button at the right of the Fill Paint field.
The Paint Editor opens.
10. In the Radial Gradient tab, change the gradient type from Pad to Reflect.
11. Click Apply.
12. Save this symbol as basicbutton in a new buttons category in the bampalette.
When you run this symbol in Preview mode, the Shape object changes color when it is clicked.
NOTE You do not have to customize all three automatic push conditions. Delete the conditions you do not use.
Creating a horizontal interactor
A horizontal interactor is used to extend or contract a symbol object when the mouse moves horizontally over it. The horizontal interactor changes the value of the parameter to which it is bound. This change in parameter value is used to apply a transformation on the object bound to the parameter. For example, if you move the mouse over a progressbar symbol, the bar moves to the left or right with the mouse.
NOTE Vertical interactors work in an identical way to horizontal interactors. The only difference is that the change in parameter value is caused by the mouse moving vertically and not horizontally.
To add a horizontal interactor to a symbol:
2. Select the progressbar object.
3. In the Styling Customizer, open the Interactor tab.
4. From the Interactor list, select Horizontal.
5. From the Parameter list, select progress.
6. Set the Maximum field to 100.
7. Set the Step field to 1.
8. Test this symbol by clicking Preview.
As the mouse moves horizontally, the progressbar follows the mouse movement. Because the value of maximum is set to 100, the progressbar never overruns the background image.
NOTE To make the progressbar move in the opposite direction to the mouse, set the Horizontal Direction to Left in the Interactor tab of the Styling Customizer.
Applying interactors to multiple objects
Interactors change the value of a parameter or condition following mouse events on symbol objects. Use the change in parameter value to coordinate state changes for multiple symbol objects. For example, you can create a button whose background color and text change when the button is clicked, or a button with multiple rotating images.
Creating a push interactor for multiple objects
Push interactors in the Symbol Editor are used to fulfill a state in a condition. When the condition has been fulfilled, the object to which the condition is bound changes representation. When a Push interactor is added to a symbol, the condition can be reused by other objects to coordinate symbol transformations.
2. In the Symbol Outline pane, right-click the Text object.
3. From the pop-up menu, click New Condition.
The New Condition dialog box opens.
4. In the ““Other conditions defined for this symbol”” pane, select [click=”BUTTON_DOWN”].
5. Click OK.
The condition is selected under the Text object in the Symbol Outline pane.
6. In the Styling Customizer, select the Paint tab.
7. Select the Stroke On check box.
When you run this symbol in Preview mode, the Text object is outlined when the mouse is pressed on the Shape object.
Creating a rotation interactor for multiple objects
A rotation interactor changes the value of a parameter. As the value of the parameter changes, the objects bound to it are transformed. By binding more than one object to a rotation parameter, you create synchronized movements in a symbol.
To rotate multiple objects:
1. In the Symbol Editor, create a new symbol.
2. Add a Rotation interactor on the Text object bound to a float parameter.
3. Create an ellipse object to the left of the Shape object.
4. With the new ellipse object selected, click the Transform tab in the Styling Customizer.
5. Bind the Angle field to the rotation parameter by setting the following values in the Transform Element Using Parameter dialog box:
Parameter Min: 0
Parameter Max: 100
Value Min: 360
Value Max: 0
6. Select the Center Relative to Base Element check box.
7. Test this symbol by clicking Preview.
8. Save this symbol.
When you rotate the mouse over the Shape object, the ellipse rotates in the opposite direction to the text object.
Rotating multiple objects
Copyright © 2018, Rogue Wave Software, Inc. All Rights Reserved.