Managing annotations
Describes the options available for annotating maps.

Explains the use of annotations.
Explains how to create annotations for polylines, polygons and points.
Explains how to set annotation visibility options.
Explains how to edit annotation labels.
Explains how to reposition annotations.
Explains how to change the shape of annotations.
Explains how to add or remove points in annotations.
Explains how to change the style of an annotation.
Explains how to delete an annotation.
Annotations
You can annotate maps using predefined annotations. These annotations are created using the buttons supplied as an annotation toolbar in the main window. This toolbar can be used to interactively add a point, polyline, or polygon annotation.
For details of how to show and hide annotation layers and create a new annotation layer or sublayer, see
Managing map layers.
Creating annotations
To create an annotation:
Polyline
1. Set the map to the position and zoom level you require.
2. Click the
3. 
4. button in the main window and then click the map and draw a line that represents the origin and end of the first part of the polyline you want to draw.
5. Click to create a point and then draw the second part of the polyline. Click again to create a second point and draw the third part and so on. Double-click to end the polyline.
The polyline is added to the annotations layer in the Map Layers pane.
Polygon
1. Set the map to the position and zoom level you require.
2. Click the
3. 
4. button in the main window and then click the map and draw a line that represents the origin and end of the first part of the polygon you want to draw.
5. Click to create a point and then draw the second part of the polygon. Click again to create a second point and draw the third part and so on. Double-click to end the polygon.
NOTE If the polygon is not closed when you double-click to end it, the origin and end points are automatically joined.
The polygon is added to the annotations layer in the Map Layers pane.
Point
1. Set the map to the position and zoom level you require.
2. Click the
3. 
4. button in the main window.
5. Click the map at the point where you want to place the point, and then click again. The point is displayed at the selected point.
The point is added to the annotations layer in the Map Layers pane.
Link
1. Set the map to the position and zoom level you require.
2. Click the
3. 
4. button in the Map Builder main window.
5. Click the map on the annotation where you want the link to start from, and then click again to the end location. The link is displayed between the selected annotations.
The link is added to the annotations layer in the Map Layers pane.
Making annotations visible or invisible
To set the annotation visibility:
1. To make invisible annotations visible, select the appropriate annotation check box in the Map Layers pane; the annotations are redisplayed in the Map View.
2. To make annotations invisible, clear the appropriate annotation check box in the Map Layers pane; the annotations are removed from the Map View.
Editing annotation labels
To edit an annotation label:
1. Select the annotation in the Map View, right-click, and choose Edit Label from the pop-up menu. The Label Attribute window appears.
The following figure shows the Label Attribute window.
1. 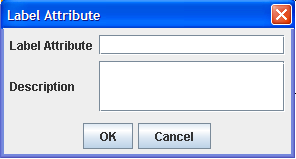
The Label Attribute window
2. Edit the Label Attribute value and then add a Descriptionvalue for the annotation. The description can be multiline, formatted in HTML, and can take the form of a tooltip.
3. Click OK.
NOTE To display the description when the mouse is held over an annotation in a Map View, select Options>Show Tool Tips on the Map.
Repositioning annotations
To reposition an annotation:
For a point:
1. First, choose the Select interactor
1. 
1. on the map toolbar.
2. Click to select the point, and with the mouse button held down, drag it to the new position, and then release the button.
For a polyline:
1. First, choose the Select interactor
1. 1. on the map toolbar.
2. Click part of the line to select it (not on a point), and with the mouse button still held down, drag it to the new position, and then release the button.
For a polygon:
1. First, choose the Select interactor
1. 1. on the map toolbar.
2. Either click part of the line to select it (not on a point) or click in the area encompassed by the polygon, and with the mouse button still held down, drag it to the new position, and then release the button.
For a link:
1. First, choose the Select interactor
1. 1. on the map toolbar.
2. Click part of the link to select it (not on a point), and with the mouse button still held down, drag it to the new position, and then release the button.
The link will automatically reshape whenever you reposition one of the start and end annotations.
Changing the shape of an annotation
To change the shape of an annotation (polylines, polygons and links only):
1. First, choose the Select interactor
1. 1. on the map toolbar.
2. Click to select the annotation and drag the chosen point to the new position. The shape is automatically updated.
Adding and removing points to/from an annotation
To add or remove points to/from an annotation (polylines, polygons and links only):
1. To add a point to the annotation, place the mouse pointer on the part of the line where you want to add the point, press CTRL and click. A new point is added.
2. To remove a point from the annotation, place the mouse pointer on the point you want to remove, press CTRL and click. The point is removed.
Changing the style of an annotation
To change the style of an annotation:
1. Select the annotation in the Map View, right-click, and choose Change Style from the pop-up menu. The Change Style window appears.
The following figure shows an example of a Change Style window.
1. 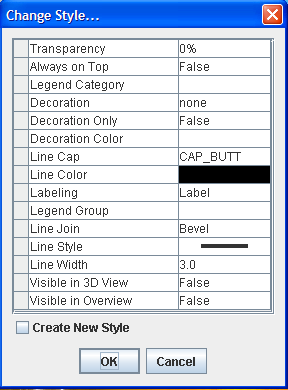
Change Style window
2. If you want to change the style of all the annotations, choose the styles you want and then click OK.
3. If you want to change the style of an individual annotation, click the Create New Style box, choose the styles you want, and then click OK.
You can also set the properties in the map style property sheet after the layer has been created.
For a detailed description of the properties, see Programming with JViews Maps
Deleting annotations
To delete an annotation:
Right-click an annotation in the Map Layers pane and select Delete Layer from the pop-up menu.
or
Right-click an annotation in the Map View and select Delete Annotation from the pop-up menu.
or
Select the annotation in the Map Layers pane and press Delete on your keyboard.
Copyright © 2018, Rogue Wave Software, Inc. All Rights Reserved.
