Map Layers
Explains how to manage and display map layers

Describes the various options available for managing map layers.
Explains how to set the dynamic styles.
Explains how to set different types of properties in the map style property sheet.
Explains how to set sublayer inheritance and independence from parent layers.
Explains how to create a new map layer or sublayer.
Explains how to populate a new map layer or sublayer.
Explains how to delete a new map layer or sublayer.
Explains how to hide/show map layers or sublayers in the map layer tree.
Explains how to display/hide map layers or sublayers in a map.
Explains how to position map layers or sublayers.
Explains how to rename map layers.
Explains how to split or filter maps layers in the Map Layer pane.
Explains how to add a simplified layer in the Map Layers pane.
Describes the layer styling that can be applied based on metadata.
Managing map layers
A map layer is created automatically each time you import a data source using the
File>Add Map Data command, or when you add a new orthodromy measure, label, or grid. The layer is created automatically and placed in the Map Layers pane. For details of how to import a data source, see
Importing a simple data source.
The following figure shows an example of the Map Layers pane.
Map Layers pane
In the Map Layers pane you can carry out the following operations:
Expand/collapse the map layer hierarchy: select or deselect the
Expand/Collapse button.
Drag and drop a layer or layers to another position in the list. Note that the layer at the bottom of the list is displayed at the top of the stack in the Map View.
Make a layer visible or invisible in the Map View: select or clear the layer check box.
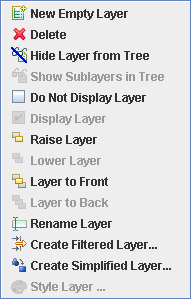
Pop-menu
The following figure shows the pop-up menu available in the Map Layers pane.
Map Layers pane pop-up menu
You can use this pop-up menu to:
NOTE If an operation is unavailable, some of the menu items may be unavailable.
Setting dynamic styles
To set dynamic styles in the Dynamic Style Setting pane:
1. Set the map to the scale that you want and define the map property values for this zoom level.
2. Click the
3. 
4. button to associate these styles with the current zoom level. A new section is added to the bar in the Dynamic Style Setting pane.
5. Repeat these two steps to create as many dynamic styles as you want. A new section is added to the bar in the Dynamic Style Setting pane each time you create a new style.
6. Either zoom in and out to see the changes of style take place when each threshold is crossed, or click one of the sections of the bar to immediately change the scale of the map to the corresponding level (displayed as a tooltip).
The following figure shows the map scale displayed as a tooltip.
7. 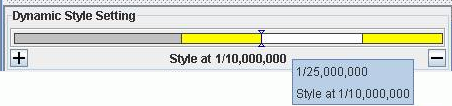
Setting Dynamic Styles
The position you are at in the overall scale range is indicated by the two arrow heads on the bar.
8. Click the
9. 
10. button to remove the current dynamic style setting from the Dynamic Style Setting pane.
Using the map style property sheet
The map style property sheet appears automatically when you select a layer in the Map Layers pane. The property sheet displayed depends on the type of layer selected, for example, the property sheet displayed for a Measures or Labels layer is different to that of a map layer. Each property sheet displays the properties of the selected map layer.
The properties correspond to Boolean values, lists, free text, and a set of editors.
To set Boolean values:
Click to the right of the corresponding property and select
True or
False.
To set a value from a list:
Click to the right of the corresponding property and select an item in the list.
To set a value with free text:
Click to the right of the corresponding property and enter a text string.
To set a value from an editor:
Click to the right of the corresponding property, click the
button, and set your values using the editor displayed.
To register property values:
Either click away from the property you have just set, or press the ENTER key.
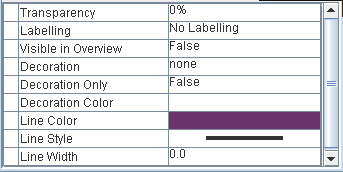
The following figure shows an example of a map style property sheet.
Map layer property sheet
Setting sublayer properties
To set a sublayer property to inherit from its parent layer:
1. Select a sublayer in the Map Layers pane to display the map style property sheet.
2. Click the Right Arrow head next to the property you want to inherit. The Right Arrow changes to an Up Arrow and the value is automatically set to that of the parent layer. You can no longer change the value without first changing the Up Arrow.
To set a sublayer property to be independent of its parent layer:
1. Select a sublayer in the Map Layers pane to display the map style property sheet.
2. Click the Up Arrow head next to the property you want to set independently. The Up Arrow changes to a Right Arrow and you can set the corresponding property value.
Creating a map layer hierarchy
To create a new layer:
Right-click in the Map Layers pane and select New Layer from the pop-up menu.
To create a new sublayer:
Select a layer or sublayer in the Map Layers pane, right-click, and select
New Layer from the pop-up menu.
Populating a new layer or sublayer
To populate a new layer or sublayer:
In the Map Layers pane, drag and drop the required layer (or layers) into the new layer or sublayer.
Deleting a map layer
To delete a layer:
Select the layer and press the Delete key
or
Right-click and select Delete from the pop-up menu.
Hiding and showing a map layer in the tree
To hide a layer in the Map Layers pane:
Point to the parent layer, right-click and select Hide Layer from Tree from the pop-up menu. The parent layer and all its sublayers are removed from the Map Layers pane.
To hide a sublayer in the Map Layers pane:
Point to the sublayer, right-click and select Hide Layer from Tree from the pop-up menu. The sublayer is removed from the Map Layers pane.
To show all the hidden sublayers of a parent layer in the Map Layers pane:
Point to the parent layer then right-click and select Unhide Sublayers from Tree from the pop-up menu. All the sublayer(s) of the parent layer are redisplayed in the Map Layers pane.
To show all the hidden sublayers in the Map Layers pane:
Right-click in the Map Layers pane away from the layers listed and select
Unhide Sublayers from Tree from the pop-up menu. All the hidden layers are redisplayed in the Map Layers pane.
NOTE Developers can suppress this feature if, for example, a subset of layers must always be invisible to the final user.
Displaying and concealing a map layer
To conceal a layer or sublayer in a map:
Point to the layer, right-click and select
Do not Display Layer from the pop-up menu. The layer is concealed in the map and remains in the Map Layers pane.
To display a layer in the Map Layers pane:
Point to the layer then right-click and select
Display Layer from the pop-up menu. The layer is redisplayed in the Map.
NOTE Displaying/Concealing a layer only works for the current layer selected. For example, concealing a layer will not conceal its sublayers.
Positioning layers in the map hierarchy
Several options exist that allow you to organize the hierarchy of layers and sublayers.
1. The layer at the bottom of the list in the Map Layers pane is displayed at the top of the stack in the Map View.
2. You can move a parent layer up or down in the hierarchy and you can do the same with sublayers in relation to their parent, however, you cannot move sublayers between different parents.
To raise a layer one level in the hierarchy:
Right-click the layer or sublayer in the Map Layers pane and select
Raise Layer from the pop-up menu.
To lower a layer one level in the hierarchy:
Right-click the layer or sublayer in the Map Layers pane and select
Lower Layer from the pop-up menu.
To bring a layer to the front of the hierarchy:
Right-click the layer or sublayer in the Map Layers pane and select
Layer to Front from the pop-up menu.
To send a layer to the back of the hierarchy:
Right-click the layer or sublayer in the Map Layers pane and select
Layer to Back from the pop-up menu.
Renaming a map layer
To rename a layer:
Right-click the layer or sublayer in the Map Layers pane and select
Rename Layer from the pop-up menu.
or
Press the CTRL key and double-click the New Layer in the Map Layers pane. Enter the new name and press the ENTER key.
or
Select the layer, press the F2 key and enter the new name.
Splitting or filtering a map layer
To split or filter a layer in the Map Layers pane:
1. Right-click a layer in the Map Layers pane and selectCreate Filtered Layer from the pop-up menu. The Select Layer Filter window opens.
The following figure shows an example of the Select Layer Filter window.
1. 
Select Layer Filter window
2. In the Select Layer Filter window, select the filter you want to apply from the list displayed in the Select Objects Where: dialog box.
NOTE The list displayed depends on the metadata contained in the map layer you have selected.
3. Select an operator from the list displayed on the left and then enter a value for the operator on the right.
NOTE You can filter an already filtered map layer again.
4. If you want to split a layer by grouping the objects that do not match the filter, check the Create a layer for non matching objects box. In this case, you create two filtered layers: one that matches the filter and one that does not match the filter.
NOTE You can split a map layer more than once.
5. Click OK.
Simplifying the polygons in a layer
To add a simplified layer in the Map Layers pane:
1. Right-click a layer in the Map Layers pane and select Create Simplified Layer from the pop-up menu. The Simplified Polygons window opens.
The following figure shows an example of the Simplified Polygons window.
1. 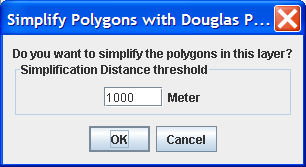
The Simplified Polygons window
2. In the Simplified Polygons window, set the distance threshold.
3. Click OK. A new layer appears in the Map Layers pane.
Adding layer styling based on metadata
Describes the layer styling that can be applied based on metadata.
Explains how to select data to be styled in a layer.
Explains how to set the color styling based on numerical data.
Explains how to set color styling based on non-numeric data.
Explains how to remove layer styling.
Selecting the data to be used for styling
To select the data to be styled in a layer containing values of meta data:
1. Open the Map Builder with the default map.
2. In the Map Layers tab, open the ESRI/Shape layer. The ESRI/Shape (data/World_Countries.shp) sublayer opens.
3. Right-click the data/World_Countries.shp layer, then select Style Layer from the pop-up menu. The Select Layer Attribute window opens.
The following figure shows an example of the Select Layer Attribute window.
4. 
The Select Layer Attribute window
5. In the Meta Data Used for Color Coding list, select the data to be used for styling.
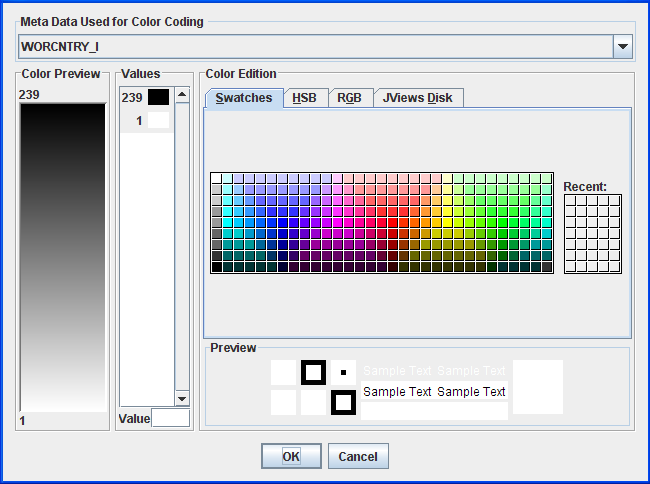
Setting the color model for numerical data
For numerical data, an interval color model is used to style ranges of values with color interpolation.
To set the color model for numerical data:
2. Select POP_1994 in the Meta Data Used for Color Coding list.
The following figure shows an example of the Select Layer Attribute pane with POP_1994 selected.
3. 
Styling numeric data
NOTE Rogue Wave® JViews Maps automatically computes the minimum and maximum values and assigns them to black and white shading. Any value between the minimum and maximum values is displayed with an interpolated color.
4. Select 1,175,731,064 from the Values list and set the color to red using the Swatches tab.
5. Select 0 from the Values list and set the color to pale yellow in the Swatches tab.
NOTE to add or remove color steps, or change the value associated to each step, right-click an element in Values and select Insert Limit from the pop-up menu. Using this technique you can use multiple colored steps to present ranges in the data.
6. Click OK. The color styling is now visible in the map.
If the styling does not appear in the map, check that the Filled option is set to true in the style property sheet.
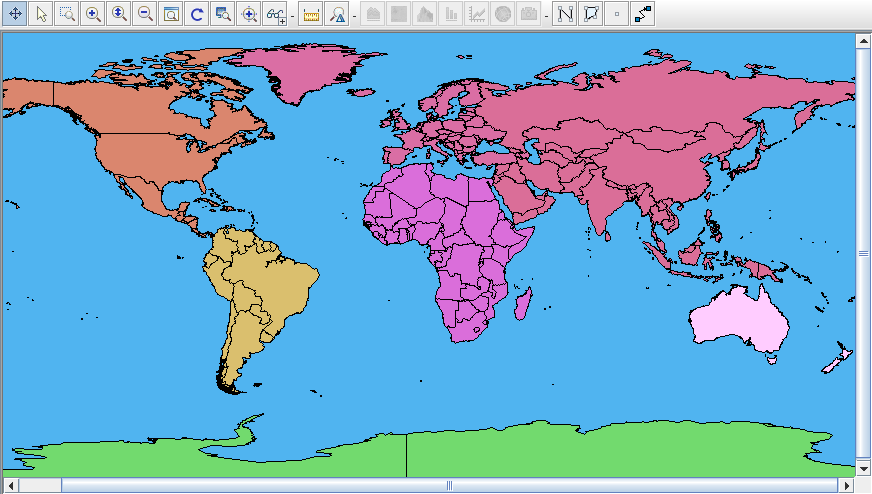
The following figure shows the resulting map with red and pale yellow colors styling set on population data.
7. 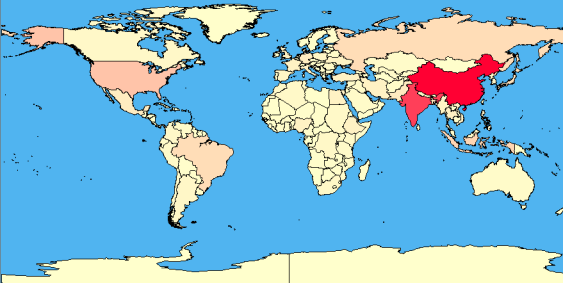
Styling for population metadata
Setting the color model for non-numerical data
For non-numerical, each possible value can be associated to a separate color.
To set the color model for non-numerical data:
2. Select CONTINENT from the Meta Data Used for Color Coding list.
The following figure shows an example of the Select Layer Attribute pane with CONTINENT selected.
3. 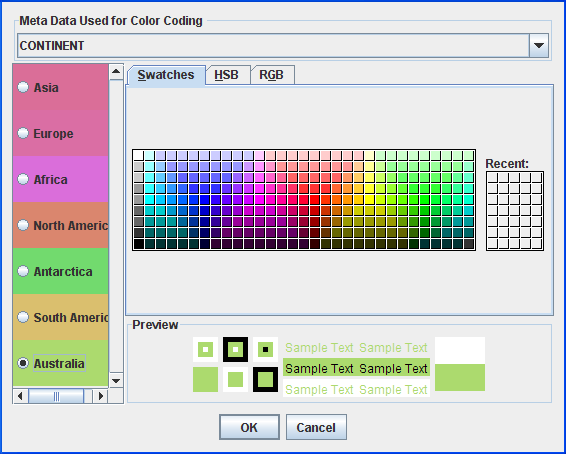
Styling non-numeric data
4. Select Australia from the list.
5. Set the color associated to Australia to pale pink using the Swatches tab.
6. Click OK. The meta data is presented in the map using the new color scheme.
If the styling does not appear in the map, check that the Filled option is set to true in the style property sheet.
The following figure shows the resulting map with the Australia displayed in pale pink.
Custom styling applied to map metadata
Remove layer styling
To remove layer styling:
1. In the Map Layer tab, right-click the styled layer, then select Style Layer from the pop-up menu. The Select Layer Attributes window opens.
2. Click the Remove Color Coding button. The Select Layer Attributes window closes and all custom styling is removed from the layer.
3. 
Remove layer styling
Copyright © 2018, Rogue Wave Software, Inc. All Rights Reserved.