Using wizards
Describes the wizards provided with the Designer to guide you through the creation of diagrams and style rules.

Describes the wizard used to create a new diagram.
Describes the wizard used to create a style rule.
Describes the wizard used to change a style rule.
Describes the wizard used to select a graph layout theme.
Describes the wizard used to edit the data model.
New Diagram wizard
The New Diagram Wizard allows you to specify the data on which a diagram is to be based and the initial look of the diagram. You can then refine the styling by working in Style Editing mode, see
Working in Style Editing mode.
To open the New Diagram Wizard, choose File>New from Wizard. By default, this wizard is open when you run the Designer; you can disable this behavior from the first page of the wizard.
The New Diagram Wizard has the following pages:
Welcome page.
Choose the Format of Data to Import, with a list of the data formats.
Import Data, with browse facilities to import from a flat file or an XML file.
Import Data from a JDBC Data Source.
Define Mapping (for flat files and JDBC data sources only), with a preview of the property-column mapping and editing facilities.
Edit Data Model.
Select Diagram Type, with a choice of ways to arrange the diagram.
Select Layout Theme, with a choice of customized layouts.
This page only appears if you have chosen the Layout Diagram type.
Create Style Rule wizard
The Create Style Rule wizard simplifies the definition of data rules which can include attribute conditions.
To open the Create Style Rule wizard, choose Edit>Create Style Ruleor right-click a rule and choose Create Style Rule in the pop-up menu.
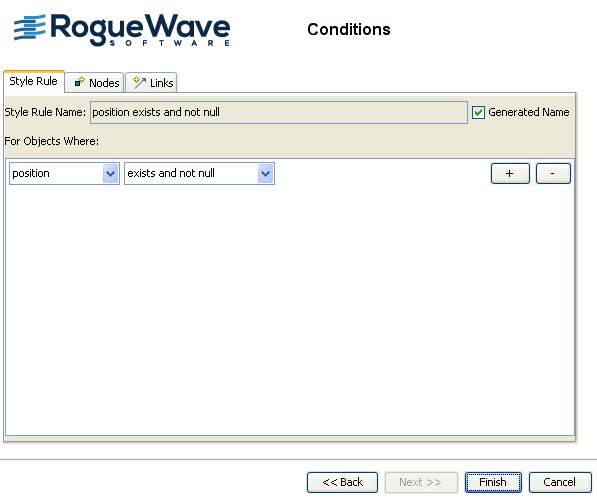
Whenever you create (or change) a style rule, a Welcome page displays. If you do not want to see it open each time, clear the box Show Welcome page at the lower left of the page. Following the Welcome page, the Conditions page displays, where you can define the conditions of the rule. See the following figure:
The Conditions page
Node and link rules
In the Conditions page, the style rule name will be automatically computed from the conditions that you define in the pane below. You can however customize this name by clearing the Generated Name option and typing your preferred name in the text field. Another option is to rename a rule in the Style Rules tree: right-click the rule and select Rename in the pop-up menu. Please note that you can at any time switch back to the generated name by checking the Generated Name box.
Conditions
You can define conditions for user-defined types, states, and attributes:
User-defined type: the object subtype to which the rule will apply, according to the types defined in your data model.
State: the runtime state to which the rule will apply: selected, expanded, collapsed, in the legend, or level of detail (high, medium, or low). Expanded, and collapsed can only apply to nodes.
Attribute: the name of an attribute of the object in your data model, for which a specific value is tested.
You can set a more or less restrictive rule by adding more or less conditions. The plus sign (+) allows you to add a condition. The minus sign (-) removes the corresponding condition. The more conditions a rule has, the more it is specific and the higher its priority.
An attribute condition tests one or more attributes against a value. If you select an attribute, you must then set a condition on its value by selecting an operator from the second drop-down list and entering a value. You can set several attribute conditions.
The operator drop-down list reflects the type of the attribute: integer, real or string. For integer or real attributes, the operator menu offers equals, does not equal, greater than, greater than or equal to, less than, less than or equal to. For string attributes, the operator menu offers equals, does not equal, contains. You can also simply test the presence of an attribute in the data model ( exists and not null ).
Viewing the data model in the style rule wizards
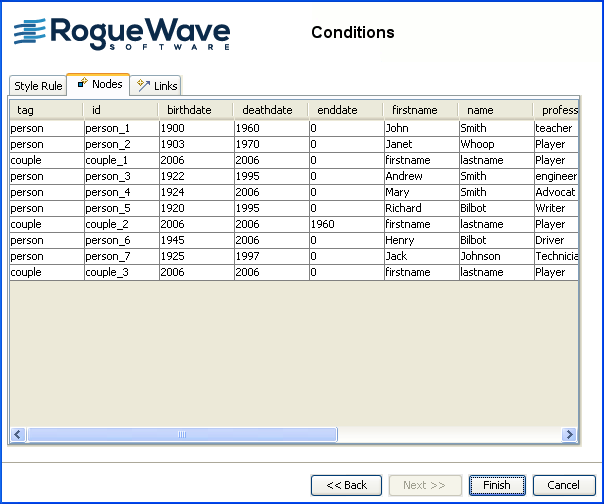
The Create Style Rule Wizard and the Change Style Rule Wizard both display a table view of the data model in the Nodes and Links tabs of the Conditions page. The tables show the property names and the current value for each property, on separate tabs for nodes and links.
A table view of the data model in a style rule wizard
When you create or change rules in one of these wizards, you can view the data properties and values that you can use to set conditions by selecting the Nodes or Links tabs.
Change Style Rule wizard
The Change Style Rule Wizard simplifies the changing of the conditions in data rules. The content is the same as in the Create Style Rule Wizard, see
Create Style Rule wizard.
To open the Change Style Rule Wizard, choose Edit>Change Style Rule or right-click a rule and choose Change Style Rule in the pop-up menu.
Graph Layout wizard
The Graph Layout Wizard allows you to select a customized graph layout that is appropriate to the purpose of the diagram. This wizard sets a layout and customizes some property settings.
To open the Graph Layout Wizard, click the wizard icon in the Styling Customizer for the Graph Layout option. This icon is the top button of the vertical toolbar to the left.
The same functionality is available as a page within the New Diagram Wizard, see
New Diagram wizard.
The layout themes available are as follows:
Dependency Diagram
Direct Links
Orthogonal Long Links
Orthogonal Short Links
Grid Diagram - Placement in Columns
Grid Diagram - Placement in Matrix
Grid Diagram - Placement in Rows
Organization Chart Diagram
Radial Tree Diagram
Symmetric Diagram
Tree Diagram
Workflow Diagram
Data wizard
The Data wizard allows you to modify the data on which a diagram is based. The styling rules set for the diagram are not affected by the changes.
To open the Data wizard, go to Diagram Editing mode and choose Data>Edit Model.
The Data wizard has the following pages:
Welcome
Edit Your Data Model
In this wizard you can:
Add and remove rows, where each row represents an object in the model.
Add, remove, and rename columns, where each column represents a property in the model.
Modify property values.
When modifying the data model, be aware that model properties may already be used in the style rules defined for the diagram. If you change a property name, the affected style rules may become inconsistent. Therefore, when you try to remove or rename a property, a warning message will be displayed indicating the style rules that will be affected by the operation, if any. In case you need to rename a property, the preferred path is to create the new property and modify the style rules to depend on this new property. Once this is done, you can safely remove the previous property using the Data wizard.
Copyright © 2018, Rogue Wave Software, Inc. All Rights Reserved.