

8.3 1stGrid - Step 2
In Step 2, you will change the Step 1 application in several ways:
You will make it an MDI application.
You will add a menu system with commands for a number of common grid operations
You will add an "About" dialog.
This section requires the most work of any of the steps in this tutorial.
8.3.1 Create a New Project
First, add a new project to the 1stGrid solution for the Step 2 application.
In the Solution Explorer, right click on the 1stGrid solution.
In the resulting context menu, select the Add | New Project option.
Click Visual C# Projects.
Select Windows Application.
Set the name to "Step 2".
Click OK.
Right-click Step 2.
Resize the form as desired.
In the property grid for the form, change the following properties:
8.3.2 Add a Menu
If the Toolbox is not already visible, then make it visible using the View | Toolbox menu option.
Drag a main menu from the Toolbox onto the form.
Click mainMenu1 at the base of the form designer.
You will now add all of the menu options for the application.
Click on the menu text "Type Here".
Type "&File".
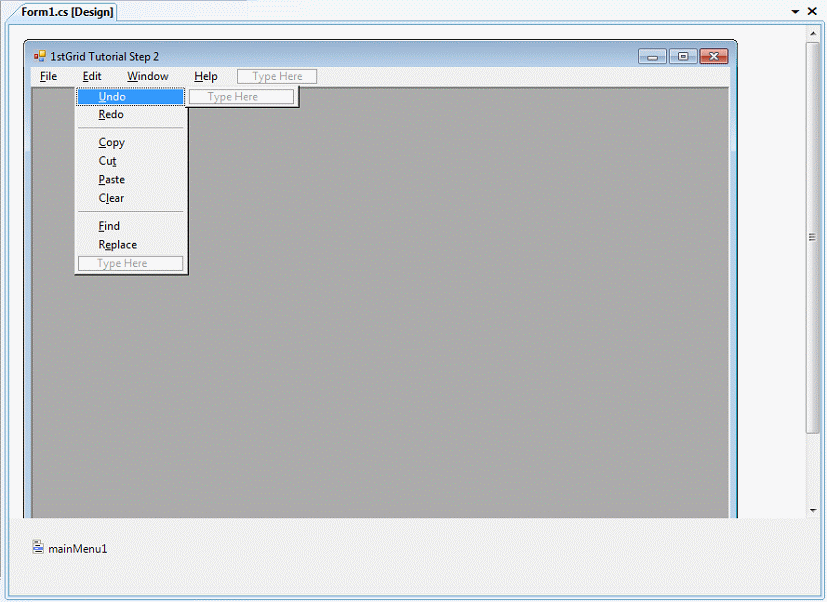
A drop down menu appears in the designer (to be designed). Add the menu options in Table 32 to the File menu. To add a separator, right-click the Menu Designer, and then click Insert Separator.
Table 32: File Menu Items
| &New
|
| &Close
|
| separator
|
| E&xit
|
Click the main menu item to the right of file, to add the Edit menu.
Add the menu options in Table 33 to the Edit menu. To add a separator, right-click the Menu Designer, and then click Insert Separator.
Type "&Edit".
Table 33: Edit Menu Items
| &Undo
|
| &Redo
|
| separator
|
| &Copy
|
| Cu&t
|
| &Paste
|
| C&lear
|
| separator
|
| &Find
|
| R&eplace
|
Click the main menu item to the right of file, to add the Window menu.
Type "&Window"
Add the following items to the Window menu.
Table 34: Windows Menu Items
| &Cascade
|
| Tile &Horizontal
|
| Tile &Vertical
|
Click the main menu item to the right of file, to add the Help menu.
Type "&Help"
Add the item "&About" to the Help menu.

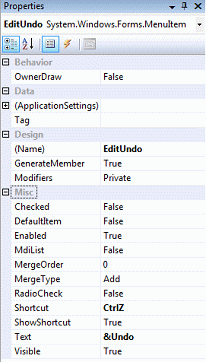
Now, for each menu item, do the following. First, select the item. In the property grid, rename the item, giving it a more meaningful name. Then give it a shortcut (if desired). Suggested names and shortcuts follow.
Table 35: Suggested Menu Item Names and Shortcuts
| FileMenu
|
| FileNew (CtrlN)
|
| FileClose
|
| FileExit
|
| EditMenu
|
| EditUndo (CtrlZ)
|
| EditRedo (CtrlR)
|
| EditCopy (CtrlC)
|
| EditCut (CtrlX)
|
| EditPaste (CtrlV)
|
| EditClear
|
| EditFind (CtrlF)
|
| EditReplace (CtrlH)
|
| WindowMenu
|
| WindowCascade
|
| WindowTileHorizontal
|
| WindowTileVertical
|
| HelpMenu
|
| HelpAbout
|

8.3.3 Add the GridDocument Class
The next steps add a GridDocument class to the application. A GridDocument is a document class that represents a document. Each GridDocument contains a grid that can be manipulated by the user.
From the Solution Explorer, right click Step2 (context menu).
Select Add | Add Windows Form.
Size the form as desired.
Select the GridDocument form.
Make the following changes to the form's properties.
Select and drag a GridControl from the Toolbox onto the form.
Size and position the grid in the form, as desired.
Select the grid control. In the property grid for the control, set the properties shown in Table 36
Table 36: GridControl Properties
| Property
|
Value
|
| DrawGrid
|
false
|
| BorderStyle
|
Sunken
|
| Anchor
|
Top, Bottom, Left, Right
|
| AutoScroll
|
true
|
| ColCount
|
15
|
| RowCount
|
40
|
DrawGrid is a property of the form; it is not a Rogue Wave property.
From the View menu, select Code to edit the source code for the form.
Modify the GridDocument constructor to accept one argument, a string containing the document name. Also, after the comment, "TODO: Add any constructor code after InitializeComponent call", add the line:
The code now looks like this:
public GridDocument(string docName)
{
   //
   // Required for Windows Form Designer support
   //
   InitializeComponent();

   //
   // TODO: Add any constructor code after InitializeComponent call
   //
   this.Text = docName;
}
|
Switch to Class View. If the class view is not visible, you can access it using the View | Class View menu option.
Expand the class view tree as follows: Step 2 | NameSpaces | Step_2 |GridDocument.
With the GridDocument class visible, right click the GridDocument class.
From the context menu that appears, select Add | Add Property. In the C# Property Wizard, fill in the properties as follows:
Table 37: GridDocument Properties
| Property
|
Value
|
| access
|
public
|
| type
|
GridControl (type this; it is not in the Property type list)
|
| name
|
Grid
|
| Accessors
|
get
|
| Modifiers
|
none
|
| Comment
|
"Get the grid control embedded in this form"
|
Click Finish.
The source code editor appears. Edit the generated property code as follows.
/// <summary>
/// Get the grid control embedded in this form
/// </summary>
public Stingray.Grid.GridControl Grid
{
  get
  {
    return gridControl1;
  }
}
|
Close the source code window and the design view for GridDocument.
8.3.4 Add an "About" Box
Return to the Solution Explorer.
Right click on Step 2.
From the context menu that appears, select Add | Add Windows Form.
Size the form as desired.
Select the form. Make the following changes to the form properties:
Set FormBorderStyle to FixedDialog.
Set Text to "About 1stGrid Tutorial".
Set StartPosition to CenterParent.
Set SizeGridStyle to Hide.
Drag a group box from the Toolbox onto the form.
Select the group box.
Change the Text property for the group box to "" (no text).
Size the group box to form a border around the perimeter of the window.

Drag a label from the Toolbox onto the form.
Select the label, and change its properties as follows:
Size the label as needed, in order to properly display the text.
With the label selected, center the label in the form with the Format | Center in Form | Horizontally menu option from the Visual Studio main menu.
Drag a button from the Toolbox onto the form.
With the button selected, center the Button in the form with the Format | Center in Form | Horizontally menu option.
Ensure the button is still selected. Change its properties as follows:
Set Text to &OK.
Set Name to OK.
Click the events button in the property grid (the lightning bolt).
Double-click the Click event.
Add this code for the button's click event:
Close the source code editor.
Close the design view for HelpAbout.
8.3.5 Add MDI Support
You will now update the source code for Form1 to add support for the MDI interface.
View the source code for Step 2 Form1.cs.
Add a new private int property, the document counter:
private int documentCount;
|
Add the following code after the "TODO: Add any constructor code after InitializeComponent call" comment:
//Add an initial doc
AddDocument();
|
Add the following implementation for the AddDocument method:
// Add a document
private void AddDocument()
{
  documentCount++;
  GridDocument doc = new GridDocument("GridDocument " + documentCount);
  doc.MdiParent = this;
  doc.Show();
}
|
8.3.6 Add Event Handlers
Finally, you will add event handlers for all of the menu options in the application menu.
Go to the design view for Form1.cs.
First, you will implement the File | New event handler.
Next, implement the File | Close event handler.
The following source code shows the implementations for the remaining menu item click event handlers.
private void FileExit_Click(object sender, System.EventArgs e)
{
  this.Close();
}

private void EditUndo_Click(object sender, System.EventArgs e)
{
  GridDocument doc = (GridDocument) this.ActiveMdiChild;
  if (doc != null)
    doc.Grid.OnUndo();
}

private void EditRedo_Click(object sender, System.EventArgs e)
{
  GridDocument doc = (GridDocument) this.ActiveMdiChild;
  if (doc != null)
    doc.Grid.OnRedo();
}

private void EditCopy_Click(object sender, System.EventArgs e)
{
  GridDocument doc = (GridDocument) this.ActiveMdiChild;
  if (doc != null)
    doc.Grid.OnCopy();
}

private void EditCut_Click(object sender, System.EventArgs e)
{
  GridDocument doc = (GridDocument) this.ActiveMdiChild;
  if (doc != null)
    doc.Grid.OnCut();
}

private void EditPaste_Click(object sender, System.EventArgs e)
{
  GridDocument doc = (GridDocument) this.ActiveMdiChild;
  if (doc != null)
    doc.Grid.OnPaste();
}

private void EditClear_Click(object sender, System.EventArgs e)
{
  GridDocument doc = (GridDocument) this.ActiveMdiChild;
  if (doc != null)
    doc.Grid.OnClear();
}

private void EditFind_Click(object sender, System.EventArgs e)
{
  GridDocument doc = (GridDocument) this.ActiveMdiChild;
  if (doc != null)
    doc.Grid.OnFind();
}

private void EditReplace_Click(object sender, System.EventArgs e)
{
  GridDocument doc = (GridDocument) this.ActiveMdiChild;
  if (doc != null)
    doc.Grid.OnReplace();
}

private void WindowCascade_Click(object sender, System.EventArgs e)
{
  this.LayoutMdi(MdiLayout.Cascade);
}

private void WindowTileHorizontal_Click(object sender, System.EventArgs e)
{
  this.LayoutMdi(MdiLayout.TileHorizontal);
}

private void WindowTileVertical_Click(object sender, System.EventArgs e)
{
  this.LayoutMdi(MdiLayout.TileVertical);
}

private void HelpAbout_Click(object sender, System.EventArgs e)
{
  new HelpAbout().ShowDialog();
}
|
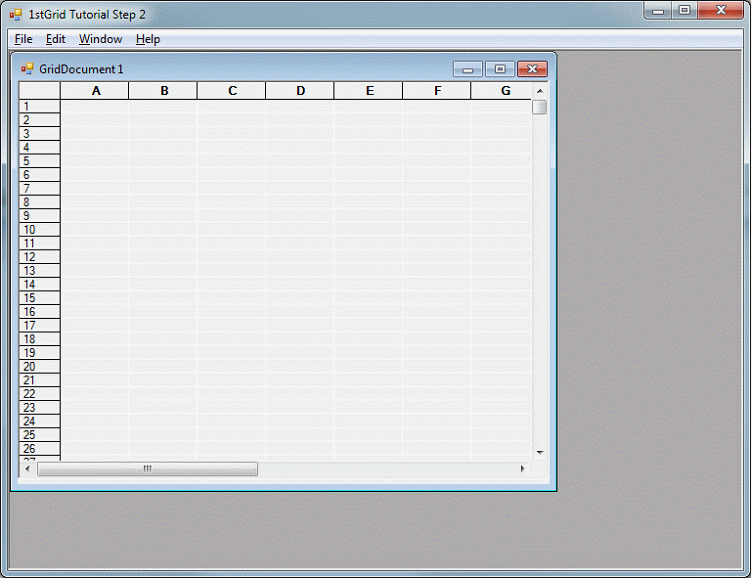
Build and run the application.
Congratulations! You've completed the longest portion of the 1stGrid tutorial.


Copyright © Rogue Wave Software, Inc. All Rights Reserved.
The Rogue Wave name and logo, and Stingray, are registered trademarks of Rogue Wave Software. All other trademarks are the property of their respective owners.
Provide feedback to Rogue Wave about its documentation.


