
This section shows you how to insert new rows and columns, remove rows and columns, hide rows and columns, and freeze rows and columns.
The RowsColumns_CS tutorial, which is located in the Tutorials subdirectory of your Objective Grid for Microsoft .NET installation directory, shows how to hide and freeze rows and columns.
Replace the code in FormLoad() with the following code:
private void FormLoad(object sender, System.EventArgs e) {
// Change the size of the grid.
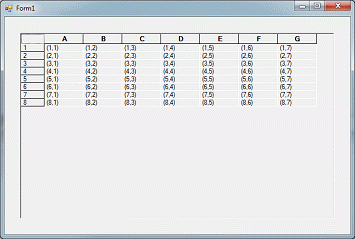
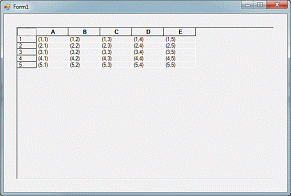
gridControl1.RowCount = 8;
gridControl1.ColCount = 7;
// Fill with data
for( int i = 1; i <= gridControl1.RowCount; ++i ) {
for( int j = 1; j <= gridControl1.ColCount; ++j ) {
gridControl1[i,j].Style.Value = "(" + i + "," + j + ")";
}
}
}
|
Build and run the application.
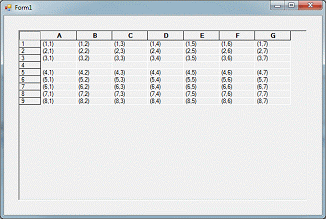
The insertion of a new row or column moves the existing row or column. For example, if you want to add a new row between rows 3 and 4, you specify row 4 as the insertion point. The current row 4 becomes the new row 5.
Add the following code to the LoadForm() method:
// Insert a new row between rows 3 and 4 gridControl1.InsertRows( 4, 1 ); |
Build and run the application.
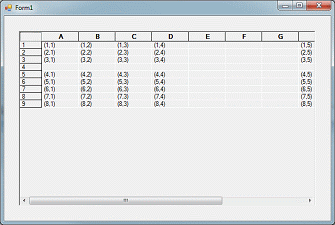
Add the following code to the LoadForm() method:
// Insert three new columns between columns 4 and 5 gridControl1.InsertCols( 5, 3 ); |
Build and run the application.
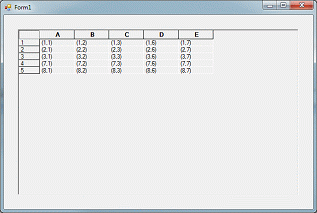
Removing rows or columns is similar to inserting them. Add the following code to the LoadForm() method:
// Remove rows 4, 5, 6, and 7. Remember rows after 4 // were displaced by 1 when the new row was added gridControl1.RemoveRows( 4, 7 ); // Remove columns 4 through 8 gridControl1.RemoveCols( 4, 8 ); |
Build and run the application.
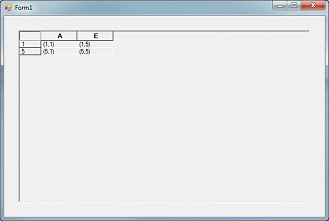
Hiding columns prevents them from being displayed.
Add the following code to the LoadForm() method:
// Hide row 1, and column 3 gridControl1.HideRows( 1, 1, true ); gridControl1.HideCols( 3, 3, true ); |
Build and run the application.

Hidden rows and columns can be made visible again by passing false to the HideRows() and HideCols() methods.
An entire range of rows and columns can be hidden by using the Range class. To illustrate this, set each cell's value to indicate its coordinate within the grid by adding the following code:
// Unhide all the rows for the next demonstration
for( int i = 1; i <= gridControl1.RowCount; ++i ) {
  gridControl1.HideRows( i, i, false );
}
for( int i = 1; i <= gridControl1.ColCount; ++i ) {
  gridControl1.HideCols( i, i, false );
}
// Reset the values to indicate rows and columns:
for( int i = 1; i <= gridControl1.RowCount; ++i ) {
  for( int j = 1; j <= gridControl1.ColCount; ++j ) {
    gridControl1[i,j].Style.Value = "(" + i + "," + j + ")";
  }
}
|
Build and run the application.
Add code to hide cells B2 through D4:
// Hide the cells B2 to D4 Range r1 = Range.Cells(2, 2, 4, 4); gridControl1.HideRange( r1, true ); |
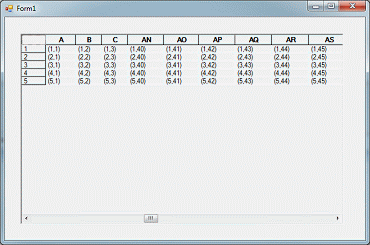
When rows or columns are frozen, they do not scroll with the rest of the grid.
Replace the FormLoad() method with the following code:
private void FormLoad(object sender, System.EventArgs e)
{
  // Change the size of the grid.
  gridControl1.RowCount = 5;

  // To test the action of the grid with a frozen
  // column, add enough cells to cause a horizontal
  // scroll bar to appear
  gridControl1.ColCount = 100;
  fillGrid();
  gridControl1.FrozenCols = 3;
}

private void fillGrid()

// fillGrid fills in all cells in the grid with data
// reflecting the row and column indices of each cell.
// This shows what happens to the grid when some
// columns are frozen, and the view is scrolled
// horizontally to reveal the rightmost columns.

{
  Style s1;
  for( int i = 1; i <= gridControl1.RowCount; ++i )
  {
    for( int j = 1; j <= gridControl1.ColCount; ++j )
    {
      s1 = gridControl1[i,j].Style;
      s1.Value = "(" + i + "," + j + ")";
    }
  }
}
|
Figure 22 shows the state of the grid after scrolling over several columns. The first three columns remain fixed, but the fourth and succeeding columns numbers increase.
Copyright © Rogue Wave Software, Inc. All Rights Reserved.
The Rogue Wave name and logo, and Stingray, are registered trademarks of Rogue Wave Software. All other trademarks are the property of their respective owners.
Provide feedback to Rogue Wave about its documentation.