


5.4 Step Three: ComDocs and Document Linking
Estimated time to complete this step: 60 minutes
5.4.1 Introduction
The third step demonstrates how Objective Chart's ComDoc system can be used to expand the capabilities of an existing application. You will create a new chart view for use as a child document view, as well as a second document template for the child document. The CDocManager used by the application will be replaced with an SRGDocManager, which allows document linking. A new menu item and handler will create and show linked documents. Finally, you will convert the Scribble document into a ComDoc and enable data passing between the two ComDocs to allow dynamic data changes.
The secondary view class can be created in the same manner as the view for the second pane in the Step Two project.
You do not need to finish the first two steps of this tutorial to start this step. Simply use the scribble<ver>.sln file in the step2 sample folder.
5.4.2 Create the Scroll View
Open the scribble<ver>.sln solution file from the scribble\step2 folder.
On the Insert menu, click New Class. Create a new class, named CChartScrollView, based on CScrollView class.
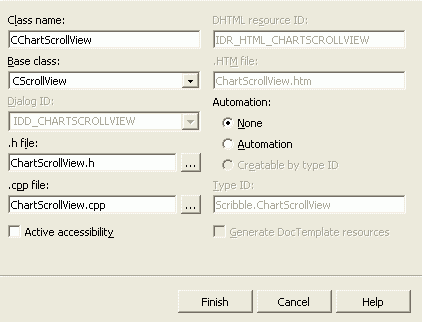
Open the ChartScrollView.cpp file. Perform a global search and replace of CScrollView with SRGScrollView (about 5 occurrences).
Your view class now has access to all the capabilities of Objective Chart.
Open ChartScrollView.h and replace CScrollView with SRGScrollView.
5.4.3 Modify the Scroll View
Several modifications to the scroll view are required to create an effective chart. The next steps will create a scatter chart and make it visible.
As in steps one and two of this tutorial, bold text indicates code that needs to be added or modified.
On the ChartScrollView.cpp file, modify the OnInitialUpdate() routine of the scroll view to create a standard scatter chart with fixed axis scales. The final product should look like this:
void CChartScrollView::OnInitialUpdate()
{
  SRGScrollView::OnInitialUpdate();

  SRGraphDisplay *pD=new SRGraphDisplay;
  pD->GetStyle()->SetGraphStyle(CX_GRAPH_XYSCATTERG);
  pD->GetStyle()->SetAxisStyle(CX_AXIS_XYSCATTER);

  //We know that the chart scale will be fixed
  //so we'll program that page size into the chart too.

  pD->GetStyle()->SetUseMaxScale(TRUE);
  pD->SetMinRangeX(0);
  pD->SetMaxRangeX(800);
  pD->SetMaxRangeY(0);
  pD->SetMinRangeY(-900);

  GetGraph()->AddComponent(pD);
}
|
Once you create the scatter chart, you need to make it visible. The OnDraw() function of the base-class knows how to draw the graph. In the ChartScrollView.cpp file, modify the OnDraw() function as follows:
void CChartScrollView::OnDraw(CDC* pDC)
{
  SRGScrollView::OnDraw(pDC);
}
|
5.4.4 Allow Linked Documents
The next task is to allow document linking. The application object needs several modifications to allow the creation of linked documents.
The first modification replaces the standard CDocManager with the specialized SRGDocManager class by overriding the AddDocTemplate() routine.
In scribble.h insert the following code just below the //}}AFX_VIRTUAL line:
virtual void AddDocTemplate(CDocTemplate* pTemplate);
|
In scribble.cpp insert
void CScribbleApp::AddDocTemplate(CDocTemplate * pTemplate)
{
  if (m_pDocManager == NULL)
    m_pDocManager = new SECDocManager;
  m_pDocManager->AddDocTemplate(pTemplate);
}
|
The second modification overloads the OnFileNew() command with a function that allows creation of documents by their names as specified in the document template string. The original OnFileNew() function is overridden with one that recognizes the new document template.
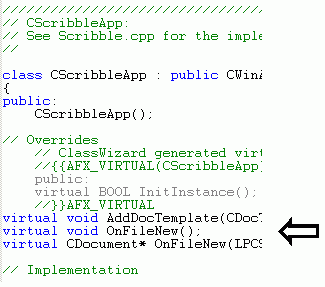
In scribble.h add the following code below the //}}AFX_VIRTUAL line, as shown in Figure 59.
virtual void OnFileNew();
virtual CDocument* OnFileNew(LPCSTR DocIdent,UINT
           nOpCode, UINT nSubCode,DWORD dwData,SECComDoc *pParent);
|
In scribble.cpp insert:
void CScribbleApp::OnFileNew()
{
  if (m_pDocManager != NULL)
    ((SECDocManager *)m_pDocManager)->OnFileNew();
}

CDocument * CScribbleApp::OnFileNew(LPCSTR DocIdent, UINT nOpCode,
            UINT nSubCode, DWORD dwData, SECComDoc * pParent)
{
  if (m_pDocManager != NULL)
    return ((SECDocManager*)m_pDocManager)
     -> OnFileNew(DocIdent,nOpCode,nSubCode,dwData,pParent);
    // NOTE: The pointer to the DocManager must point to an SECDocManager
    // object or catastrophic failure will result.
  return NULL;
}
|
While still in scribble.cpp find the line
ON_COMMAND(ID_FILE_NEW, CWinApp::OnFileNew) and remove "CWinApp::" so that our new override will be used.
You need to create the document template string itself by inserting an IDR_CHARTTYPE string into the resources. Locate the String Table folder on the Resources tab and open the String Table.
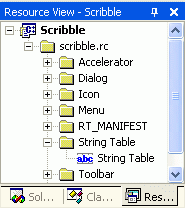
Click on an empty row at the end of the string table and modify the string ID (IDR_CHARTTYPE) and value:
\nChart\nChart\nChart Files (*.GRP)\n.GRP\nChart.Document\nChart Document
|
Don't press return until you are finished typing the above text. It will automatically wrap around for you as you type.
Insert the following line near the top of scribble.cpp.
#include "ChartScrollView.h"
|
To add the second template declaration in the InitInstance() function, modify the InitInstance() function (in file scribble.cpp) according to the following code:
BOOL CScribbleApp::InitInstance()
{
  // Standard initialization
  // If you are not using these features and wish to reduce
  // the size of your final executable, you should remove
  // from the following the specific initialization routines
  // you do not need.

#ifdef _AFXDLL
  Enable3dControls(); // Call this when using MFC in a shared
                      // DLL
#else
  Enable3dControlsStatic(); // Call this when linking to MFC
                            // statically
#endif

  LoadStdProfileSettings();  // Load standard INI file
                             // options (including MRU)


  // Register the application's document templates.  Document
  // templates serve as the connection between documents,
  // frame windows and views.

  CMultiDocTemplate* pDocTemplate;
  pDocTemplate = new CMultiDocTemplate(
    IDR_SCRIBBTYPE,
    RUNTIME_CLASS(CScribbleDoc),
    RUNTIME_CLASS(CChildFrame), // custom MDI child frame
    RUNTIME_CLASS(CScribbleView));
  AddDocTemplate(pDocTemplate);

  pDocTemplate = new CMultiDocTemplate(
    IDR_CHARTTYPE,
    RUNTIME_CLASS(CGraphDoc), // our own ComDoc enable chart
                              // document.
    RUNTIME_CLASS(CMDIChildWnd),
    RUNTIME_CLASS(CChartScrollView));
  AddDocTemplate(pDocTemplate);

  // create main MDI Frame window
  CMainFrame* pMainFrame = new CMainFrame;
  if (!pMainFrame->LoadFrame(IDR_MAINFRAME))
    return FALSE;
  m_pMainWnd = pMainFrame;

  OnFileNew("Scribb",0,0,0,NULL);

  // Enable drag/drop open.  We don't call this in Win32,
  // since a document file extension wasn't chosen while
  // running AppWizard.

  m_pMainWnd->DragAcceptFiles();

  // Enable DDE Execute open
  EnableShellOpen();
  RegisterShellFileTypes(TRUE);

  // Parse command line for standard shell commands, DDE,
  // file open
  CCommandLineInfo cmdInfo;
  ParseCommandLine(cmdInfo);

  // Dispatch commands specified on the command line
  if(cmdInfo.m_nShellCommand!=CCommandLineInfo::FileNew)
  {
    if (!ProcessShellCommand(cmdInfo))
      return FALSE;
  }


  // The main window has been initialized, so show/update it.
  pMainFrame->ShowWindow(m_nCmdShow);
  pMainFrame->UpdateWindow();

  return TRUE;
}
|
Note that the default behavior is changed in regard to the command-line parameter parsing. To prevent the display of the document-type choice dialog, the application explicitly creates a default Scribble document. If another document type is requested on the command line, the command-line parser creates a new file.
5.4.5 Create a Linked Document
Now you're ready to create a linked document. The original Scribble view must now be told how to create a linked document and how to maintain the data in the document once it has been displayed.
On the Resources tab, locate the Menu folder, and open the IDR_SCRIBBTYPE menu for editing.
On the View menu, double-click the blank area at the bottom to add a new menu item (Linked chart command) to the View menu resource.
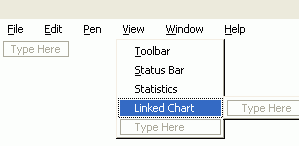
Type the ID and Caption as seen in Figure 62:
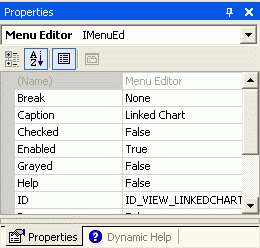
Add a handler for the menu item. Select ID_VIEWED_LINKEDCHART as the Object ID.
Fill in the handler function body as shown below:
void CScribbleView::OnViewLinkedchart()
{
  // Rather than construct a data block we will create the
  // chart first....
  CGraphDoc * pGD = (CGraphDoc *)((CScribbleApp *)AfxGetApp())
-> OnFileNew("Chart",0,0,0,(SECComDoc *)GetDocument());

  // And then transfer data to it.
  ASSERT(pGD->IsKindOf(RUNTIME_CLASS(CGraphDoc)));
  SRGraph *pG=&pGD->m_Graph;
  int g=0; // The group number;
  for(POSITION p=GetDocument()->
m_strokeList.GetHeadPosition();p!=NULL;)
  {
    CStroke *pS=GetDocument()->m_strokeList.GetNext(p);
    for(int x=0;x<pS->m_pointArray.GetSize();x++)
    {
      SRGValueBlock vb;
      vb.group=g;
      vb.index=x;
      vb.value=(double)pS->m_pointArray.GetAt(x).x;
      vb.bNullFlag=0;
      pGD->SecDocUpdate(SRG_SET_VALUE,(DWORD)(&vb));
      vb.group=g+1;
      vb.index=x;
      vb.value=(double)pS->m_pointArray.GetAt(x).y;
      pGD->SecDocUpdate(SRG_SET_VALUE,(DWORD)(&vb));
    }
    g+=2;
  }
}
|
Notice how the new OnFileNew() overload is used to create a document of type Chart. This secondary (or child) document is of the CGraphDoc class. (CGraphDoc is an Objective Chart class.) The chart document and view objects are created by the application framework. The CGraphDoc class has all the functionality required for this demonstration, so no code has been added for it. In particular, CGraphDoc has a member variable m_graph of type SRGraph that stores our graph. After the child document (and view) is created, the routine loops through the points "scribbled" so far, calling SecDocUpdate to copy the data to the SRGraph object in the new child document. Document updates are performed when the child document is created.
In the scribvw.cpp file, modify the OnLButtonDown() and OnMouseMove() functions so the Scribble view updates the chart in the child document as mouse events occur:
Revised OnLButtonDown()
void CScribbleView::OnLButtonDown(UINT, CPoint point)
{
  // Pressing the mouse button in the view window starts a
  // new stroke

  // CScrollView changes the viewport origin and mapping
  // mode.
  // It's necessary to convert the point from device
  // coordinates to logical coordinates, such as are stored
  // in the document.

  CClientDC dc(this);
  OnPrepareDC(&dc);
  dc.DPtoLP(&point);

  m_pStrokeCur = GetDocument()->NewStroke();
  // Add first point to the new stroke
  m_pStrokeCur->m_pointArray.Add(point);

  // Data is added to the chart
  SRGraph * pGraph = &GetDocument()->m_Graph;
  int nGroups=pGraph->GetGroupCount();
  SRGraphData *pData=pGraph->GetGroup(nGroups-2)
    ->GetIndex(0);
  pData->SetValue((double)point.x);
  pData->GetStyle()->SetObjectStyle(CX_OBJECT_LINE);

  pData=pGraph->GetGroup(nGroups-1)->GetIndex(0);
  pData->SetValue((double)point.y);
  pData->GetStyle()->SetObjectStyle(CX_OBJECT_LINE);

  // this section will update any linked documents too.
  SRGValueBlock vb;
  vb.group=nGroups-2;
  vb.index=0;
  vb.value=(double)point.x;
  vb.bNullFlag=0;
  GetDocument()->
UpdateLinkedDocuments(SRG_SET_VALUE,(DWORD)(&vb));
  vb.group=nGroups-1;
  vb.index=0;
  vb.value=(double)point.y;
  GetDocument()->
UpdateLinkedDocuments(SRG_SET_VALUE,(DWORD)(&vb));

  SetCapture();       // Capture the mouse until button up.
  m_ptPrev = point;   // Serves as the MoveTo() anchor point
                      // for the LineTo() the next point, as
                      // the user drags the mouse.

  return;
}
|
Revised OnMouseMove()
void CScribbleView::OnMouseMove(UINT, CPoint point)
{
  // Mouse movement is interesting in the Scribble
  // application only if the user is currently drawing a new
  // stroke by dragging the captured mouse.

  if (GetCapture() != this)
    return;
// If this window (view) didn't capture the
// mouse,then the user isn't drawing in this window.

  CClientDC dc(this);
  // CScrollView changes the viewport origin and mapping
  // mode. It's necessary to convert the point from device
  // coordinates to logical coordinates, such as are stored
  // in the document.

  OnPrepareDC(&dc);
  dc.DPtoLP(&point);

  m_pStrokeCur->m_pointArray.Add(point);


  // Data is added to the chart
  SRGraph * pGraph = &GetDocument()->m_Graph;
  int nGroups=pGraph->GetGroupCount();
  int nArraySize=m_pStrokeCur->m_pointArray.GetSize();

  SRGraphData *pData=pGraph->GetGroup(nGroups-2)->
GetIndex(nArraySize-1);
  pData->SetValue((double)point.x);
  pData->GetStyle()->SetObjectStyle(CX_OBJECT_LINE);

  pData=pGraph->GetGroup(nGroups-1)->GetIndex(nArraySize-1);
  pData->SetValue((double)point.y);
  pData->GetStyle()->SetObjectStyle(CX_OBJECT_LINE);

  // this section will update any linked documents too.
  SRGValueBlock vb;
  vb.group=nGroups-2;
  vb.index=nArraySize-1;
  vb.value=(double)point.x;
  vb.bNullFlag=0;
  GetDocument()->
UpdateLinkedDocuments(SRG_SET_VALUE,(DWORD)(&vb));
  vb.group=nGroups-1;
  vb.index=nArraySize-1;
  vb.value=(double)point.y;
  GetDocument()->
UpdateLinkedDocuments(SRG_SET_VALUE,(DWORD)(&vb));

  // Draw a line from the previous detected point in the
  // mouse drag to the current point.
  CPen* pOldPen = dc.SelectObject(GetDocument()->
GetCurrentPen());
  dc.MoveTo(m_ptPrev);
  dc.LineTo(point);
  dc.SelectObject(pOldPen);
  m_ptPrev = point;
  return;
}
|
A one-way link between Scribble and the child document and chart is complete. Stroke data entered in the Scribble window are copied to the linked document as well as the chart created in Step 2 (stored in CScribDoc and displayed in the splitter window).
5.4.6 Update the Linked Documents
A useful feature of the ComDoc system is that it can allow the linked document to update its parent. CGraphDoc already has a routine designed to allow Objective Chart to update an Objective Grid application when visual data objects in the linked chart are dragged with the mouse. By trapping this update call, Objective Chart can adjust points in the original Scribble data.
First the original Scribble document must be updated to derive from ComDoc. Simply use the search and replace facility on the scribdoc.h and scribdoc.cpp files to change the base class from CDocument to SECComDoc. (SECComDoc is an Objective Chart class.)
Override the SECComDoc function SECDocUpdate() to trap the update commands from the child document and modify the local data structures to reflect the changes.
Insert the following line to the public implementation section of scribdoc.h.
virtual BOOL SecDocUpdate(UINT nSubCode, DWORD dwData);
|
Add the function below to scribdoc.cpp.
BOOL CScribbleDoc::SecDocUpdate(UINT nSubCode, DWORD dwData)
{
  switch(nSubCode)
  {
  case 256:
// This is the Objective Grid Cell value update code.
    {

      // First we will update the original Scribble data

      SRGValueBlock *pVB=(SRGValueBlock *)dwData;
      int nStroke=(pVB->group-1)/2;
// two groups per stroke
      CStroke *pS=m_strokeList.GetAt(m_strokeList.FindIndex(nStroke));


      CPoint point=pS->m_pointArray.GetAt(pVB->index-1);

      if(pVB->group & 1)
        point.x=(int)(0.5+pVB->value);
      else
        point.y=(int)(0.5+pVB->value);

      pS->m_pointArray.SetAt(pVB->index-1,point);

      if(!pVB->group & 1)
        pS->FinishStroke();
      // recalculate the bounding rectangle.

      // Then we can update the chart data too.

      m_Graph.SetValue(pVB->index-1,pVB->group-1,pVB->value);


      UpdateAllViews(NULL);

      return TRUE;
    }
  default:
    return FALSE;
  }
}
|
This routine updates both the Scribble data and chart displayed in the splitter window. The two documents are now linked in both directions. Strokes added to CScribDoc are copied to the linked chart. And, if the user repositions a data object in the chart, the changed values are updated in CScribDoc.
Build (F7) and execute (Ctrl+F5) your application.
Draw some strokes in Scribb1 window.
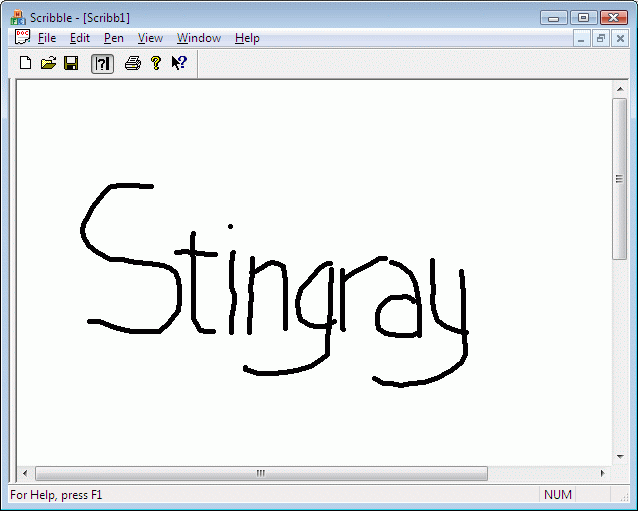
On the View menu, click Linked chart.

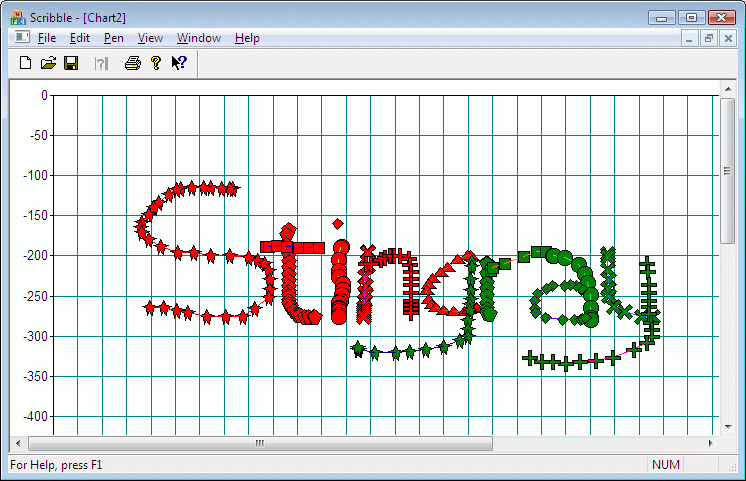
Click any data object in the Chart1 window, drag it, and view the resulting change to the image in the Scribb1 window.
Congratulations! You have completed the Objective Chart Scribble tutorial.


Copyright © Rogue Wave Software, Inc. All Rights Reserved.
The Rogue Wave name and logo, and Stingray, are registered trademarks of Rogue Wave Software. All other trademarks are the property of their respective owners.
Provide feedback to Rogue Wave about its documentation.


