Workspace automation
Client side workspace automation is performed via Client Side hooks that are triggered at certain events in the IP lifecycle. Scripts can be attached to each of these lifecycle events which can be used to configure workspace, run simulations, initiate continuous integration flows, and capture metadata. The workspace manifest file can be used to support additional automation, providing an up to date record of activity in the workspace from the client. Further workspace (and many other) automation possibilities are enabled by the Perforce IPLM Events system.
Workspace automation overview
Client side hooks enable workspace automation, when events occur in the workspace IPs with hook scripts defined for that event (either directly or on their IP Library) run the associated scripts. Hook scripts can be defined to run verification, simulations, initiate Jenkins runs, capture metadata and annotate it back onto Perforce IPLM releases and other objects.
The Workspace Manifest file is maintained by Perforce IPLM and reflects an up to date view of the current workspace, avoiding the need to run certain calls against the Perforce IPLM Server.
Client side hooks
Client side hooks are defined via fields on the IP object or on the Library object. Each hook event is a separate field in the IP or Library template. If the field is defined on the Library the defined hook script will be run on every IP in that Library when the specified event occurs. If it is defined on the IP the hook will be run for events that occur on that IP only. Fields set on an IP override the corresponding setting of a field on the Library. It requires IP or Library write permission to set hook scripts on an IP or Library respectively.
Client side hooks in IPLM Web
On the IP page, in the Hooks tab, you can view the current hooks.
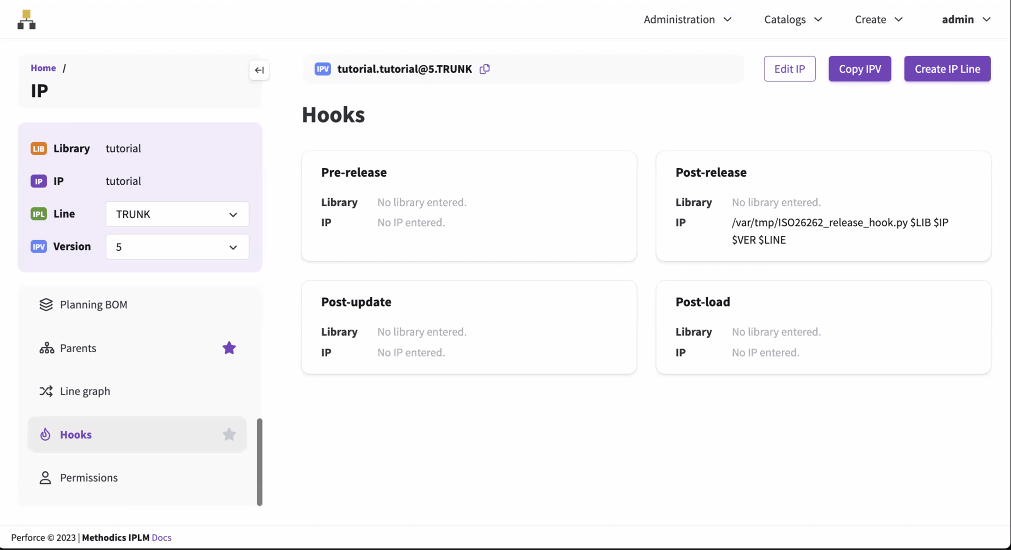
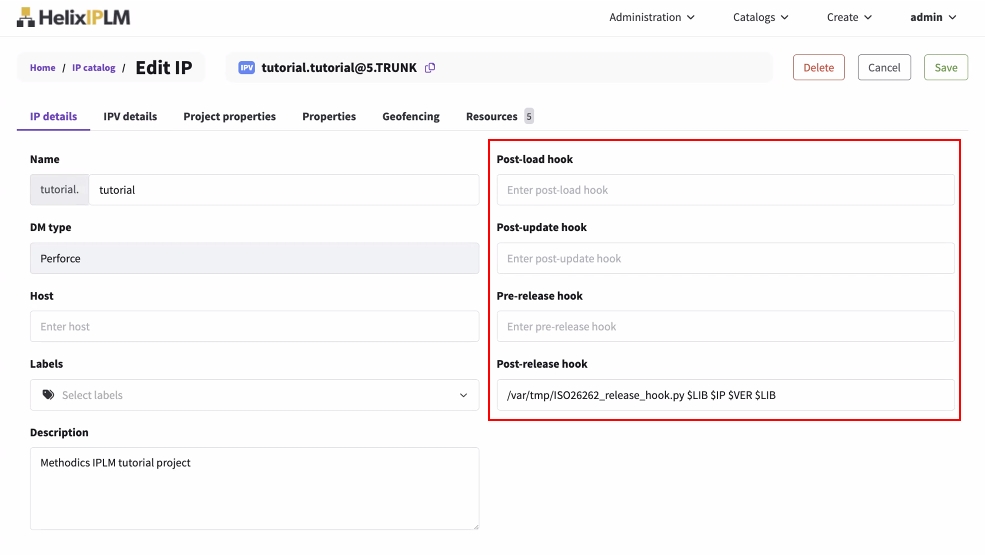
Select Edit IP to open the IP details tab where you can edit the hooks.
Hooks using CLI
IP Edit template
# Hooks are optional commands executed when certain events occur. These
# variables can be used as arguments to the hooks :
#     $IP     : IP name
#     $LIB    : Library name
#     $VER    : Version number
#               For pre-release hook, the old version number. For post-release
#               hook, the new version number.
#     $LINE   : Line name
#     $IPID   : Complete IP identifier (shorthand for $LIB.$IP@$VER.$LINE)
#     $IP_DIR : IP directory in the workspace
#     $ARGS   : Any arguments passed to the pi command with the --args argument
#               For instance, pi release lib.ip --args [arguments_for_hook]
[HOOKS]
# IP Permissions apply
pre_release =
post_release = /central_location/fusa/ISO26262_release_hook.py $LIB $IP $VER $LINE
post_load =
post_update =
pre_integrate =
post_integrate =
Each event type has a separate script setting, as well as a set of arguments that are passed to the script for that event.
| Hook Argument | Note | Description |
|---|---|---|
| $IP |
|
The name of the IP affected by the event |
| $LIB |
|
The library of the IP affected by the event |
| $VER |
Pre-release hook, this is the old version number Post-release hook, this is the new version number |
The version of the IP affected by the event |
| $LINE |
|
The line of the IP affected by the event |
| $IPID |
Pre-release hook, this is the old version number Post-release hook, this is the new version number |
A combination of the previous 4 fields: $LIB.$IP@$VER.$LINE |
| $IP_DIR |
|
The IP's directory in the workspace. This can be changed via the '–path' project property |
| $ARGS |
|
Command line arguments that should be provided to the hook script. The format of the --args flag to support multiple arguments is: --args="[arguments_for_hook]" for example --args="–arg1 value1 --arg2 value2" |
The output of each hook script is passed to stdout.
Pre/Post release hooks
You can use pre and post-release hooks to call any of your scripts that return a unix value. PerforceIPLM interprets a '0' return value as a 'pass' and any non-zero integer as a fail. Releases created by modifying resources on IPLM Web will not trigger the hooks. See Server Side Hooks or Events for information about automation around releases made outside a workspace.
Perforce IPLM executes the pre-release hook script after it determines that the workspace can be released, checking first for local file modifications, etc. If the pre-release hook returns a non-zero unix value, the release is aborted. Pre-release hooks are typically used for 'smoke test' checks to make sure a workspace is worthy of a release. In general pre-release hook scripts should be limited to a fairly short run time, such that they complete quickly and do not collide with releases from other users in different workspaces.
Perforce IPLM will execute a post-release hook after the release is generated. The post release hook's return value is of interest to the user, but generally does not stop any Perforce IPLM actions. Post release hooks can be used to run checks, including simulations, verification, etc, and then apply the results of those checks back onto the new release as Attributes or Widgets. Post release hooks are a powerful way to automatically generate and capture metadata.
Release hooks are only executed for releases from the command line.
Pre-release Hook
When a user attempts to release a new version of an IP from the command line (by typing 'pi release'), Perforce IPLM can be configured to run special checks to make sure that the release meets some minimum conditions. For example, a new IP release should pass a compilation, or a lint check etc. This pre-release hook is generally light-weight, and it runs in the context of the user's workspace. The hook itself is usually a script that is visible to the user and can be executed by the user. The hook can have arguments, including the special arguments described above. An example of a pre-release hook is
/tools/project/scripts/bin/lint_check $LIB $IP $VER $ENV_VAR1
Here, the '$IP' and '$VER' are interpreted by Perforce IPLM when running the hook, and their values are filled in. Perforce IPLM will also replace any environment variables if the arguments begin with a '$', and they are not one of the Perforce IPLM special arguments.
Post-release hook
The post-release hook is run in the same user workspace that created the release.
Once a release is created, Perforce IPLM can be configured to run a post-release hook. This hook is typically used to run further quality metrics on the IP to establish the release quality. For example, a post-release hook can be used to call a regression of several tests. Depending the the pass rate of the regression, the release might for instance be sealed with a 'BRONZE', 'SILVER', or 'GOLD' alias. An example of a post-release hook is:
/tools/project/scripts/bin/basic_regr $LIB $IP $VER --args="--grid grid1"
Here, the '$LIB', '$IP', and '$VER' are interpreted by Perforce IPLM when running the hook, and their values are filled in.
Post-load hook
The post-load hook is called after the workspace is created, it can be used to customize IP workspaces after creation. See Workspace configuration for workspace customization options.
Post-update hook
The post-update hook is called after a 'pi update' command is called on the IP in the workspace, it can be used to customize IP workspaces after update. See Updating the workspace.
Pre-integrate hook
The pre-integrate hook is called before a 'pi integrate' command is called on the IP in the workspace, it can be used to perform checks on the IPV to see if the DM level integrate should be performed. The 'pi integrate' command will be aborted if the script returns anything other than '0'.
Post-integrate hook
The post-integrate hook is called after a 'pi integrate' command is called on the IP in the workspace, it can be used to perform a DM level integration on the IPV.
Workspace manifest file
To help with customer scripting Perforce IPLM maintains a JSON description of the workspace located in the <WS_ROOT>/.methodics/ws_manifest.json location
The workspace manifest file will contain the following items:
- the top IPV (and identifier_id)
- the list of IPV resources in the workspaces
- the mapping from aliased IPVs in the workspace to the actual release number
- the actual location of each IPV in the workspace
- dm_type (to figure out if we can run DM commands on it)
- repo_root (if we want to run DM commands on it)
{
  "resources": [
    {
      "dm_type": "P4",
      "ipid": {
        "alias": "HEAD",
        "ip": "olive",
        "library": "food",
        "line": "TRUNK",
        "version": 3
      },
      "path": "food.olive",
      "repo_path": "//depot/olive/trunk"    }
  ],
  "top_ipv": {
    "dm_type": "P4",
    "ipid": {
      "ip": "vodka",
      "library": "drinks",
      "line": "TRUNK",
      "version": 2
    },
    "path": "drinks.vodka",
    "repo_path": "//depot/vodka/trunk"  }
}
In the above example we have a workspace made from the drinks.vodka top level IP with a single resource, food.olive. Both of these IPs are located at the top of the workspace.
The workspace manifest file is updated after the following commands:
- pi ip load
- pi update
- pi release