Using Continuous Integration with Perforce IPLM
Introduction
Continuous Integration (CI) is a very popular practice with design teams as a methodology to build and release stable models of their design. This implies a system that merges in changes from multiple users onto a single model and verifies that the model meets some minimum quality criteria. The merge, build and qualification of the model is done on a continuous basis, using automation. Models can be built several times a day, depending on the rate of change in the design.
Perforce IPLM has a built-in release model that is well suited to take advantage of CI workflows. Customers widely use popular CI tools like Jenkins in conjunction with Perforce IPLM releases to build the desired CI workflow that makes sense in their context.
Releases and CI
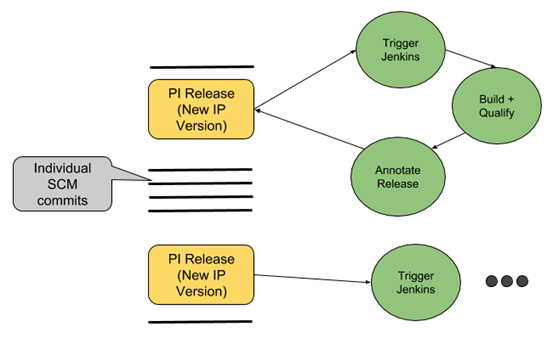
A Perforce IPLM release creates a new version of an IP (an IPV). This release captures file changes or a change number (depending on the underlying SCM) as well as all the ‘resources’ - dependencies - between the IP being released and other IPs in its resource list. Releases can be generated from a modified workspace or by editing the IP definition directly.
Once a new release is created, Perforce IPLM has a post-release trigger that allows users to connect the release mechanism to CI tools like Jenkins. At this point, the CI tool can use, build, and test this release and qualify it with metadata as required.
Note that this is different from a more traditional CI flow, where any commits to an SCM typically trigger a new CI event and a lead to a build and qualification run. In this case, new releases trigger the CI event. There can be many changes (and many commits) between two consecutive releases.
Advantages of qualifying releases
One of the challenges of CI in a hardware design environment is that a true commit-based flow - where each SCM commit is qualified - can get very resource and time intensive. Teams usually end up spending a lot of compute and license resources on qualifying individual commits. In addition, these qualification runs take a long time, so there are many false failures due to exposed commits and other problems.
Reducing all these resource needs, while still delivering a CI flow, is where release-based CI comes in. Instead of qualifying each commit, users can set up Jenkins to only qualify Perforce IPLM releases. Individual commits between releases are ignored from a CI perspective.
Triggering Jenkins on release
Users can connect a Perforce IPLM release to Jenkins using a post-release hook script. Configuring Jenkins for this flow, and samples of the basic post-release hook scripts are available in the customer documentation of Perforce IPLM.
Once the Jenkins build is complete, qualification results (pass or fail, regression statistics, and others) can then be annotated back onto the Perforce IPLM release itself in the form of metadata. This metadata can be release Aliases (“GOLD”, “SILVER” etc.). Jenkins can also be used to fill out additional metadata like test results, engineering flow results etc. that make sense in the context of a particular release (or IP Version) qualification.
Top-down versus bottom-up hierarchical builds
In a top-down operation users can configure jobs with build dependencies based on the IP resource tree for the project. This is the standard methodology for managing hierarchical builds in Jenkins,
With Perforce IPLM a bottom-up approach can also be followed which allows a change to an IP to be qualified in the context of all projects in the company that use it. This uses the “pi ip usage” feature and gives the customer the required visibility when IPs are being reused between projects. In essence, this facilitates Hierarchical Traceability. When a shared IP used by multiple projects is changed, the impact of that change can be determined across those projects by tracing the hierarchy. By querying Perforce IPLM for projects that use that IP, builds for those projects can be configured and triggered via hooks to start the validation flows. Build artifacts can be stored as Attributes/Properties on Perforce IPLM releases. Now the revision control data, release metadata and build artifacts are all combined, and can be accessed via the Perforce IPLM query language
Event driven CI
Perforce IPLM includes a Messaging Platform for initiating workflows based on key events. Users (or programs) may subscribe to an event such as a qualified release of an IP and Jenkins can configured to consume these events and schedule jobs based on milestone events, for example, a Pi release + metadata attachment to the resulting IP Version (Properties/Attributes/Labels). This is another example workflow where customers can leverage the Perforce IPLM platform to enable CI for the enterprise.
Conclusion
As CI flows gain popularity and traction in the hardware design space, it is critical that they are properly integrated into an IP-centric design management platform like Perforce IPLM. It is also equally important to understand the load that CI systems can put on hardware design environments. The Perforce IPLM / Jenkins integration can mitigate the worst effects of using CI, while enabling a solid workflow.
Using Jenkins with Perforce IPLM
Jenkins works via various “build jobs”, which are at the heart of the Jenkins build process. A build job is a particular task or step executed individually, or as part of a larger build process. A real project typically requires many separate, but related build jobs.
Jenkins provides various configuration wizards for these build jobs, and this document will focus on the Freestyle project type configuration.
Installation
You can either run Jenkins installer or install jenkins.war manually. To run Jenkins installer, follow the steps on the official page:
https://www.jenkins.io/doc/book/installing/linux/
To install jenkins.war manually, use the following steps:
-
Download Jenkins by using:
wget http://mirrors.jenkins.io/war-stable/latest/jenkins.war
-
Start Jenkins by using:
java -jar $(pwd)/jenkins.war --httpPort=7070 &
PiServer uses the default port 8080, and Prometheus may use 9090, so use 7070 for Jenkins.
The default setup provides details on recommended plugins.
Interfaces
Jenkins CLI download
There is a command line client (CLI) available from the Jenkins server, which can be downloaded via:
wget http://localhost:7070/jnlpJars/jenkins-cli.jar
Alias creation
It is recommended to create an alias:
alias jenkins-cli="java -jar jenkins-cli.jar -s http://localhost:7070 -auth admin:admin"
Jenkins plugins
Additional plugins can be installed via this command line client as follows:
# use green icons instead of blue for success state
jenkins-cli install-plugin "greenballs"
# new gui for viewing pipelines
jenkins-cli install-plugin "blueocean"
# various ways of displaying job dependencies
jenkins-cli install-plugin "dependency-queue-plugin"jenkins-cli install-plugin "delivery-pipeline-plugin"jenkins-cli install-plugin "display-upstream-changes"jenkins-cli install-plugin "downstream-buildview"jenkins-cli install-plugin "upstream-downstream-view"
There is support for various programming language interfaces with Jenkins:
- Python support ( https://python-jenkins.readthedocs.io/en/latest/ ):
Retrieving Jenkins version
Here is an example python script that retrieves the version of the Jenkins server. You may need to run with sudo.
#!/usr/bin/env python2.7

import jenkins

server = jenkins.Jenkins('http://localhost:7070', username='admin', password='admin')
user = server.get_whoami()
version = server.get_version()
print('Hello %s from Jenkins %s' % (user['fullName'], version))
Security
All Jenkins build jobs are executed, and owned, as the user that was used to start the Jenkins build server.
That also means that when browsing the workspaces via the Jenkins build results, the (unix) permission of that user are used, regardless of who has been logged into Jenkins, or who triggered the build.
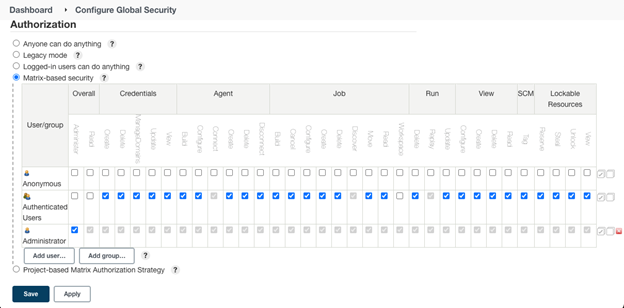
It is highly recommended to disable workspace browsing when there are any concerns regarding (unintended) access to sensitive data.
One method is via Jenkins > Manage Jenkins > Configure Global Security > Matrix-based security. Make sure to create a Jenkins admin account that still has “Overall Read” permissions, but disable that, and “Workspace” permissions for anyone else.
Recommendations
- In order to have reproducible builds, it is recommended to have static IPV resource trees.
- The user that runs the Jenkins service should have at minimum read access to the IPV tree used for the build.
- As a post-processing step properties/attributes could be attached to IPV indicating the build ID and success/fail status.
- Jenkins builds could be automatically triggered via `curl` call during a post-release hook.
- Setup a Jenkins master with zero execution slots, and add one more Jenkins slave nodes with slots to distribute the load. Master is only used for job scheduling. Slaves are used for job execution.
Freestyle project configuration
This is the central feature of Jenkins. Jenkins will build your project, combining any SCM with any build system, and this can even be used for something other than software builds.
The freestyle project configuration is a very flexible way of configuring a Jenkins build job. This configuration can be created via the web GUI provided by Jenkins.
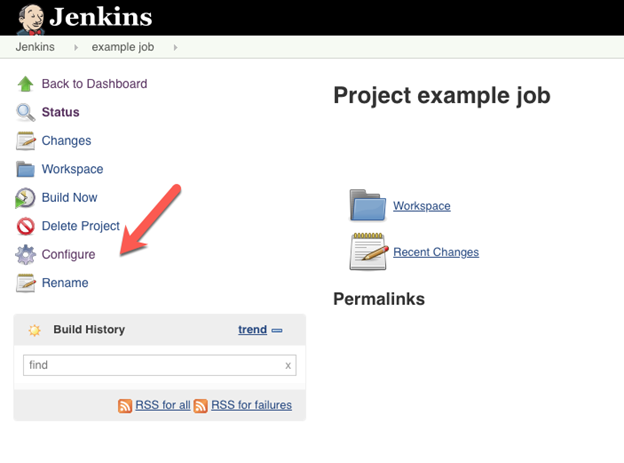
Once the job has been created, it can be accessed via “Jenkins > job name > Configure”
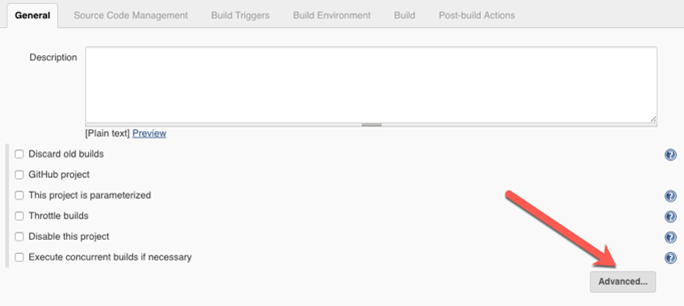
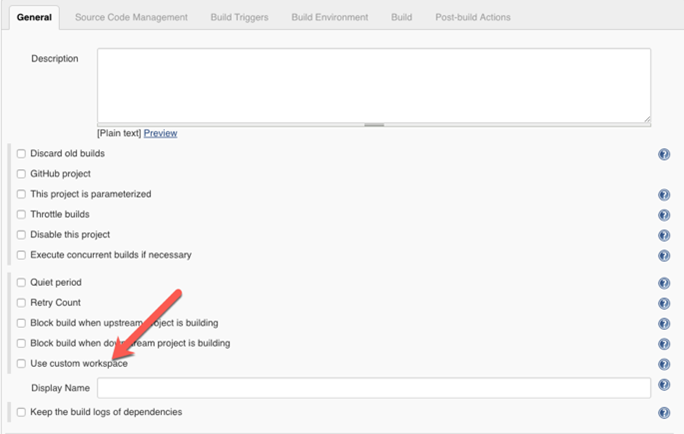
General - Use Custom Workspace [Advanced]
Each build job gets a workspace assigned, which by default is stored under the home folder of the users used to start Jenkins (for example, /home/username/workspace/job name). If this workspace should be at different location (perhaps on an NFS mount that has a larger storage capacity), it can be configured in the Advanced settings under the General section.
The ownership will remain the user that was used to start Jenkins. This workspace can be accessed via the environment variable $WORKSPACE inside build jobs.
Source code management
Build triggers
Here build jobs execution can be configured. Potential options are “Trigger builds remotely”, which enables a build to be executed via a curl call for example, or “Build periodically”, which enables a cron-like regular execution schedule.
Build Environment
One potentially interesting option here is “Delete workspace before build starts”. Depending on the amount of data that is stored in a workspace for a particular IPV, this could be a very expensive operation.
A suggestion would be that any script that generates data inside a workspace should store this in a directory that is outside of the revision-controlled data, and this data either gets archived as artifacts, or deleted at the end of the build.
By avoiding polluting the revision control data with build results, it’s possible to enable time and storage saving by using the Perforce IPLM caching features.
$WORKSPACE          # jenkins workspace
+- tutorial.padring # top IPV workspace
+- data/…           # store generated data here outside the IPV
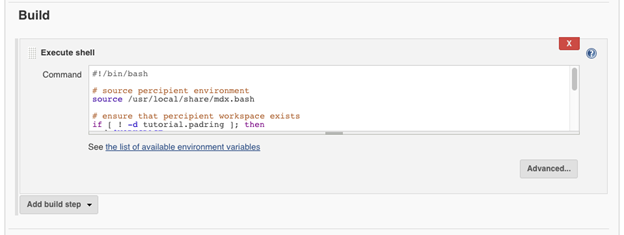
Build
Multiple build steps can be added for each Jenkins build job. For build step the “Execute shell” feature is being used.
The shell used can be configured under Jenkins > Manage Jenkins > Configure System > Shell > shell executable, and is /bin/sh by default.
A very simple example could be to source the required environment variables, use Perforce IPLM to load the project data, and execute other scripts that are related to this build.
Jenkins build
#!/bin/bash

# source Perforce IPLM environment
source /usr/share/mdx/config/mdx.bash

# ensure that Perforce IPLM workspace exists
if [ ! -d tutorial.padring ]; then
   pi ip load tutorial.padring
else
   cd "$WORKSPACE/tutorial.padring"
   pi update
fi

# run commands inside Perforce IPLM workspace
cd "$WORKSPACE/tutorial.padring"
pi ws st -v
For more complicated scripts, various settings like “This project is parameterized” under the “General” build job settings can be used to provide configurable inputs that will be passed onto a build.
Alternatively, a wrapper script could be used there that takes a few inputs and handles the rest of the execution.
Jenkins provides this feature by parsing the header line in the shell script and using this to execute in any scripting language. The arguments passed to this script are what is provided on the header line, and the rest of the script is captured in a temporary file, which is provided as last argument to the wrapper script.
This script would be stored at a predefined location and could be configured as a build-step shell executable as follows (the starting characters ‘#!’ are critical).
Jenkins build with a wrapper script
#!/path/to/wrapper/script tutorial.padring
# run commands inside Perforce IPLM workspace
cd "$WORKSPACE/tutorial.padring"
pi ws st -v
Wrapper script
#!/bin/bash
# filename of the wrapper
PROG=$(basename $0)

# first argument is IPV to load into Perforce IPLM workspace
IPV=$1

# last argument is file containing the script to be executed
SCRIPT=$2

# check if we're under a valid jenkins build job
if [ ! -d "$WORKSPACE" ]; then
   echo "$PROG: missing WORKSPACE variable set by jenkins" exit 1
fi

# source Perforce IPLM environment
source /usr/share/mdx/config/mdx.bash

# load workspace
if [ ! -d $IPV ]; then
    pi ip load $IPV
else
    cd "$WORKSPACE/$IPV"
    pi update
fi

# explicitly use language interpreter to execute it
# this will skip the header line of the script
/bin/bash $SCRIPT
When using $WORKSPACE in an Execute Shell step, it is recommended to place it into double-quotes (for example, "$WORKSPACE"). This ensures that if your path includes spaces, it will work properly. If the name of your job includes spaces, then so will your workspace.
This wrapper could be used in a compute grid environment to copy the script to a shared filer location, and then submit this script to a queue for execution. Depending on the requirements this wrapper could then wait until the submitted job has finished, or there could be a line in the submitted script to trigger another Jenkins build job to start when finished.
Post-build actions
Multiple post-build actions can be added per build job. Interesting features are “E-mail Notifications”, and potentially “Delete workspace when build is done”.
Inside the build step scripts exit codes can be used to indicate success/failure, and this can be combined with the “E-mail notifications” to send emails indicating the status of a particular build.
The “Delete workspace when build is done” could be used, but it is recommended here that the deletion of the Perforce IPLM workspace is done as the last action during the build process via “pi ws rm” instead, as deleting the entire Jenkins workspace will not remove this workspace from the Perforce IPLM database.
Pipeline project configuration
A Jenkins pipeline provides a way to automate the various build steps into Jenkins. This can be done via scripting in the groovy programming language. For more details, see https://jenkins.io/doc/book/pipeline/
Folders
Jenkins (v2) supports folders. Structure is “folder1/folder2/job”. Each folder is still registered as a job, but with a specific configuration XML file. Jobs can be created also via a configuration XML. The configuration file can be found here: ~/jobs/job_name/config.xml.
Here is an example python script to create a new folder. You may need to run it with sudo.
Create a folder
#!/usr/bin/env python2.7

import jenkins

EMPTY_FOLDER_XML = """
<?xml version='1.1' encoding='UTF-8'?>
<com.cloudbees.hudson.plugins.folder.Folder>
    <actions/>
    <description></description>
    <properties>
        <org.jenkinsci.plugins.pipeline.modeldefinition.config.FolderConfig>
	     <dockerLabel></dockerLabel>
	     <registry/>
	 </org.jenkinsci.plugins.pipeline.modeldefinition.config.FolderConfig>
    </properties>
    <folderViews class="com.cloudbees.hudson.plugins.folder.views.DefaultFolderViewHolder">
        <views>
	     <hudson.model.AllView>
                <owner class="com.cloudbees.hudson.plugins.folder.Folder" reference="../../../.."/>
		 <name>All</name>
		 <filterExecutors>false</filterExecutors>
		 <filterQueue>false</filterQueue>
		 <properties class="hudson.model.View$PropertyList"/>
            </hudson.model.AllView>
        </views>
	 <tabBar class="hudson.views.DefaultViewsTabBar"/>
    </folderViews>
    <healthMetrics/>
    <icon class="com.cloudbees.hudson.plugins.folder.icons.StockFolderIcon"/>
</com.cloudbees.hudson.plugins.folder.Folder>
"""
server = jenkins.Jenkins('http://localhost:7070', username='admin', password='admin')
server.create_job("folder name", EMPTY_FOLDER_XML.strip())
Nested folders like A/B/C/D can be created with that naming convention, but parents will need to be created before a child can be added. For IPV one suggestion might be to create a separate folder for each lib/ip/line/release/<job> structure. We switch release/line here as this would be more applicable to the directory structure (a line has releases). You could create a job for the release or create another sub-folder for releases and add multiple jobs there. When doing complex flows this might be more applicable.
Nested folders
def create_nested_folders(folders):
    folder = None
    for f in folders.split('/'):
        folder = '{}/{}'.format(folder, f) if folder else f
        try:
            server.get_job_config(folder)
        except jenkins.NotFoundException:
#           log.info('creating folder %s', folder)
            server.create_job(folder, EMPTY_FOLDER_XML.strip())
Scripted Pipelines
Jenkins support various types of jobs. Each will have its own XML configuration file. Jenkins v1 style jobs are built out of various “build steps” that can be configured via the GUI. Jenkins v2 added “pipeline” steps, which can be created in various ways: explicit steps, declarative steps, scripted steps. These are all done via the groovy programming language. See https://jenkins.io/doc/book/pipeline/ for more details on pipelines.
There are 2 types of pipeline syntax:
-
Scripted (old style)
-
Declarative (new style)
Scripted style requires more groovy knowledge, declarative is a simplified DSL syntax that is easier to use. Both use the underlying groovy language.
Scripted Pipeline offers a tremendous amount of flexibility and extensibility to Jenkins users. The Groovy learning-curve isn’t typically desirable for all members of a given team, so Declarative Pipeline was created to offer a simpler and more opinionated syntax for authoring Jenkins Pipeline.
When creating a new job typically some kind of revision control system is selected, but for now with Perforce IPLM integration this can be skipped and no SCM support will be selected.
Python example for creating a new job with shell build steps:
Create a new job with shell build steps
#!/usr/bin/env python2.7
import jenkins
import jinja2
TEMPLATE_JOB_XML = """
<?xml version='1.1' encoding='UTF-8'?>
<project>
<actions/>
<description>{{ description }}</description>
<keepDependencies>false</keepDependencies>
<properties/>
<scm class="hudson.scm.NullSCM"/>
<canRoam>true</canRoam>
<disabled>false</disabled>
<blockBuildWhenDownstreamBuilding>true</blockBuildWhenDownstreamBuilding>
<blockBuildWhenUpstreamBuilding>true</blockBuildWhenUpstreamBuilding>
{% if parents %}
<triggers>
<jenkins.triggers.ReverseBuildTrigger>
<spec></spec>
<upstreamProjects>{{ parents|join(',') }}</upstreamProjects>
<threshold>
<name>SUCCESS</name>
<ordinal>0</ordinal>
<color>BLUE</color>
<completeBuild>true</completeBuild>
</threshold>
</jenkins.triggers.ReverseBuildTrigger>
</triggers>
{% endif %}
<concurrentBuild>false</concurrentBuild>
<builders>
<hudson.tasks.Shell>
<command>echo 'hello'</command>
</hudson.tasks.Shell>
</builders>
{% if children %}
<publishers>
<hudson.tasks.BuildTrigger>
<childProjects>{{ children|join(',') }}</childProjects>
<threshold>
<name>SUCCESS</name>
<ordinal>0</ordinal>
<color>BLUE</color>
<completeBuild>true</completeBuild>
</threshold>
</hudson.tasks.BuildTrigger>
</publishers>
{% endif %}
<buildWrappers>
<hudson.plugins.timestamper.TimestamperBuildWrapper/>
</buildWrappers>
</project>
"""
template = jinja2.Environment(trim_blocks=True).from_string(TEMPLATE_JOB_XML.strip())
xml = template.render(description='new job')
server = jenkins.Jenkins('http://localhost:7070', username='admin', password='admin')
server.create_job('lib/ip/line/release/job', xml.strip())
The item between <hudson.tasks.Shell> are (bash) shell scripts.
The items between {% … %} markers are jinja2 ( http://jinja.pocoo.org/docs/2.10/ ) template markers and can be used to add upstream or downstream dependencies. Don’t define both, there’s not much point in doing that.
Pipeline configuration
Here is an example for a pipeline configuration:
#!/usr/bin/env python2.7

import jenkins
import jinja2

EMPTY_FOLDER_XML = """
<?xml version='1.1' encoding='UTF-8'?>
<com.cloudbees.hudson.plugins.folder.Folder>
	<actions/>
	<description></description>
	<properties>
		<org.jenkinsci.plugins.pipeline.modeldefinition.config.FolderConfig>
			<dockerLabel></dockerLabel>
			<registry/>
		</org.jenkinsci.plugins.pipeline.modeldefinition.config.FolderConfig>
	</properties>
	<folderViews class="com.cloudbees.hudson.plugins.folder.views.DefaultFolderViewHolder">
		<views>
			<hudson.model.AllView>
				<owner class="com.cloudbees.hudson.plugins.folder.Folder" reference="../../../.."/>
				<name>All</name>
				<filterExecutors>false</filterExecutors>
				<filterQueue>false</filterQueue>
				<properties class="hudson.model.View$PropertyList"/>
			</hudson.model.AllView>
		</views>
		<tabBar class="hudson.views.DefaultViewsTabBar"/>
	</folderViews>
	<healthMetrics/>
	<icon class="com.cloudbees.hudson.plugins.folder.icons.StockFolderIcon"/>
</com.cloudbees.hudson.plugins.folder.Folder>
"""

TEMPLATE_PIPELINE_XML = """
<?xml version='1.1' encoding='UTF-8'?>
<flow-definition>
	<actions>
		<org.jenkinsci.plugins.pipeline.modeldefinition.actions.DeclarativeJobAction/>
	</actions>
	<description>{{ description }}</description>
	<keepDependencies>false</keepDependencies>
	<properties>
		<org.jenkinsci.plugins.workflow.job.properties.DisableConcurrentBuildsJobProperty/>
	</properties>
	<definition class="org.jenkinsci.plugins.workflow.cps.CpsFlowDefinition">
		<script>#!/usr/bin/env groovy
pipeline {
agent any
stages {
	stage("Generate") {
		parallel {
			stage("streamout") {
				steps { echo "Generating GDS file" }
			}
			stage("netlist") {
				steps { echo "Generating Netlist file" }
			}
		}
	}
	stage("Validate") {
		parallel {
			stage("DRC") {
				steps { echo "Running Calibre DRC" }
			}
			stage("LVS") {
				steps { echo "Running Calibre LVS" }
			}
		}
	}
{% if resources %}
	stage("Dependencies") {
		parallel {
{% for r in resources %}
			stage("{{ r }}") {
				steps { build(job:"{{ r }}", wait:false) }
			}
{% endfor %}
		}
	}
{% endif %}
}
}
		</script>
		<sandbox>true</sandbox>
	</definition>
	<triggers/>
	<disabled>false</disabled>
</flow-definition>
"""

server = jenkins.Jenkins('http://localhost:7070', username='admin', password='admin')

def create_nested_folders(folders):
	folder = None
	for f in folders.split('/'):
		folder = '{}/{}'.format(folder, f) if folder else f
		try:
			server.get_job_config(folder)
		except jenkins.NotFoundException:
#			log.info('creating folder %s', folder)
			server.create_job(folder, EMPTY_FOLDER_XML.strip())

def create_pipeline(folder, job, xml):
	try:
		server.get_job_config(folder)
	except jenkins.NotFoundException:
		create_nested_folders(folder)
	name = '{}/{}'.format(folder, job)
	try:
		job = server.get_job_config(name)
		if job != xml:
#			log.info('updating job %s', name)
			server.reconfig_job(name, xml)
	except jenkins.NotFoundException:
#		log.info('creating job %s', name)
		server.create_job(name, xml)

template = jinja2.Environment(trim_blocks=True).from_string(TEMPLATE_PIPELINE_XML.strip())
xml = template.render(description='pipeline example')
create_pipeline('lib/ip/line/release', 'pipeline', xml.strip())
The parts between {% … %} are jinja2 template markers, and can be used to add/remove things from the template before sending it to the server.
Reuse inside groovy pipeline scripts becomes a little trickier. Shared scripts should be configured as shared libraries ( https://jenkins.io/doc/book/pipeline/shared-libraries/ ), which requires a predefined directory structure, and global configuration modifications.
Alternatively we can use the groovy load() statement, but this means we’re going from declarative pipeline style to scripted.
Pipeline configuration 2
TEMPLATE_PIPELINE_XML = """
<?xml version='1.1' encoding='UTF-8'?>
<flow-definition>
	<actions>
		<org.jenkinsci.plugins.pipeline.modeldefinition.actions.DeclarativeJobAction/>
	</actions>
	<description>{{ description }}</description>
	<keepDependencies>false</keepDependencies>
	<properties>
		<org.jenkinsci.plugins.workflow.job.properties.DisableConcurrentBuildsJobProperty/>
	</properties>
	<definition class="org.jenkinsci.plugins.workflow.cps.CpsFlowDefinition">
		<script>#!/usr/bin/env groovy
node {
	env.WORKSPACE = "{{ workspace }}"
	env.IPV = "{{ ipv }}"
	common = load "/home/jenkins/stages.groovy"
	common.stages()
{% if resources %}
	stage("Dependencies") {
		parallel(
{% for r in resources %}
		"{{ r }}": { build(job:"{{ r }}", wait:false, propagate:true) },
{% endfor %}
		)
	}
{% endif %}
}
		</script>
		<sandbox>true</sandbox>
	</definition>
	<triggers/>
	<disabled>false</disabled>
</flow-definition>
"""
Groovy code storage
The actual groovy code can be stored somewhere else:
/home/jenkins/stages.groovy
#!/usr/bin/env groovy
def stages() {
	try {
		stage("Workspace") {
			sh "/home/jenkins/build_workspace.sh ${env.IPV} ${env.WORKSPACE}"
		}
		ws(env.WORKSPACE) {
			stage("Generate") {
				parallel(
					"streamout": { sh "/home/jenkins/flow_gds_out.sh ${env.IPV} " },
					"netlist": { sh "/home/jenkins/flow_cdl_out.sh ${env.IPV} " },
				)
			}
			stage("Validate") {
				parallel(
					"DRC": { sh "/home/jenkins/flow_calibre_drc.sh ${env.IPV} " },
					"LVS": { sh "/home/jenkins/flow_calibre_lvs.sh ${env.IPV} " },
				)
			}
			currentBuild.result = 'SUCCESS'
		}
	}
	catch(Exception err) { currentBuild.result = 'FAILURE' }
	stage("Tag") {
		parallel(
			"Build URL": { sh "/home/jenkins/jenkins_tag_build.sh ${env.IPV} ${env.BUILD_URL}" },
			"Build Status": { sh "/home/jenkins/jenkins_tag_status.sh ${env.IPV} ${currentBuild.result}" }
		)
	}
	echo "RESULT: ${currentBuild.result}"
}
return this;
The “return this” as the end of the groovy script is critical.
The shell scripts executed within the pipeline are simple bash scripts.
/home/jenkins/build_workspace.sh
#!/usr/bin/env bash
ipv=$1
ws=$2
source /usr/share/mdx/config/mdx.bash
if [ ! -d $ws ]; then
    pi ip load $ipv $ws
else
    cd $ws
    pi update
fi
cd $ws
pi ws st -v
/home/jenkins/jenkins_tag_build.sh
#!/usr/bin/env bash
ipv=$1
build=$2
source /usr/share/mdx/config/mdx.bash
pi ip attr set $ipv build $build
Alternatively you could use the declarative pipeline syntax, and use the script() step to load the additional groovy code. This way it is possible to mix the declarative and scripted syntax and have best of both worlds.