Edit a branch
This page assumes that you have read Add a branch.
On this page:
Overview
Once you have created a branch, additional options become available for managing the branch further. Click on the name of the branch to expand the branch pane to view the additional options. All settings described in this section are optional.
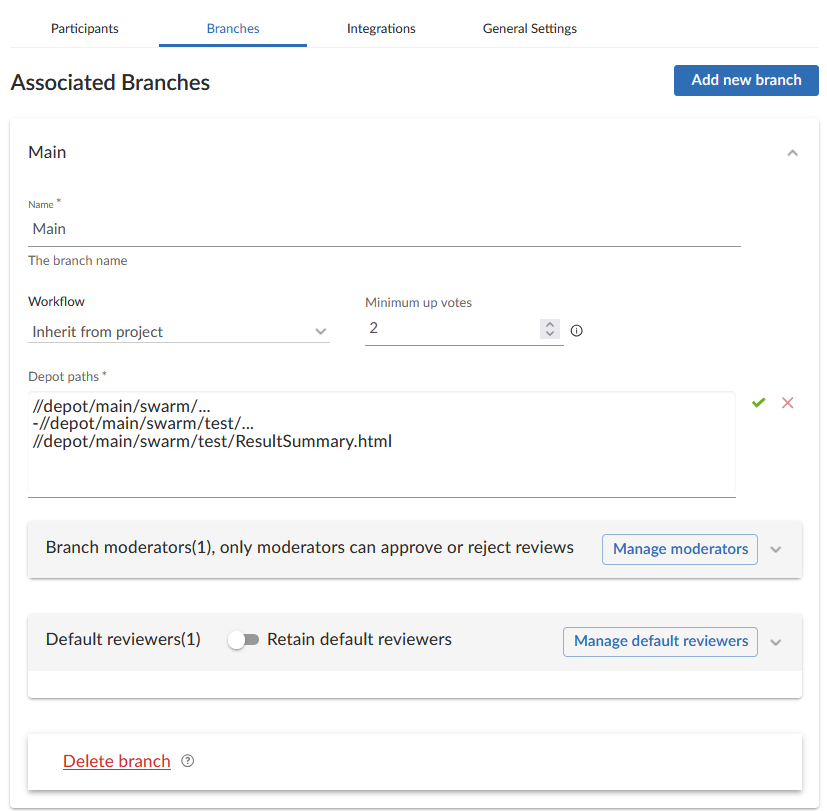
Associate a workflow for a branch
You can associate a workflow with the project branch. If you have disabled the workflow feature, this option will not be displayed.
To associate a workflow with a project branch, select one from the Workflow dropdown list, or enter the workflow name in the search field. You will only be able to see the workflows that you own or shared workflows. When a workflow is associated with a project, the workflow is used for all of the branches in that project.
To use the parent project workflow, select Inherit from project from the Workflow dropdown list. This option is select by default when you create a new branch. If the parent project is set to No workflow, the branch will use the global workflow rules. When a project branch is associated with a workflow, the workflow of the parent project is ignored and the branch workflow is used.
To remove the existing workflow without replacing it with another workflow, select No Workflow from the Workflow dropdown list. This is the default when you create a new project.
For more information about workflows and how project workflows interact with branch workflows, see Workflow basics.
Set minimum up votes
Use Minimum up votes to set the minimum number of up votes required for reviews in this branch.
A review cannot be approved until all of the Required reviewers have voted up the review and the Minimum up votes specified has been satisfied.
When this setting is defined at the project level, minimum number of up votes is automatically applied to all branches. However, if you set Minimum up votes to 1 or higher on a specific branch, that branch will use its own setting and ignore the project-level setting.
To use the project-level value, set Minimum up votes to Inherit from project. This is set by default for new branches.
To override the project setting and use a custom value for a certain branch, set Minimum up votes to 1 or higher on that branch.
Notes on minimum up votes
-
If a review includes changes across multiple projects or branches, the minimum number of up votes on each project or branch must be met before the review can be approved.
-
Required reviewers are included when counting up votes.
-
When the workflow rule Count votes up from is set to Members for a project or branch, only up votes from members belong to that project or branch will count toward the minimum up votes requirement. For more information on the Count votes up from rule, see Workflow rules.
If workflows are disabled, all votes are counted, not just votes from project members.
Troubleshooting: Commits not displayed in the top level view
The Project Commits tab can fail to show some P4 Server commits in the top level view. However, the branch views for individual project display the commits correctly.
The Project Commits tab top level client view is made up of all of the branches of the project.
For example, Project Alpha has the following branches:
Branch: QA
-
//depot/alpha/dev/QA/...
Branch: Dev
-
//depot/alpha/dev/...
-
-//depot/alpha/dev/QA/...
The Project Commits tab view displays the branches in the order they were created, going through each path from top to bottom within each branch.
For example, in the Alpha project:
-
The first path shows everything under
//depot/alpha/dev/QA/in the top-level commits view. -
The second path shows everything under
//depot/alpha/dev/in the top-level commits view. -
The third path removes (excludes) everything under
//depot/alpha/dev/QA/from the top-level commits view.
As a result, commits to //depot/alpha/dev/QA/ that should appear in the QA branch do not show up in the top-level Project Commits tab.
To avoid this problem, and ensure every branch is displayed in the top-level Project Commits tab, use a simple branch structure and plan the branch order as you create them.
In the example above, if you created the Dev branch first, and then created the QA branch, //depot/alpha/dev/QA/ would not be excluded, and the commits would show up correctly in the Project Commits tab.
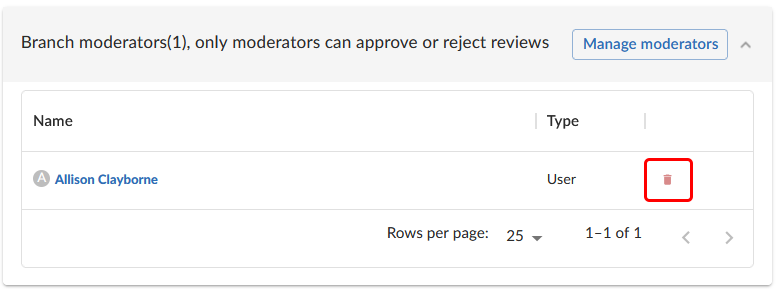
Add branch moderators
Only moderators can approve or reject reviews on the branch.
To add moderators to a branch:
-
Click the Manage moderators button.
-
Choose the Users or Groups tab.
-
If you selected Users, start typing a the name of a user. Suggested users on the P4 Server will appear automatically.
-
If you selected groups, then all of the members of that group will have the same moderator privileges for that project branch. Use this option if you wanted to add several users at once.
-
-
Click Add.
After you finish setting up the branch and save the project, reviews on this branch can only be approved or rejected by moderators.
Moderators can also transition a review to any other state. Below is a summary of branch moderator roles and review state rules.
| Role | Allowed actions | Restrictions |
|---|---|---|
|
Moderators |
Can move a review to any state. Can approve or reject reviews. Can prevent automatic approvals. |
None (unless |
|
Authors (not moderators) |
Can change state to:
Can attach committed changelists. |
Cannot approve or reject reviews. |
|
Authors (also moderators) |
Can change state to:
Can attach committed changelists. |
Cannot approve their own reviews if |
|
Project members |
Can change state to:
Can attach committed changelists. |
Cannot approve, reject, or archive reviews. |
|
Other users |
None |
Cannot change review states. |
|
All roles |
Can start a review. |
Cannot change state if it’s not in their allowed states (for example, can’t change from Rejected). |
Additional notes
-
Moderators can prevent automatic approvals. For more information about automatically approving reviews using workflow rules see Workflow rules.
-
By default, if a review spans multiple branches with different moderators, only one moderator from any branch needs to approve it. You can change this (via a global setting) to require one moderator per branch. If a moderator belongs to multiple branches, one approval counts for each. For instructions on how to configure moderator behavior, see Moderator behavior when a review spans multiple branches.
To delete a moderator, click the delete icon against their name.
Add default reviewers
You can add default reviewers in the Default reviewers pane. To add a default reviewer:
-
Click the Manage default reviewers button.
-
Choose the Users or Groups tab.
-
If you selected Users, start typing a the name of a user. Suggested users will appear automatically.
-
If you selected groups, then all of the members of the selected group will be added as a default reviewer.
You can add up to 25 users or groups combined.
-
-
Click Add.
From now on, each new review on this branch will automatically include these reviewers.
To keep default reviewers from being removed on reviews for this branch, turn on Retain default reviewers. For more information about retained default reviewers, see Retain default reviewers.

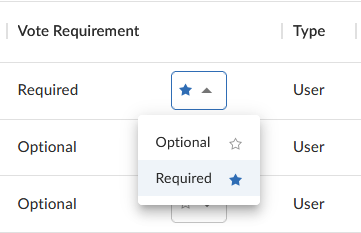
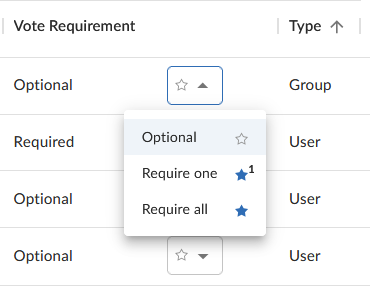
After you add default reviewers, you can control whether their votes are required or optional for approving a review. This is done using the Vote Requirement column.
For users, select on of the following vote requirements.
-
Optional - This users vote is not required to approve a review.
-
Required - This users vote is required to approve a review
For groups, select on of the following vote requirements.
-
Optional - The vote from users in this group is not required to approve a review.
-
Required one - At least one member of the group must approve the review, and no member votes down the review either.
-
Required all - All members of the group must vote up the review to approve it.
Default reviewers for reviews in multiple projects or branches:
When a review belongs to more than one project or branch:
-
The default reviewers from all the related projects and branches are combined and added to the review.
-
If a reviewer has different vote requirements in different places, the strictest setting is used.
For example:
-
In Project-A, Reviewer X is optional.
-
In Project-B, Reviewer X is optional.
-
In the project branch, Branch-b, Reviewer X is required.
As a result, Reviewer X will be added as a required reviewer on the review.
Mentioning default reviewers
If users or groups are @mentioned in a new changelist description that includes #review, they will be added to the review as reviewers. If any of these reviewers are already specified as default reviewers they will not be added to the review again, the reviewer's most restrictive reviewer option is used for the review.
To remove a user or group as a default reviewer, click the delete icon in their row of the table.