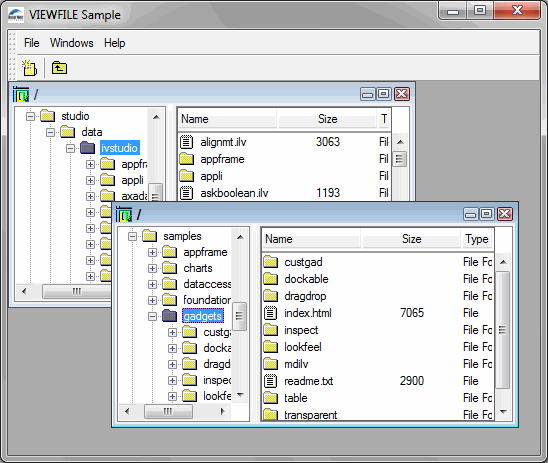
void FileViewerApplication::makePanels() { // Initialize the main window. initMainWindow(); // Initialize the desktop manager. initDesktopManager(); // Initialize the panes. initPanes(); // Initialize the application. configureApplication(); // Update the main window layout. getMainWindow()->updatePanes(IlvTrue); // Show it. getMainWindow()->show(); } |
void FileViewerApplication::initDesktopManager() { createDesktopManager(getMainWindow()-> getMainWorkspaceViewPane()->getView()); } |
IlvDesktopManager* FileViewerApplication::createDesktopManager(IlvView* view) const { return new IlvDesktopManager(view); } |
void FileViewerApplication::configureApplication() { // The desktop manager is maximized by default. getDesktopManager()-> makeMaximizedStateButtons((IlvToolBar*) ((IlvGraphicPane*)getMainWindow()-> getPane("Menu Bar", IlvTrue))->getObject()); getDesktopManager()->maximize(0); // Create a frame initialized at "/". getDesktopManager()->setCurrentFrame(createNewFrame(IlvRect(0, 0, 400, 200), "/")); } |
IlvViewFrame* FileViewerApplication::createNewFrame(const IlvRect& rect, const char* path) const { // Create a view frame in the desktop manager view. IlvViewFrame* vframe = new IlvViewFrame(getDesktopManager()->getView(), path, rect, IlvFalse); vframe->setDestroyCallback(DestroyFrame); // Create a file viewer window inside the view frame. FileViewerWindow* viewerWindow = createFileViewerWindow(vframe, rect); // Create the file viewer in the file viewer window. FileViewer* viewer = createFileViewer(viewerWindow); // Associate the viewer window with the viewer. SetFileViewer(viewerWindow, viewer); // Initialize the file viewer. viewer->init(IlvPathName(path)); return vframe; } |
void FileViewerApplication::initMenuBar() { // The menu bar is in fact an IlvToolBar. IlvToolBar* menubar = new IlvToolBar(getDisplay(), IlvPoint(0, 0)); // Add three items. menubar->addLabel("File"); menubar->addLabel("Windows"); menubar->addLabel("Help"); // Create the pane that will encapsulate the menu bar. IlvGraphicPane* menubarPane = new ApplicationMenuBarPane("Menu Bar", menubar); // Change the mode of the menu bar to make it show items on several // rows, if needed. menubar->setConstraintMode(IlvTrue); // Add the pane to the application on top of the main workspace. getMainWindow()->addRelativeDockingPane(menubarPane, IlvDockableMainWindow:: GetMainWorkspaceName(), IlvTop); // Now fill the menus with popup menus. IlvPopupMenu* menu; // Menu File:New / Separator / Exit. menu = new IlvPopupMenu(getDisplay()); menu->addLabel("New (Ctrl+N)"); menu->getItem(0)->setBitmap(getBitmap("newBm")); menu->getItem(0)->setCallback(AddNewFrame); menu->getItem(0)->setClientData(this); menu->getItem(0)->setAcceleratorText("Ctrl+N"); menu->getItem(0)->setAcceleratorKey(IlvCtrlChar('N')); menu->addItem(IlvMenuItem()); menu->addLabel("Exit"); menu->getItem(2)->setCallback(ExitApplication); menu->getItem(2)->setClientData(this); menubar->getItem(0)->setMenu(menu, IlvFalse); // Menu Windows:Cascade / Tile Horizontally / Tile Vertically. menu = new IlvPopupMenu(getDisplay()); menu->addLabel("Cascade"); menu->getItem(0)->setCallback(CascadeFrames); menu->getItem(0)->setClientData(this); menu->addLabel("Tile Horizontally"); menu->getItem(1)->setCallback(TileHorizontallyFrames); menu->getItem(1)->setClientData(this); menu->addLabel("Tile Vertically"); menu->getItem(2)->setCallback(TileVerticallyFrames); menu->getItem(2)->setClientData(this); menubar->getItem(1)->setMenu(menu, IlvFalse); // Menu Help:About. menu = new IlvPopupMenu(getDisplay()); menu->addLabel("About"); menubar->getItem(2)->setMenu(menu, IlvFalse); menu->getItem(0)->setCallback(ShowAboutPanel); menu->getItem(0)->setClientData(this); } |

static void CascadeFrames(IlvGraphic* g, IlvAny arg) { FileViewerApplication* application = (FileViewerApplication*)arg; application->getDesktopManager()->cascadeFrames(); } static void TileHorizontallyFrames(IlvGraphic* g, IlvAny arg) { FileViewerApplication* application = (FileViewerApplication*)arg; application->getDesktopManager()->tileFrames(IlvHorizontal); } static void TileVerticallyFrames(IlvGraphic* g, IlvAny arg) { FileViewerApplication* application = (FileViewerApplication*)arg; application->getDesktopManager()->tileFrames(IlvVertical); } |

void FileViewerApplication::initToolBar() { IlvToolBar* toolbar = new IlvToolBar(getDisplay(), IlvPoint(0, 0)); // Item New. toolbar->insertBitmap(getBitmap("newBm")); toolbar->getItem(0)->setCallback(AddNewFrame); toolbar->getItem(0)->setClientData(this); toolbar->getItem(0)->setToolTip("New"); // Separator. toolbar->addItem(IlvMenuItem()); // Item Up One Level. toolbar->insertBitmap(getBitmap("upBm")); toolbar->getItem(2)->setCallback(UpOneLevel); toolbar->getItem(2)->setClientData(this); toolbar->getItem(2)->setToolTip("Up One Level"); // Encapsulate the toolbar into a graphic pane. IlvGraphicPane* toolbarPane = new IlvAbstractBarPane("Toolbar", toolbar); // Add the pane to the application on top of the main workspace. getMainWindow()->addRelativeDockingPane(toolbarPane, IlvDockableMainWindow:: GetMainWorkspaceName(), IlvTop); } |
static void AddNewFrame(IlvGraphic* g, IlvAny arg) { FileViewerApplication* application = (FileViewerApplication*)arg; IlvViewFrame* vframe = application->createNewFrame(IlvRect(0, 0, 400, 200), "/"); application->getDesktopManager()->setCurrentFrame(vframe); } |
メモ: 「新規作成」アイテムは、アクセラレーター・キーに関連付けられており、Ctrl+N キーを押すと新しいフレームを作成できます。メニュー、メニュー・バーとツールバーの「アクセラレーターをメニュー・アイテムに関連付ける」を参照してください。 |
