Using Automatic Scroll Modes to Display Real-Time Data
To use automatic scroll modes to display data arriving on the fly (real-time data), do the following:
1. Define the range of the abscissa coordinate that will be displayed.
This is required because the scrolling operation is performed along the abscissa coordinate.
2. Define the range of the ordinate coordinate that will be displayed.
Although this step is not required, it is useful because it prevents the range of values represented by the ordinate scale from being constantly updated to fit the displayed data.
3. Set the scroll mode (shift mode or cycle mode) to be used.
4. Set the scroll ratio to be used.
The next section contains an example that illustrates these basic steps.
Scroll Example
The following example shows you how to display three sets of data arriving on the fly. The data sets are empty when created and are set on three polyline displayers. A data point is added to each data set at each period of a timer. The shift scroll mode is used in this example.
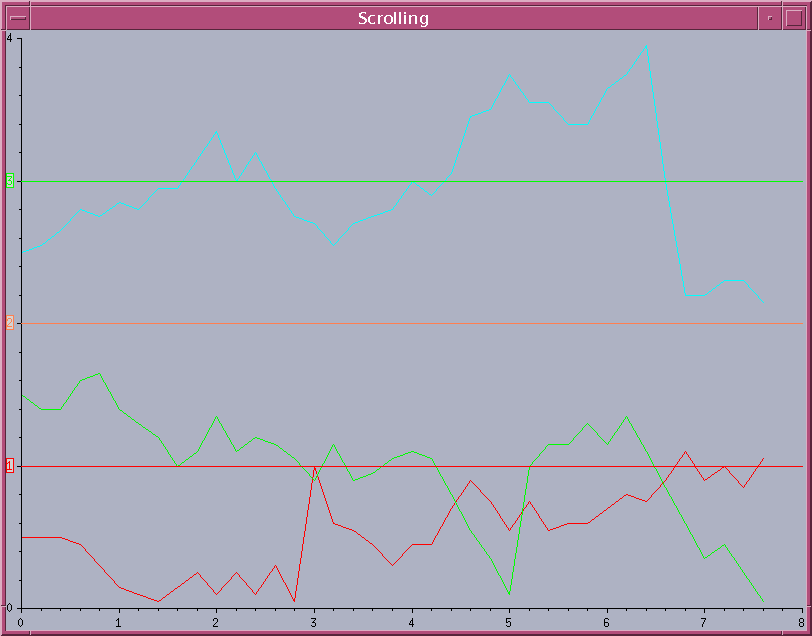
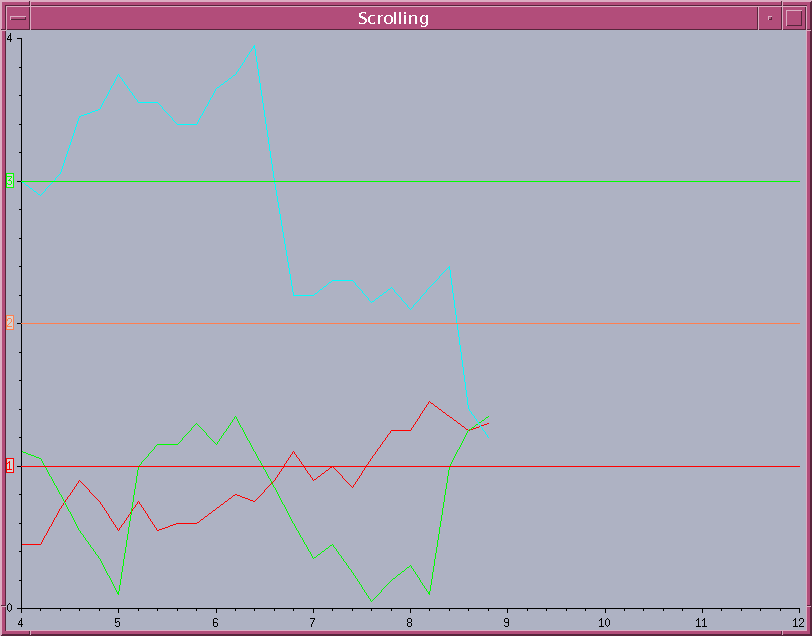
The following images show the example chart at two different periods of the timer.
Figure 12.1 shows the chart before the scrolling operation.
Figure 12.2 shows the chart after it has been scrolled. The chart shifts according to the value defined by the scroll ratio.
Figure 12.1 Chart before the Scrolling Operation in Shift Scroll Mode
Figure 12.2 Chart after Scrolling by the Scroll Ratio in Shift Scroll Mode
The complete source code for this example can be found in the scroll1.cpp file located in the $ILVHOME/samples/charts/userman/src directory. This section describes only the steps required to use the scroll modes to display data coming on the fly.
Defining the Range of the Abscissa Coordinate
The range of values that will be displayed for a given coordinate is set on the coordinate information object associated with this coordinate. To define the range of the abscissa coordinate, we can use the following code:
chart->getAbscissaInfo()->setUserDataRange(IlvCoordInterval(0,8)); |
This specified interval is the one that is displayed for the abscissa coordinate at the beginning of the data display (see
Figure 12.1). This interval will change when the chart scrolls. However, the difference between the maximum and minimum values of the displayed interval will remain the same (see
Figure 12.2).
Defining the Range of the Ordinate Coordinate
To define the range of the ordinate coordinate, we can use the following code:
chart->getOrdinateInfo()->setUserDataRange(IlvCoordInterval(MinOrd,MaxOrd)); |
Setting the Scroll Mode
For this example, we want to use the shift scroll mode. To set the scroll mode, we can use the following code:
chart->setScrollMode(IlvChartGraphic::IlvScrollModeShift); |
Setting the Scroll Ratio
We want to set the scroll ratio to 0.5. This means that half of the displayed range of the abscissa coordinate will be shifted when necessary. To set the scroll ratio, we can use the following code:
chart->setScrollRatio(.5); |
Adding the Data on the Fly
Data is added on the fly by using a method that is called at each period of a timer. This method simply adds a new data point to each defined data set. The chart will be automatically updated to reflect the addition of data points without doing anything more.
For more information on how data is automatically updated, see
Modifying Data and Updating Charts.
The method that is called at each period of the timer is the following:
static void AddPoints(IlvTimer* timer, IlAny arg) // Timer callback to add points. { IlvChartGraphic* chart = (IlvChartGraphic*)arg; IlvDisplay* display = timer->getDisplay(); IlUInt count; IlvDoublePoint previousPoint; IlvDoublePoint nextPoint; IlvChartDataSet* dataSet; // Add one point on each dataSet. for (IlUInt i = 0; i < chart->getDataSetsCount(); i++) { dataSet = chart->getDataSet(i); count = dataSet->getDataCount(); // Get the previous data point to have a smooth random creation. if (count != 0) { dataSet->getPoint(count-1, previousPoint); // Create a new data point. GeneratePoint(previousPoint, nextPoint); } else { nextPoint.x(0); nextPoint.y(i+0.5); } // Add the data point to the data set. dataSet->addPoint(nextPoint); } } |
Version 6.0
Copyright © 2015, Rogue Wave Software, Inc. All Rights Reserved.


