Looking at a View Window
Here is a simplified drawing of a Rogue Wave® Views window:
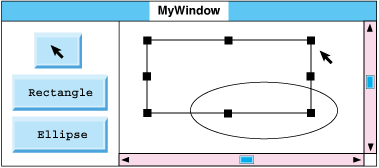
Figure 1.3 A Rogue Wave Views Window
This window contains buttons enabling you to draw rectangles and ellipses, and an arrow button to select an existing object and either move or resize it. It has a set of scroll bars for moving different parts of a larger working view into the display area.
This window is composed of four different Rogue Wave Views views:
Top-Level View: Top Window
The purpose of the top window is generally to hold various kinds of lower-level views. You rarely draw directly into a top window, but most often into one of the lower-level views that it holds.
Figure 1.4 Top Window
Views of this kind are the only views that:

Include a title bar.
Can be associated with a system menu that allows the user of your programs to intervene concerning such things as resizing or iconifying your window.
You can associate as many lower-level views as you need with the top window. The top window holds not only the title of the window but also its current size. None of the views held within the top window can extend beyond the rectangular perimeter of the top window. A corollary of this situation is that a top window can never be held within any other kind of lower-level view.
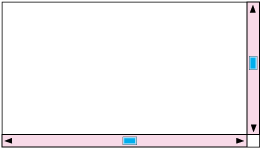
Scroll View
The scroll view is a lower-level view.The sole purpose of the scroll view is to contain a pair of scroll bars, allowing you to scroll the lower-level drawing view that is contained within the scroll view.
Figure 1.5 Scroll View
Note: This type of window is provided with the Gadgets package of Rogue Wave Views. There is a native implementation in the Foundation package, for Microsoft Windows and Motif ports only. |
Tools View
The tools view is a lower-level view that contains drawing and selection command buttons. This kind of view can store and display graphic objects as well as coordinate actions that the user can perform on these objects.
Figure 1.5 Tools View
Working View
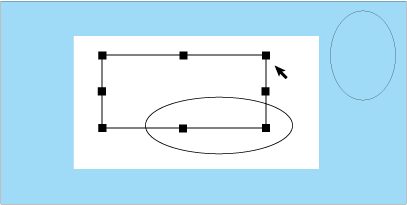
The working view is the lowest-level view. The working view is larger than the part that you see at any particular moment. In the following figure, the white rectangle in the middle of the large gray rectangle represents what you see. For example, there’s an ellipse in the top-right-hand corner of the view that is not currently visible. To see it, the user has to use the scroll bars in the higher-level scroll view.
Figure 1.6 Working View
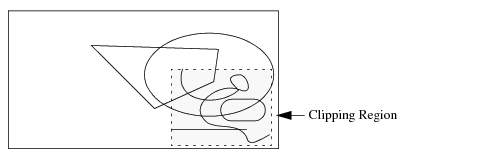
You can control the working area of change by clipping. While a clipping region is active, only changes to that region are displayed.
Figure 1.7 Clipped Area
Version 5.8
Copyright © 2014, Rogue Wave Software, Inc. All Rights Reserved.