Creating a Simple Polar Chart
You are now going to see how to create a polar chart. We will use the same data that we used for creating the Temperatures Chart in the previous section. Instead of representing the morning and afternoon mean temperatures in a Cartesian chart, we are going to represent them in a polar chart. We will follow the same
basic steps to create a polar chart as we did to create our Cartesian chart.
For our polar chart, the data sets are the same, since we want to represent the same data as in the Cartesian chart. The days of the week will still be represented along the abscissa and the temperatures along the ordinate. The data will simply be displayed differently since the abscissa values will be mapped along a circular scale and the ordinate values will be displayed radially. The displayers are also the same since we want to represent the data with the same graphical representations. We will customize the scales in the same way as we did for the Cartesian chart. However, we will show you some additional ways to customize the abscissa scale. Finally, we will also add a legend to the chart.
Figure 5.10 shows the polar chart that we will create.
Figure 5.10 Example Polar Chart
The complete source code of this example can be found in the polar.cpp file located in the $ILVHOME/samples/charts/userman/src directory.
Creating the Data Set
Once again, the first step is to create the data sets and put the data to be displayed into the data sets. Use the same data and procedures as for the Cartesian chart example. See
Creating the Data Sets.
Creating a Polar Chart
To create our polar chart, we use the following code:
IlvChartGraphic* chart = new IlvPolarChart(display, IlvRect(10, 10, 450, 300), IlTrue, 90, 270, IlTrue); |
The IlvRect object passed as a parameter corresponds to the bounding box of the created chart. The Boolean value IlvTrue that follows the IlvRect parameter indicates that grids should be added to the scales created by default. The next parameter is set to 90 degrees and indicates the starting angle at which the minimum data value will be displayed. This means that the first day of the week referenced by the index 0 will be displayed at 90 degrees on the abscissa scale. The next parameter is set to 270 degrees and indicates the angle range within which the data will be projected on the screen. The last Boolean value indicates whether the polar system of coordinates is oriented clockwise. It is set to IlvTrue, which means that the abscissa values will be displayed clockwise.
Note: The range parameter of the constructor of a polar chart must be set to the angle range within which you want the data to be projected on the screen if the abscissa values of the data are not expressed in degrees. Otherwise, the range parameter must be set to 0. |
Adding the Data Sets to the Chart Data Object
To add the data sets to the chart data object, use the same data and procedures as for the Cartesian chart example. See
Adding the Data Sets to the Chart Data Object.
Creating and Adding the Displayers
Because we want to use the same graphical representations for our data, we will use the same displayers as we used for the Cartesian chart. See
Creating and Adding the Displayers.
We have now completed the basic steps for creating a chart. We will continue with the additional steps to customize the ordinate and abscissa scales and to add a legend to the chart.
Customizing the Ordinate Scale
For the ordinate scale, we want to customize the scale as we did for the Cartesian chart. See
Customizing the Ordinate Scale.
Customizing the Abscissa Scale
We want to customize the abscissa scale as we did for the Cartesian chart. In addition, we want to change the format of the step labels along the abscissa scale and specify that the step labels should be drawn at the axes crossings for the abscissa scale.
2. Change the format of the step labels.
The format used to display the labels at the major tick marks of the abscissa scale of a polar chart is set by default to "%.2f". This displays the labels as floating values with two digits after the decimal point. Since the abscissa values are integers corresponding to the indexes of the days of the week, we want to set the step label format to "%.0f". This will display the indexes of the days in the form of integers.
abscissaScale->setStepLabelFormat("%.0f"); |
3. Display the step labels at the intersection of the axes.
By default, the flag indicating whether the step labels must be drawn where the axes intersect is set to IlvFalse for the abscissa scale of a polar chart. The label "0" for the first day of the week will not be drawn by default since the corresponding tick mark is located on the abscissa scale at the intersection of the ordinate scale. To make this label appear, the flag must be set to IlvTrue.
abscissaScale->drawLabelOnCrossings(IlTrue); |
Adding the Legend
Again, we want to add a legend to our chart. Use the same procedures as for the Cartesian chart example. See
Adding a Legend.
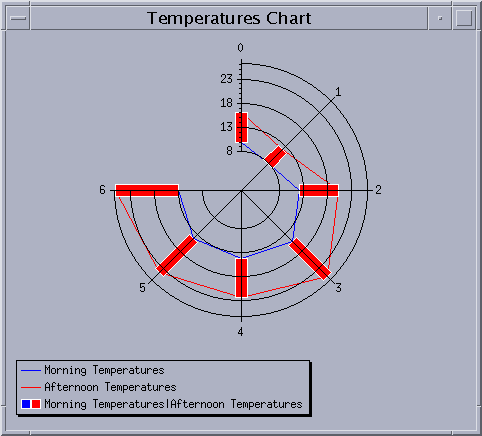
Figure 5.11 shows our finished polar chart.
Figure 5.11 The Temperatures Chart Displayed as a Polar Chart
Version 5.8
Copyright © 2014, Rogue Wave Software, Inc. All Rights Reserved.