Developing the client side
After creating the server side of your Gantt JavaScript ™ Web application, you create the client side. The Gantt JavaScript Web application support allows you to easily build a client based on JavaScript that runs on Web browsers that support JavaScript. You build an HTML Web page for the JavaScript client using predefined JavaScript™ components.

Explains the advantages of the JavaScript client and the components supplied to develop them.
Explains how to create a JavaScript client.
Describes the JavaScript component for the pop-up menu.
Developing a JavaScript client
The static nature of HTML limits the interactivity of Web pages. JavaScript™ allows you to create Web pages that are more interactive and engaging. It gives content providers new controls and allows them to manipulate the contents of HTML pages through scripting. To learn more about JavaScript, you can search for the following items on websites:
The Microsoft® Web Workshop within:
Rogue Wave® JViews Gantt provides a set of browser-independent JavaScript™ components that allow you to build your Web pages very easily.
JViews Framework common JavaScript components are located in:
<installdir>/jviews-framework/lib/thinclient/javascript
JViews Gantt JavaScript components
<installdir>/jviews-gantt/lib/thinclient/javascript/gantt
Warning JavaScript support must be enabled in your Web browser in order to run JViews GanttJavaScript Web applications
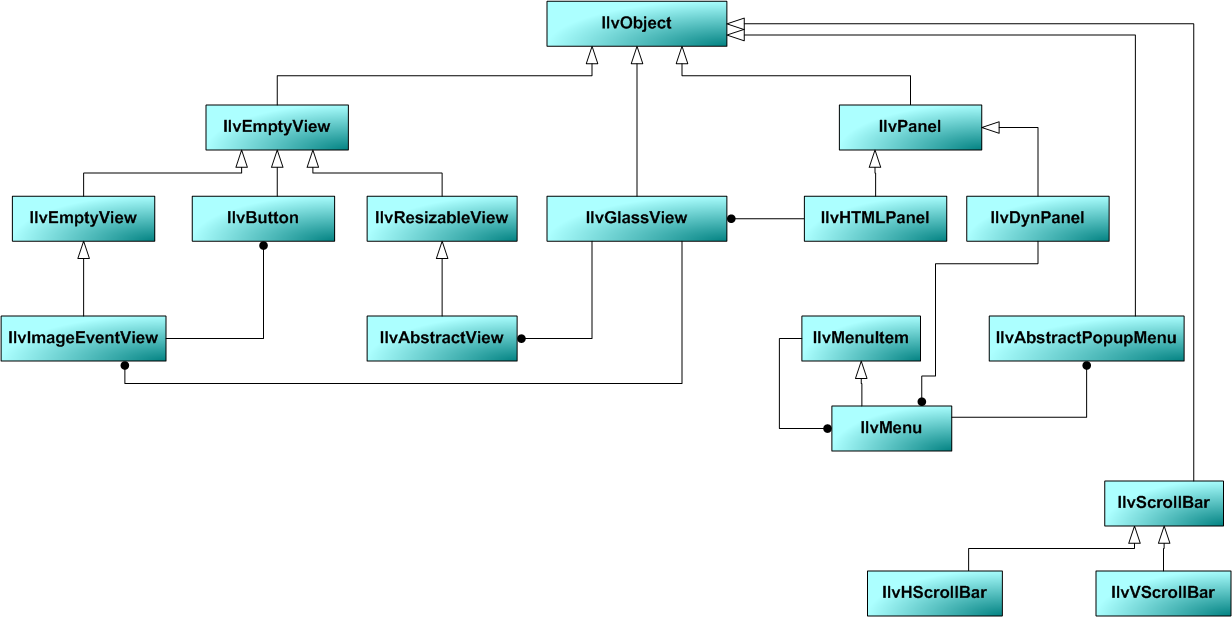
Common JavaScript components
See also The IlvView JavaScript Component in Rogue Wave JViews Framework Advanced Features.
The common JavaScript ™ components are located in the directory:
<installdir>/jviews-framework/lib/thinclient/javascript
Here is an overview of the common JavaScript component classes and their relationships:
Common JavaScript components
Here is the list of common JavaScript files and a brief description of each:
Common JavaScript files
Script File | Description |
IlvAbstractPopupMenu.js | Defines the IlvAbstractPopupMenu, IlvMenu, and IlvMenuItem classes that are the base classes of pop-up menus. |
IlvAbstractView.js | Defines the IlvAbstractView class, the base class for IlvGanttComponentView. |
IlvButton.js | Defines the IlvButton class, a simple JavaScript button. |
IlvEmptyView.js | Defines the class IlvEmptyView, the base class for all view components that have a size and position on the HTML page. |
IlvEvaluatorView.js | Defines a very simple JavaScript debugging window that can be added to your Web page. |
IlvGlassView.js | Defines the IlvGlassView class. |
IlvImageView.js | |
IlvInteractor.js | Defines the IlvInteractor class, the base class for all view interactors. |
IlvInteractorButton.js | Defines the IlvInteractorButton class, a subclass of IlvButton that can set an interactor on a view. |
IlvResizableView.js | Defines the IlvResizableView class, the base class for all view components that can be interactively resized. This is the base class for IlvGanttView. |
IlvScrollbar.js | Defines the JavaScript scroll bar classes IlvScrollbar, IlvVScrollbar, and IlvHScrollbar. |
IlvToolBar.js | Defines the IlvToolBar class, a JavaScript toolbar that can contain IlvButtons. |
IlvUtil.js | JavaScript tools and functions used by other scripts. This file must always be included. This file defines the IlvObject and IlvPanel classes. |
The full reference documentation of each component can be found in the JavaScript component reference located in:
<installdir>/jviews-framework/doc/html/refjs_fwork/index.html
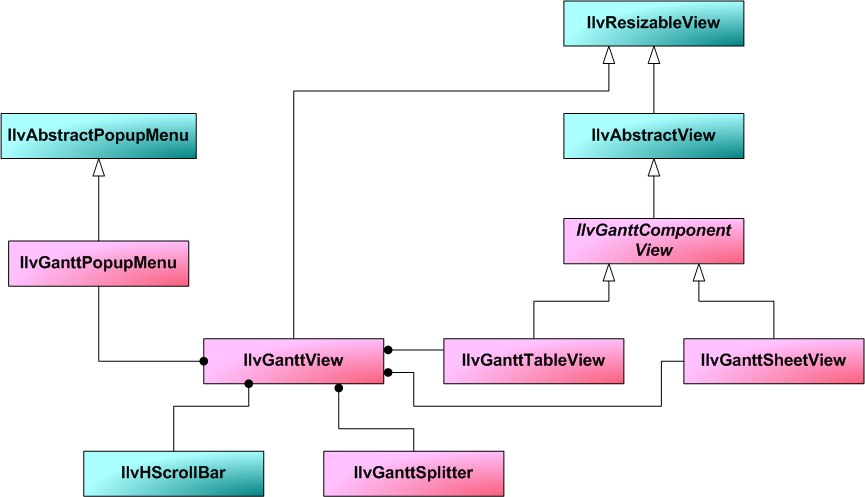
Gantt JavaScript components
The JViews Gantt JavaScript components are located in the directory:
<installdir>/jviews-gantt/lib/thinclient/javascript/gantt
Here is an overview of the Gantt JavaScript component classes and their relationships:
Gantt JavaScript components
Here is the list of JViews Gantt JavaScript files and a brief description of each:
The full reference documentation of each component can be found in the JavaScript component reference located in:
<installdir>/jviews-gantt/doc/html/refjsgantt/index.html
The JavaScript client for the Gantt Servlet example
You can now create a JavaScript ™ client for the Gantt Servlet example, starting with a very simple example and including most of the JavaScript components. The full HTML file for the Gantt Servlet example is located in:
<installdir>/jviews-gantt/samples/servlet/webpages/index.htmlThis section covers:
Directory structure of the Web application
Before you start using the Gantt JavaScript components to build the client, you must first decide on the directory structure that the users see when they visit your Web application with their browser. This structure does not, and should not, match the location of the example and JavaScript files in the Rogue Wave JViews Gantt distribution. The Gantt Servlet example is developed to use the following directory structure:
Directory structure of the JavaScript Web application
The Ant build file for the Gantt Servlet example:
<installdir>/jviews-gantt/samples/servlet/build.xml
creates this directory structure in the gantt-thinclient.war Web Archive.
The IlvGanttView JavaScript component
The
IlvGanttView component (located in the
IlvGanttView.js file) is the main Gantt JavaScript component. This component queries the servlet and displays the resulting image of the chart. The steps are as follows:
Importing the JavaScript files
First, you must include the JavaScript files that are required to use the
IlvGanttView component:
IlvUtil.js IlvEmptyView.js IlvImageView.js IlvGlassView.js IlvResizableView.js IlvAbstractView.js IlvScrollbar.js IlvGanttView.js Here is a simple HTML page that creates an
IlvGanttView object:
<HTML>
<HEAD>
<META HTTP-EQUIV="Expires" CONTENT="Mon, 01 Jan 1990 00:00:01 GMT">
<META HTTP-EQUIV="Pragma" CONTENT="no-cache">
</HEAD>
<script TYPE="text/javascript" src="script/IlvUtil.js" ></script>
<script TYPE="text/javascript" src="script/IlvEmptyView.js"></script>
<script TYPE="text/javascript" src="script/IlvImageView.js"></script>
<script TYPE="text/javascript" src="script/IlvGlassView.js"></script>
<script TYPE="text/javascript" src="script/IlvResizableView.js"></script>
<script TYPE="text/javascript" src="script/IlvAbstractView.js"></script>
<script TYPE="text/javascript" src="script/IlvScrollbar.js"></script>
<script TYPE="text/javascript" src="script/IlvGanttView.js"></script>
<script TYPE="text/javascript">
function init()
{
chartView.init();
}
function handleResize()
{
if (document.layers)
window.location.reload()
}
</script>
<body onload="init()" onunload=”IlvObject.callDispose()”
onresize="handleResize()" bgcolor="#ffffff">
<script TYPE="text/javascript">
// The Gantt chart servlet.
var servletName = "/gantt/GanttChartServlet";
// Position of the Gantt chart.
var chartX = 25;
var chartY = 25;
var chartH = 350;
var chartW = 700;
var chartView = new IlvGanttView(chartX, chartY, chartW, chartH);
chartView.setServletURL(servletName);
chartView.toHTML();
</script>
</body>
</html>
The example starts with importing the necessary JavaScript files:
<script TYPE="text/javascript" src="script/IlvUtil.js" ></script>
<script TYPE="text/javascript" src="script/IlvEmptyView.js"></script>
<script TYPE="text/javascript" src="script/IlvImageView.js"></script>
<script TYPE="text/javascript" src="script/IlvGlassView.js"></script>
<script TYPE="text/javascript" src="script/IlvResizableView.js"></script>
<script TYPE="text/javascript" src="script/IlvAbstractView.js"></script>
<script TYPE="text/javascript" src="script/IlvScrollbar.js"></script>
<script TYPE="text/javascript" src="script/IlvGanttView.js"></script>
The JavaScript files must be placed in the head of the page. Note that the scripts are included from the relative
script subdirectory. Remember that when you build the JavaScript Web application, the HTML Web pages are placed in the upper directory and the scripts are in the
script directory (see
Gantt JavaScript components).
Creating the Gantt View
In the body of the page, you create an
IlvGanttView located in (25, 25) on the HTML page. The size is 350 x 700. This view displays images produced by the servlet
GanttChartServlet. Note the
toHTML method that creates the HTML necessary for the component.
Defining JavaScript functions
This example also defines two JavaScript functions:
The
init function, called on the
onload event of the page, initializes the
IlvGanttView by calling its
init method.
The
handleResize function, called on the
onresize event of the page, reloads the page when the Web browser is resized.
NOTE The global callDispose() function must be called in the onunload event of the HTML page. This function disposes of all the resources acquired by the JavaScript components.
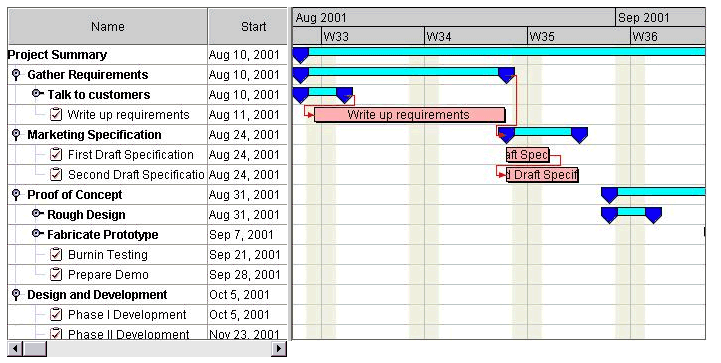
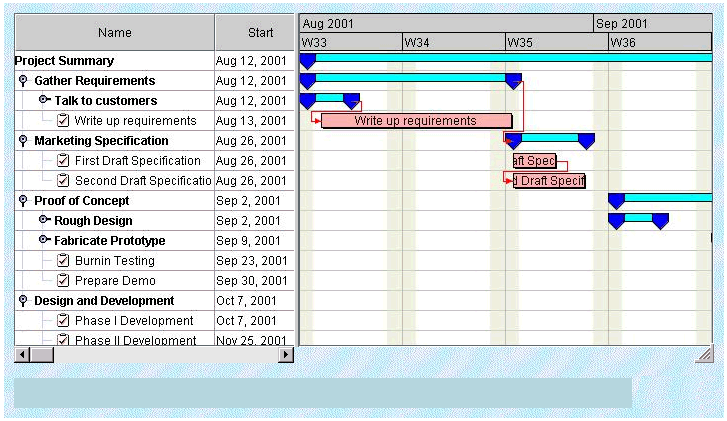
Once the image is loaded from the server, the page looks like this:
The message panel
You can now add a JavaScript panel below our main view. A JavaScript panel is an area of the page that can contain some HTML content. You can use the JavaScript panel to display status messages as the user interacts with the
JViews Gantt view. You create the message panel using the class
IlvHTMLPanel, defined in the
IlvUtil.js file.
The body of the page is now:
<body onload="init()" onunload="IlvObject.callDispose()"
onresize="handleResize()" bgcolor="#ffffff">
<script TYPE="text/javascript">
// The Gantt chart servlet.
var servletName = "/gantt/GanttChartServlet";
// Position of the Gantt chart.
var chartX = 25;
var chartY = 25;
var chartH = 350;
var chartW = 700;
var chartView = new IlvGanttView(chartX, chartY, chartW, chartH);
chartView.setServletURL(servletName);
chartView.toHTML();
var messagePanel = new IlvHTMLPanel('');
messagePanel.setBackgroundColor('#B6D5DA');
messagePanel.setVisible(true);
chartView.setMessagePanel(messagePanel);
var layoutPage = function(chart) {
messagePanel.setBounds(chart.getLeft(),
chart.getTop() + chart.getHeight() + 15,
chart.getWidth(),
45);
}
layoutPage(chartView);
chartView.addSizeListener(layoutPage);
</script>
</body>
Note that the class
IlvHTMLPanel does not have a
toHTML method, it generates its HTML content immediately from within its constructor. Also, the
IlvHTMLPanel is initially hidden. You must explicitly call its
setVisible method to show it on the page. These are the main differences between the JavaScript “view” components and the JavaScript “panel” components.
In this example, the main Gantt view is made interactively resizable. To this effect, there is a layoutPage function that positions the message panel relative to the current size and position of the main Gantt view:
var layoutPage = function(chart) {
messagePanel.setBounds(chart.getLeft(),
chart.getTop() + chart.getHeight() + 15,
chart.getWidth(),
45);
}
The layoutPage function is then called to perform the initial arrangement of the components:
layoutPage(chartView);
The method
addSizeListener is called to listen for resize events on
layoutPage from the
IlvGanttView:
chartView.addSizeListener(layoutPage);
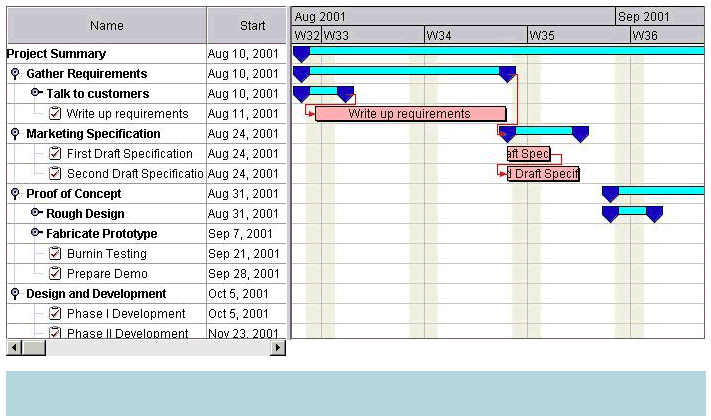
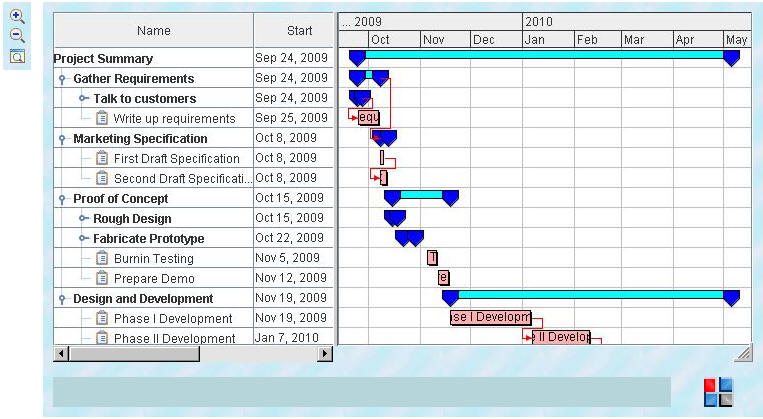
The Web page now looks like this:
Interactively resizing the Gantt view
You can now make the main Gantt view interactively resizable by calling the setResizable method:
var chartView = new IlvGanttView(chartX, chartY, chartW, chartH);
chartView.setServletURL(servletName);
chartView.setResizable(true);
chartView.toHTML();
Our
IlvGanttView now displays a resize tool at its lower right corner:
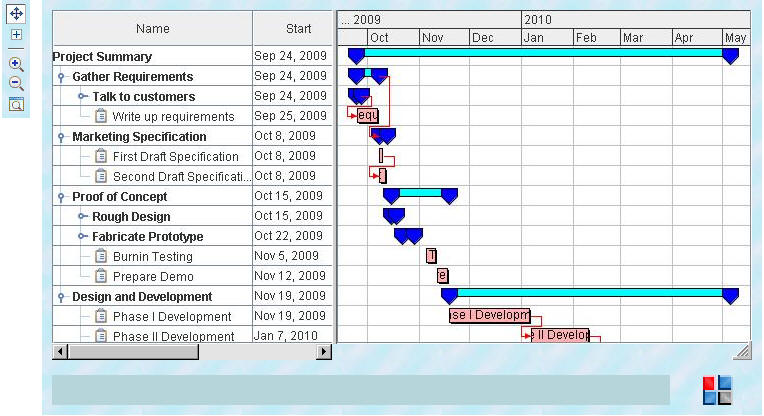
You can now click and drag on the tool to interactively resize the Gantt view. When the resize operation completes, the layoutPage method is invoked, and the position of the message panel is updated to match that of the main view.
Decorative panels
Next, you can add some decorative panels around our main Gantt view to improve the appearance of the Web page. You
IlvHTMLPanel use to display a tiled image pattern as a background frame:
var backgroundPanel = new IlvHTMLPanel('');
backgroundPanel.setBackgroundImage(ilvImagePath + 'skybg.jpg');
backgroundPanel.setBackgroundColor('#909090');
backgroundPanel.setVisible(true);
The background panel must be created before the
IlvGanttView.toHTML method is invoked. JavaScript components have an implied z-order in the browser that is determined by the order in which their HTML code is created in the page body. The
IlvHTMLPanel component creates its HTML code in its constructor and the
IlvGanttView component creates its HTML code in its
toHTML method. By placing the background panel before the Gantt view in the page body, you ensure that the panel appears behind the Gantt view.
The ilvImagePath variable, used to define the tiled image for the background panel, is a global variable defined in IlvUtil.js. It contains the path to the images used by the script files. Its default value is script/images, which is the location of the image files relative to the Web pages in the Web application.
You can also add a small company logo to display on the right side of the message panel. You use an
IlvImageView component instead of an
IlvHTMLPanel because you do not want to tile the logo image:
var logoPanel = new IlvImageView(0, 0, 67, 30,
ilvImagePath+'ilog-small.gif');
logoPanel.toHTML();
The
IlvImageView component has the additional advantage of remaining hidden until its image is loaded. This is important for a nice appearance when the images take some time to download from the server due to image size or network latencies. Normally, if an image has not been loaded from the server yet, the browser displays a box with a red “X” in it:
The
IlvImageView component avoids this effect and remains invisible until the image is available to display.
Finally, you must update the layoutPage method to properly arrange the new panels:
var layoutPage = function(chart) {
messagePanel.setBounds(chart.getLeft(),
chart.getTop()+chart.getHeight()+15,
chart.getWidth()-logoPanel.getWidth()-15,
logoPanel.getHeight());
backgroundPanel.setBounds(chart.getLeft() - 10,
chart.getTop() - 10,
chart.getWidth()+ 20,
messagePanel.getTop() +
messagePanel.getHeight() + 20 -
chart.getTop());
logoPanel.setLocation(messagePanel.getLeft() +
messagePanel.getWidth() + 15,
messagePanel.getTop());
}
The body of the HTML file now looks like this:
<body onload="init()" onunload="IlvObject.callDispose()"
onresize="handleResize()" bgcolor="#ffffff">
<script TYPE="text/javascript">
// The Gantt chart servlet
var servletName = "/gantt/GanttChartServlet";
// Position of the Gantt chart.
var chartX = 25;
var chartY = 25;
var chartH = 350;
var chartW = 700;
var backgroundPanel = new IlvHTMLPanel('');
backgroundPanel.setBackgroundImage(ilvImagePath + 'skybg.jpg');
backgroundPanel.setBackgroundColor('#909090');
backgroundPanel.setVisible(true);
var chartView = new IlvGanttView(chartX, chartY, chartW, chartH);
chartView.setServletURL(servletName);
chartView.setResizable(true);
chartView.toHTML();
var messagePanel = new IlvHTMLPanel('');
messagePanel.setBackgroundColor('#B6D5DA');
messagePanel.setVisible(true);
chartView.setMessagePanel(messagePanel);
var logoPanel = new IlvImageView(0, 0, 67, 30, ilvImagePath+'ilog-small.gif');
logoPanel.toHTML();
var layoutPage = function(chart) {
messagePanel.setBounds(chart.getLeft(),
chart.getTop() + chart.getHeight() + 15,
chart.getWidth() - logoPanel.getWidth() - 15,
logoPanel.getHeight());
backgroundPanel.setBounds(chart.getLeft() - 10,
chart.getTop() - 10,
chart.getWidth()+ 20,
messagePanel.getTop() +
messagePanel.getHeight() + 20 -
chart.getTop());
logoPanel.setLocation(messagePanel.getLeft()+messagePanel.getWidth()+15,
messagePanel.getTop());
}
layoutPage(chartView);
chartView.addSizeListener(layoutPage);
</script>
</body>
You should now see the following Web page:
IlvToolBar and IlvButton
The
IlvButton class is a simple JavaScript button component that allows you to call some JavaScript code when the user clicks it. The
IlvToolBar class is a component that you can use to arrange
IlvButtons vertically or horizontally. You can now add some buttons to the page to zoom in and out on the chart. The steps are as follows:
Importing the JavaScript files
First, you must include the JavaScript files that define the
IlvButton and
IlvToolBar classes. The JavaScript import statements now look like this:
<script TYPE="text/javascript" src="script/IlvUtil.js" ></script>
<script TYPE="text/javascript" src="script/IlvEmptyView.js"></script>
<script TYPE="text/javascript" src="script/IlvImageView.js"></script>
<script TYPE="text/javascript" src="script/IlvGlassView.js"></script>
<script TYPE="text/javascript" src="script/IlvResizableView.js"></script>
<script TYPE="text/javascript" src="script/IlvAbstractView.js"></script>
<script TYPE="text/javascript" src="script/IlvScrollbar.js"></script>
<script TYPE="text/javascript" src="script/IlvGanttView.js"></script>
<script TYPE="text/javascript" src="script/IlvButton.js"></script>
<script TYPE="text/javascript" src="script/IlvToolBar.js"></script>
Creating the toolbar
In the page body, you first create the vertical toolbar and give it the same background image as the main background panel:
var backgroundPattern = ilvImagePath + 'skybg.jpg';
var toolbar = new IlvToolBar(0, 0);
toolbar.setOrientation(IlvToolBar.VERTICAL);
toolbar.setBackgroundColor('#53537A');
toolbar.setBackgroundImage(backgroundPattern);
Notice that the initial position of the toolbar is set to (0, 0) and its toHTML function is not called until the layoutPage function has calculated the correct position of the toolbar and generated its HTML code. This approach makes the page more maintainable by encapsulating all the component positioning into the layoutPage function and eliminates complex initial position calculations when you create each component.
Creating buttons
Next, you create three buttons and add them to the toolbar. Each button is defined by its position, size, three images, and a piece of JavaScript to be executed when the button is clicked. The actual positioning of each button is controlled by the toolbar it is contained in, so you simply set the initial position of each button to (0, 0). The three images used by the button are:
The main image specified in the
IlvButton constructor. This is the image used when the mouse is not over the button and the button is not selected.
The rollover image is used when the mouse is over the button, but the button is not selected.
The selected image is used when the mouse button is pressed on the button.
The code to create the three zoom buttons is:
// Create the Zoom-In toolbar button.
var zoomInAction = function() {
chartView.zoomIn();
};
var zoomInButton = new IlvButton(0, 0, 20, 20,
ilvImagePath+'zoomin-up.gif',
zoomInAction);
zoomInButton.setRolloverImage(ilvImagePath+'zoomin-sel.gif');
zoomInButton.setSelectedImage(ilvImagePath+'zoomin-dn.gif');
zoomInButton.setToolTipText("Zoom In");
zoomInButton.setMessage("Press to zoom in");
zoomInButton.setMessagePanel(messagePanel);
toolbar.addButton(zoomInButton);
// Create the Zoom-Out toolbar button.
var zoomOutAction = function() {
chartView.zoomOut();
};
var zoomOutButton = new IlvButton(0, 0, 20, 20,
ilvImagePath+'zoomout-up.gif',
zoomOutAction);
zoomOutButton.setRolloverImage(ilvImagePath+'zoomout-sel.gif');
zoomOutButton.setSelectedImage(ilvImagePath+'zoomout-dn.gif');
zoomOutButton.setToolTipText("Zoom Out");
zoomOutButton.setMessage("Press to zoom out");
zoomOutButton.setMessagePanel(messagePanel);
toolbar.addButton(zoomOutButton);
// Create the Zoom-To-Fit toolbar button.
var zoomFitAction = function() {
chartView.zoomToFit();
};
var zoomFitButton = new IlvButton(0, 0, 20, 20,
ilvImagePath+'zoomfit-up.gif',
zoomFitAction);
zoomFitButton.setRolloverImage(ilvImagePath+'zoomfit-sel.gif');
zoomFitButton.setSelectedImage(ilvImagePath+'zoomfit-dn.gif');
zoomFitButton.setToolTipText("Zoom To Fit");
zoomFitButton.setMessage("Press to zoom to fit");
zoomFitButton.setMessagePanel(messagePanel);
toolbar.addButton(zoomFitButton);
The
zoomInButton simply calls the
zoomIn method of the
IlvGanttView, the
zoomOutButton calls the
zoomOut method, and the
zoomFitButton calls the
zoomToFit method. Each button also has a
message property. The message is automatically displayed in the status window of the browser when the mouse is over the button. The message can also be displayed in an
IlvHTMLPanel positioned on the page. This is accomplished by setting the
messagePanel property of the buttons.
Updating the layoutPage function
Finally, you must update the layoutPage function to arrange the toolbar on the page and generate the HTML code for the toolbar:
var layoutPage = function(chart) {
messagePanel.setBounds(chart.getLeft(),
chart.getTop()+chart.getHeight()+15,
chart.getWidth()- logoPanel.getWidth()-15,
logoPanel.getHeight());
backgroundPanel.setBounds(chart.getLeft() - 10,
chart.getTop() - 10,
chart.getWidth()+ 20,
messagePanel.getTop()
+ messagePanel.getHeight()
+ 20
- chart.getTop());
logoPanel.setLocation(messagePanel.getLeft()
+ messagePanel.getWidth()
+ 15,
messagePanel.getTop());
toolbar.setLocation(backgroundPanel.getLeft()
+ backgroundPanel.getWidth()
+ 15,
backgroundPanel.getTop());
}
layoutPage(chartView);
chartView.addSizeListener(layoutPage);
toolbar.toHTML();
The complete body of the page is now:
<body onload="init()" onunload=”IlvObject.callDispose()”
onresize="handleResize()" bgcolor="#ffffff">
<script TYPE="text/javascript">
// The Gantt chart servlet.
var servletName = "/gantt/GanttChartServlet";
// The background image.
var backgroundPattern = ilvImagePath + 'skybg.jpg';
// Position of the Gantt chart.
var chartX = 25;
var chartY = 25;
var chartH = 350;
var chartW = 700;
var backgroundPanel = new IlvHTMLPanel('');
backgroundPanel.setBackgroundImage(backgroundPattern);
backgroundPanel.setBackgroundColor('#909090');
backgroundPanel.setVisible(true);
var chartView = new IlvGanttView(chartX, chartY, chartW, chartH);
chartView.setServletURL(servletName);
chartView.setResizable(true);
chartView.toHTML();
var messagePanel = new IlvHTMLPanel('');
messagePanel.setBackgroundColor('#B6D5DA');
messagePanel.setVisible(true);
chartView.setMessagePanel(messagePanel);
var logoPanel = new IlvImageView(0, 0, 67, 30,
ilvImagePath+'ilog-small.gif');
logoPanel.toHTML();
var toolbar = new IlvToolBar(0, 0);
toolbar.setOrientation(IlvToolBar.VERTICAL);
toolbar.setBackgroundColor('#53537A');
toolbar.setBackgroundImage(backgroundPattern);
// Create the Zoom-In toolbar button.
var zoomInAction = function() {
chartView.zoomIn();
};
var zoomInButton = new IlvButton(0, 0, 20, 20,
ilvImagePath+'zoomin-up.gif',
zoomInAction);
zoomInButton.setRolloverImage(ilvImagePath+'zoomin-sel.gif');
zoomInButton.setSelectedImage(ilvImagePath+'zoomin-dn.gif');
zoomInButton.setToolTipText("Zoom In");
zoomInButton.setMessage("Press to zoom in");
zoomInButton.setMessagePanel(messagePanel);
toolbar.addButton(zoomInButton);
// Create the Zoom-Out toolbar button.
var zoomOutAction = function() {
chartView.zoomOut();
};
var zoomOutButton = new IlvButton(0, 0, 20, 20,
ilvImagePath+'zoomout-up.gif',
zoomOutAction);
zoomOutButton.setRolloverImage(ilvImagePath+'zoomout-sel.gif');
zoomOutButton.setSelectedImage(ilvImagePath+'zoomout-dn.gif');
zoomOutButton.setToolTipText("Zoom Out");
zoomOutButton.setMessage("Press to zoom out");
zoomOutButton.setMessagePanel(messagePanel);
toolbar.addButton(zoomOutButton);
// Create the Zoom-To-Fit toolbar button.
var zoomFitAction = function() {
chartView.zoomToFit();
};
var zoomFitButton = new IlvButton(0, 0, 20, 20,
ilvImagePath+'zoomfit-up.gif',
zoomFitAction);
zoomFitButton.setRolloverImage(ilvImagePath+'zoomfit-sel.gif');
zoomFitButton.setSelectedImage(ilvImagePath+'zoomfit-dn.gif');
zoomFitButton.setToolTipText("Zoom To Fit");
zoomFitButton.setMessage("Press to zoom to fit");
zoomFitButton.setMessagePanel(messagePanel);
toolbar.addButton(zoomFitButton);
var layoutPage = function(chart) {
messagePanel.setBounds(chart.getLeft(),
chart.getTop()+chart.getHeight()+15,
chart.getWidth()- logoPanel.getWidth()-15,
logoPanel.getHeight());
backgroundPanel.setBounds(chart.getLeft() - 10,
chart.getTop() - 10,
chart.getWidth()+ 20,
messagePanel.getTop()
+ messagePanel.getHeight()
+ 20
- chart.getTop());
logoPanel.setLocation(messagePanel.getLeft()
+ messagePanel.getWidth()
+ 15,
messagePanel.getTop());
toolbar.setLocation(backgroundPanel.getLeft()
+ backgroundPanel.getWidth()
+ 15,
backgroundPanel.getTop());
}
layoutPage(chartView);
chartView.addSizeListener(layoutPage);
toolbar.toHTML();
</script>
</body>
The page now looks like this with our new vertical toolbar:
IlvGanttSheetScrollInteractor
Until now, you have added components and buttons to the page. You can now add an interactor that allows direct interaction with the image. The
IlvGanttSheetScrollInteractor allows the user to interactively scroll and pan the image of the Gantt sheet. The
IlvGanttView component is composed of two child views: an
IlvGanttTableView that displays the image of the table on the left side of the splitter, and an
IlvGanttSheetView that displays the image of the Gantt sheet on the right side of the splitter. This is shown in
Gantt JavaScript components. You set interactors separately on the Gantt table and sheet views. The code to create an
IlvGanttSheetScrollInteractor and set it on the
IlvGanttSheetView is very simple:
var sheetView = chartView.getSheetView();
var sheetScrollInteractor = new IlvGanttSheetScrollInteractor();
sheetView.setInteractor(sheetScrollInteractor);
In order to use the
IlvGanttSheetScrollInteractor class, you must include the JavaScript files that define the class and its base class,
IlvInteractor:
<script TYPE="text/javascript" src="script/IlvInteractor.js"></script>
<script TYPE="text/javascript"
src="script/IlvGanttSheetScrollInteractor.js"></script>
IlvRowExpandCollapseInteractor
The
IlvRowExpandCollapseInteractor can be set on both an
IlvGanttTableView and an
IlvGanttSheetView. It allows the user to click rows in the image to expand and collapse them. You can set the interactor on the Gantt table view. The steps are as follows:
1. Include the JavaScript file that defines the class:
<script TYPE="text/javascript"
src="script/IlvRowExpandCollapseInteractor.js"></script>
var tableView = chartView.getTableView();
var tableToggleRowInteractor =
new IlvRowExpandCollapseInteractor('toggleRow');
tableView.setInteractor(tableToggleRowInteractor);
The string ‘toggleRow’ refers to a named action on the server side that this interactor invokes. On the server side, this action is registered with the servlet support object in the file:
in the createServletSupport method:
protected IlvGanttServletSupport createServletSupport()
{
IlvGanttServletSupport support = new ServletSupport();
support.addServerAction("toggleRow", new IlvRowExpandCollapseAction());
return support;
}
These types of interactors and how to use them are described in detail in
Adding client/server interactions.
IlvInteractorButton
The
IlvInteractorButton class is a subclass of
IlvButton that installs an interactor on a view. If multiple interactor buttons are defined for the same view, they behave like radio buttons. When an interactor button is pressed, it installs its interactor and remains pressed until another button installs a different interactor.
In this example, you can define an
IlvRowExpandCollapseInteractor for the Gantt sheet view. You can then add two interactor buttons to the toolbar that toggle between the scroll interactor and the new row interactor. The steps are as follows:
<script TYPE="text/javascript" src="script/IlvInteractorButton.js"></
script>
2. Create the new interactor for the Gantt sheet view:
var sheetView = chartView.getSheetView();
var sheetScrollInteractor = new IlvGanttSheetScrollInteractor();
sheetView.setInteractor(sheetScrollInteractor);
var sheetToggleRowInteractor =
new IlvRowExpandCollapseInteractor('toggleRow');
3. Create the interactor buttons and add them to the toolbar:
// Create the scroll toolbar button for the Gantt sheet.
var sheetPanButton =
new IlvInteractorButton(0, 0, 20, 20,
ilvImagePath+'move-up.gif',
sheetScrollInteractor,
sheetView);
sheetPanButton.setRolloverImage(ilvImagePath+'move-sel.gif');
sheetPanButton.setSelectedImage(ilvImagePath+'move-dn.gif');
sheetPanButton.setToolTipText("Pan Gantt Sheet");
sheetPanButton.setMessage("Scroll and pan the Gantt sheet");
sheetPanButton.setMessagePanel(messagePanel);
toolbar.addButton(sheetPanButton);
// Create the toggle row toolbar button for the Gantt sheet.
var sheetToggleRowButton =
new IlvInteractorButton(0, 0, 20, 20,
ilvImagePath+'bluearrow-plusminus-up.gif',
sheetToggleRowInteractor,
sheetView);
sheetToggleRowButton.setRolloverImage(ilvImagePath+'bluearrow-
plusminus-sel.gif');
sheetToggleRowButton.setSelectedImage(ilvImagePath+'bluearrow-
plusminus-dn.gif');
sheetToggleRowButton.setToolTipText("Expand/Collapse Gantt Sheet Rows");
sheetToggleRowButton.setMessage("Expand/collapse rows in the Gantt sheet");
sheetToggleRowButton.setMessagePanel(messagePanel);
toolbar.addButton(sheetToggleRowButton);
The body of the page is now:
<body onload="init()" onunload="IlvObject.callDispose()"
onresize="handleResize()" bgcolor="#ffffff">
<script TYPE="text/javascript">
// The Gantt chart servlet.
var servletName = "/gantt/GanttChartServlet";
// The background image.
var backgroundPattern = ilvImagePath + 'skybg.jpg';
// Position of the Gantt chart.
var chartX = 25;
var chartY = 25;
var chartH = 350;
var chartW = 700;
var backgroundPanel = new IlvHTMLPanel('');
backgroundPanel.setBackgroundImage(backgroundPattern);
backgroundPanel.setBackgroundColor('#909090');
backgroundPanel.setVisible(true);
var chartView = new IlvGanttView(chartX, chartY, chartW, chartH);
chartView.setServletURL(servletName);
chartView.setResizable(true);
chartView.toHTML();
var sheetView = chartView.getSheetView();
var sheetScrollInteractor = new IlvGanttSheetScrollInteractor();
sheetView.setInteractor(sheetScrollInteractor);
var sheetToggleRowInteractor =
new IlvRowExpandCollapseInteractor('toggleRow');
var tableView = chartView.getTableView();
var tableToggleRowInteractor =
new IlvRowExpandCollapseInteractor('toggleRow');
tableView.setInteractor(tableToggleRowInteractor);
var messagePanel = new IlvHTMLPanel('');
messagePanel.setBackgroundColor('#B6D5DA');
messagePanel.setVisible(true);
chartView.setMessagePanel(messagePanel);
var logoPanel = new IlvImageView(0, 0, 67, 30,
ilvImagePath+'ilog-small.gif');
logoPanel.toHTML();
var toolbar = new IlvToolBar(0, 0);
toolbar.setOrientation(IlvToolBar.VERTICAL);
toolbar.setBackgroundColor('#53537A');
toolbar.setBackgroundImage(backgroundPattern);
// Create the scroll toolbar button for the Gantt sheet.
var sheetPanButton =
new IlvInteractorButton(0, 0, 20, 20,
ilvImagePath+'move-up.gif',
sheetScrollInteractor,
sheetView);
sheetPanButton.setRolloverImage(ilvImagePath+'move-sel.gif');
sheetPanButton.setSelectedImage(ilvImagePath+'move-dn.gif');
sheetPanButton.setToolTipText("Pan Gantt Sheet");
sheetPanButton.setMessage("Scroll and pan the Gantt sheet");
sheetPanButton.setMessagePanel(messagePanel);
toolbar.addButton(sheetPanButton);
// Create the toggle row toolbar button for the Gantt sheet.
var sheetToggleRowButton =
new IlvInteractorButton(0, 0, 20, 20,
ilvImagePath+'bluearrow-plusminus-up.gif',
sheetToggleRowInteractor,
sheetView);
sheetToggleRowButton.setRolloverImage(ilvImagePath+'bluearrow-
plusminus-sel.gif');
sheetToggleRowButton.setSelectedImage(ilvImagePath+'bluearrow-
plusminus-dn.gif');
sheetToggleRowButton.setToolTipText("Expand/Collapse Gantt Sheet Rows");
sheetToggleRowButton.setMessage("Expand/collapse rows in the Gantt sheet");
sheetToggleRowButton.setMessagePanel(messagePanel);
toolbar.addButton(sheetToggleRowButton);
// Create a toolbar separator.
var separator = new IlvButton(0, 0, 20, 10,
ilvImagePath+'horzsep.gif');
toolbar.addButton(separator);
// Create the Zoom-In toolbar button.
var zoomInAction = function() {
chartView.zoomIn();
};
var zoomInButton = new IlvButton(0, 0, 20, 20,
ilvImagePath+'zoomin-up.gif',
zoomInAction);
zoomInButton.setRolloverImage(ilvImagePath+'zoomin-sel.gif');
zoomInButton.setSelectedImage(ilvImagePath+'zoomin-dn.gif');
zoomInButton.setToolTipText("Zoom In");
zoomInButton.setMessage("Press to zoom in");
zoomInButton.setMessagePanel(messagePanel);
toolbar.addButton(zoomInButton);
// Create the Zoom-Out toolbar button.
var zoomOutAction = function() {
chartView.zoomOut();
};
var zoomOutButton = new IlvButton(0, 0, 20, 20,
ilvImagePath+'zoomout-up.gif',
zoomOutAction);
zoomOutButton.setRolloverImage(ilvImagePath+'zoomout-sel.gif');
zoomOutButton.setSelectedImage(ilvImagePath+'zoomout-dn.gif');
zoomOutButton.setToolTipText("Zoom Out");
zoomOutButton.setMessage("Press to zoom out");
zoomOutButton.setMessagePanel(messagePanel);
toolbar.addButton(zoomOutButton);
// Create the Zoom-To-Fit toolbar button.
var zoomFitAction = function() {
chartView.zoomToFit();
};
var zoomFitButton = new IlvButton(0, 0, 20, 20,
ilvImagePath+'zoomfit-up.gif',
zoomFitAction);
zoomFitButton.setRolloverImage(ilvImagePath+'zoomfit-sel.gif');
zoomFitButton.setSelectedImage(ilvImagePath+'zoomfit-dn.gif');
zoomFitButton.setToolTipText("Zoom To Fit");
zoomFitButton.setMessage("Press to zoom to fit");
zoomFitButton.setMessagePanel(messagePanel);
toolbar.addButton(zoomFitButton);
var layoutPage = function(chart) {
messagePanel.setBounds(chart.getLeft(),
chart.getTop()+chart.getHeight()+15,
chart.getWidth()- logoPanel.getWidth()-15,
logoPanel.getHeight());
backgroundPanel.setBounds(chart.getLeft() - 10,
chart.getTop() - 10,
chart.getWidth()+ 20,
messagePanel.getTop()
+ messagePanel.getHeight()
+ 20
- chart.getTop());
logoPanel.setLocation(messagePanel.getLeft()
+ messagePanel.getWidth()
+ 15,
messagePanel.getTop());
toolbar.setLocation(backgroundPanel.getLeft()
+ backgroundPanel.getWidth()
+ 15,
backgroundPanel.getTop());
}
layoutPage(chartView);
chartView.addSizeListener(layoutPage);
toolbar.toHTML();
</script>
</body>
This results in the following page:
You can now click the first two toolbar buttons to select which interactor is installed on the Gantt sheet view.
The pop-up menu in JavaScript
The pop-up menu component is attached to the main view. This pop-up menu is triggered by a right-click in the view.
To use the pop-up menu, you must first include the following scripts.
The pop-up menu component is
IlvGanttPopupMenu.
<script TYPE="text/javascript" src="script/IlvAbstractPopupMenu.js"></script>
<script TYPE="text/javascript" src="script/gantt/IlvGanttPopupMenu.js">
</script>
The pop-up menu can be contextual or static.
Static pop-up menu
The menu is static, that is, not conditioned by the context in which it is called, and is defined in the HTML file by using
IlvMenu and
IlvMenuItem instances. The menu is a pure client-side object and there is no round trip to the server to generate the menu.
Defining a static pop-up menu in the HTML file
//Creates the pop-up menu.
var popupMenu = new IlvGanttPopupMenu(true);
//Creates the menu model.
var root = new IlvMenu("root");
var item1 = new IlvMenuItem("item1", true, "alert('item1 clicked')");
var item2 = new IlvMenuItem("item2", true, "alert('item2 clicked')");
root.add(item1);
root.add(item2);
//Sets the menu model to the pop-up menu.
popupMenu.setMenu(root);
[...]
//Sets the pop-up menu to the view.
chartView.setPopupMenu(popupMenu);
Configuring servlet support for a pop-up menu
public class GanttChartServlet extends IlvGanttServlet{
[...]
protected void configureServletSupport(IlvGanttServletSupport support) {
[...]
support.setPopupEnabled(true);
}
[...]
}
Contextual pop-up menu
The pop-up menu is dynamically generated by the server depending on:
The
menuModelId property of the current interactor set on the view.
The object selected when the user triggered the pop-up menu.
On the client side, you need only declare the pop-up menu and set it on the view.
Declaring a contextual pop-up menu and setting it on the view, client side
var popupMenu = new IlvGanttPopupMenu(true);
//Sets the pop-up menu to the view
chartView.setPopupMenu(popupMenu);
On the server side, you need to configure the servlet support to handle pop-up menus and to set the factory that generates the menu.
Configuring servlet support and setting the factory, server side
public class GanttChartServlet extends IlvGanttServlet {
[...]
protected void configureServletSupport(IlvGanttServletSupport support) {
[...]
support.setPopupEnabled(true);
support.getPopupMenuSupport().setMenuFactory(new SimpleMenuFactory());
}
[...]
}
The factory must implement the
IlvMenuFactory interface.
Styling the pop-up menu
You can style the pop-up menu by setting a CSS class name in the following properties:
itemStyleClass: the base CSS class name applied to a menu item.
itemHighlightedStyleClass: the style applied over the base style when the cursor is over the item.
itemDisabledStyleClass: the style applied over the base style when the cursor is disabled.
The following example shows how to use CSS to style the pop-up menu.
[...]
<style>
.PopupMenuItem {
background: #21bdbd;
color: black;
font-family: sans-serif;
font-size: 12px;
}
.PopupMenuItemHighlighted {
background: #057879;
font-style: italic;
color: white;
}
.PopupMenuItemDisabled {
background-color: #EEEEEE;
font-style: italic;
color: black;
}
</style>
[...]
<script>
var popupMenu = new IlvGanttPopupMenu(true);
popupMenu.setItemStyleClass('PopupMenuItem');
popupMenu.setItemHighlightedStyleClass('PopupMenuItemHighlighted');
popupMenu.setItemDisabledStyleClass('PopupMenuItemDisabled');
</script>
Copyright © 2018, Rogue Wave Software, Inc. All Rights Reserved.