Developing the client
Describes the client side of a JavaScript Web application and how to develop a JavaScript™ client by adding JavaScript components.

Describes how JavaScript influences client-side development.

Describes the
IlvView component.

Describes the
IlvOverview component.

Describes the IlvLegend component.

Describes the
IlvButton component.

Describes the
IlvZoomTool component.

Describes the
IlvZoomInteractor component.

Describes the
IlvPanInteractor component.

Describes the
IlvPanTool component.

Describes the
IlvMapInteractor and
IlvMapRectInteractor components.

Describes the JavaScript component for the pop-up menu.
Overview of client-side development
After creating the server (see
Developing the server), you can create the client side. The Rogue Wave® JViews JavaScript Web application support allows you to build a JavaScript client easily. The static nature of HTML limits the interactivity of Web pages. JavaScript allows you to create more interactive and engaging Web pages. It gives content providers new controls and allows them to manipulate the contents of HTML pages through scripting.
Rogue Wave JViews provides a set of components written in JavaScript™ that allows you to build your JavaScript pages very easily. The JavaScript files are located in <installdir>/jviews-framework/lib/thinclient/javascript.
Important This sample is compatible with the browsers and browser versions listed in the
Release notes under
Requirements for running Web applications.
The JavaScript client for the XML Grapher example includes most of the JavaScript components. The full HTML file for the XML Grapher example is located in
<installdir> /jviews-framework/samples/xmlgrapher/index.html.
The full reference documentation of each component can be found in the
JavaScript Reference Manual located in
<installdir> /documentation/framework/refjsf/html/index.html.
The IlvView JavaScript component
The IlvView component (located in the IlvView.js file) is the main component. This component queries the servlet and displays the resulting image.
To use this component, you need to include the following JavaScript™ files: IlvUtil.js, IlvView.js, the files for the superclasses of IlvView: IlvAbstractView.js, IlvResizableView.js, and IlvEmptyView.js, and IlvGlassView.js.
Instead of including the individual .js files of each component, you can add the file framework.js which is located in <installdir>/jviews-framework/lib/thinclient/framework/framework.js
This file is a concatenation of all the .js files required for doing JavaScript Web application in the Framework.
Here is a simple HTML page that creates an instance of IlvView:
HTML code
<html>
<head>
<META HTTP-EQUIV="Expires" CONTENT="Mon, 01 Jan 1990 00:00:01 GMT">
<META HTTP-EQUIV="Pragma" CONTENT="no-cache">
</head>
<script TYPE="text/javascript" src="script/IlvUtil.js"></script>
<script TYPE="text/javascript" src="script/IlvEmptyView.js"></script>
<script TYPE="text/javascript" src="script/IlvImageView.js"></script>
<script TYPE="text/javascript" src="script/IlvGlassView.js"></script>
<script TYPE="text/javascript" src="script/IlvResizableView.js"></script>
<script TYPE="text/javascript" src="script/IlvAbstractView.js"></script>
<script TYPE="text/javascript" src="script/IlvView.js"></script>
<script TYPE="text/javascript">
function init() {
view.init()
return false
}
function handleResize() {
if (document.layers)
window.location.reload()
}
</script>
<body onload="init()" onunload=”IlvObject.callDispose()”
onresize="handleResize()" bgcolor="#ffffff">
<script>
//position of the main view
var y = 40
var x = 40
var h = 270
var w = 440
// Main view
var view = new IlvView(x, y, w, h)
view.setRequestURL(’/xmlgrapher/demo.xmlgrapher.servlet.XmlGrapherServlet’)
view.toHTML()
</script>
</body>
</hmtl>
This example starts by importing some JavaScript files:
<script TYPE="text/javascript" src="script/IlvUtil.js"></script>
<script TYPE="text/javascript" src="script/IlvEmptyView.js"></script>
<script TYPE="text/javascript" src="script/IlvImageView.js"></script>
<script TYPE="text/javascript" src="script/IlvGlassView.js"></script>
<script TYPE="text/javascript" src="script/IlvResizableView.js"></script>
<script TYPE="text/javascript" src="script/IlvAbstractView.js"></script>
<script TYPE="text/javascript" src="script/IlvView.js"></script>
In the body of the page, the example creates an
IlvView object located in (40, 40) on the HTML page. The size is 440 x 270. This view displays images produced by the servlet
XmlGrapherServlet. Note the
toHTML method that creates the HTML necessary for the component.
This example also defines two JavaScript functions:

The
init function, called on the
onload event of the page, initializes the
IlvView by calling its
init method.

The
handleResize function, called on the
onresize event of the page, reloads the page when the Web browser is resized.
NOTE The global IlvObject.callDispose() function must be called in the onunload event of the HTML page. This function disposes of all resources acquired by the JViews JavaScript components.
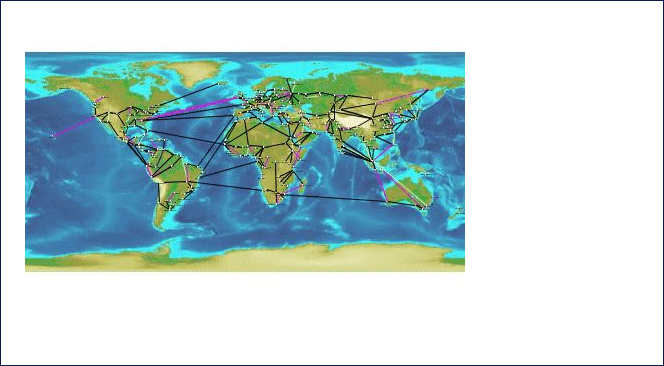
Once the image is loaded from the server, the page now looks like this:
Generated HTML page
The IlvOverview JavaScript component
The
IlvOverview component (located in the
IlvOverview.js ) file shows an overview of the manager. An
IlvOverview is linked to an
IlvView component. By default, the
IlvOverview queries the server to obtain an image of the global area and displays it. Once the overview is visible, a rectangle corresponding to the area visible in the main view is drawn on top of the overview. You can move this rectangle to change the area visible in the main view.
Here is the body of the previous example with an IlvOverview component. Note that you cannot move the rectangle of the overview now because the complete area is visible in the main view. You be able to do that later when the zooming functionality is added.
NOTE The lines added are in bold.
<body onload="init()" onunload=”IlvObject.callDispose()”
onresize="handleResize()" bgcolor="#ffffff">
<script>
//position of the main view
var y = 40
var x = 40
var h = 270
var w = 440
// Main view
var view = new IlvView(x, y, w, h)
view.setRequestURL(’/xmlgrapher/demo.xmlgrapher.servlet.XmlGrapherServlet’)
// Overview window.
var overview=new IlvOverview(x+w+50, y+4, 120, 70, view)
overview.setColor(’white’)
view.toHTML()
overview.toHTML()
</script>
Compared to the previous example, there is a new import statement for IlvOverview.js:
<script TYPE="text/javascript" src="script/IlvOverview.js"></script>
An IlvOverview object located in (x+w+50, y+4) with a size of 120 x 70 was created:
var overview = new IlvOverview(x+w+50, y+4, 120, 70, view)
The following line sets the color of the draggable rectangle:
overview.setColor(’white’)
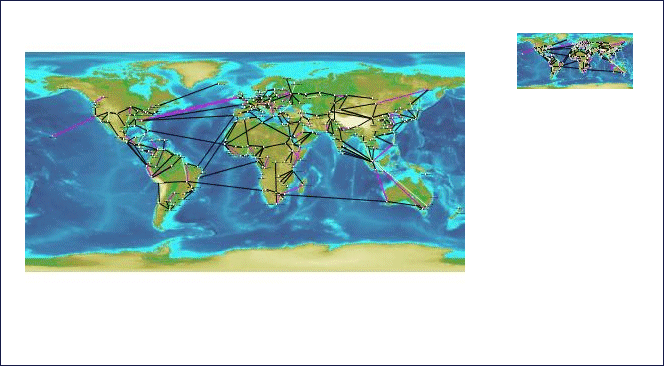
The page looks now like this:
The IlvLegend JavaScript component
You can add an
IlvLegend component to the page. The
IlvLegend component shows a list of layers that are available on the server side, and allows you to turn the visibility of a layer on and off.
To use the IlvLegend, you must first include the IlvLegend.js file.
<script TYPE="text/javascript" src="IlvLegend.js"></script>
The body of the HTML file now looks like this:
<body onload="init()" onunload="IlvObject.callDispose()"
onresize="handleResize()" bgcolor="#ffffff">
<script>
//position of the main view
var y = 40
var x = 40
var h = 270
var w = 440
// Main view
var view = new IlvView(x, y, w, h)
view.setRequestURL(’/xmlgrapher/demo.xmlgrapher.servlet.XmlGrapherServlet’)
// Overview window.
var overview=new IlvOverview(x+w+50, y+4, 120, 70, view)
overview.setColor(’white’)
// Legend
var legend = new IlvLegend(x+w+50, y+150,120, 115, view)
legend.setTitle(’Themes’)
legend.setTitleBackgroundColor(’#21bdbd’)
legend.setTextColor(’white’)
legend.setBackgroundColor(’#21d6d6’)
legend.setTitleFontSize(2);
view.toHTML()
overview.toHTML()
legend.toHTML()
</script>
</body>
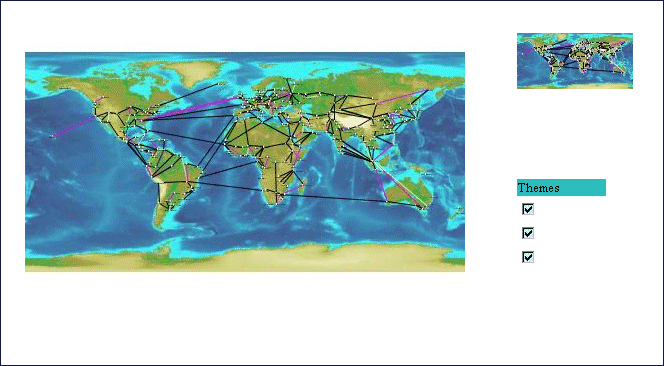
You should see the following page:
The visibility of layers can now be turned on and off.
The IlvButton JavaScript component
The IlvButton component is a simple button that allows you to call some JavaScript™ code by clicking it. You can add some buttons to the page to zoom in and out.
In addition to buttons, you can add some JavaScript panels to create a frame around the main view. A JavaScript panel is an area of the page that can contain some HTML. Creating a panel is done using the class IlvHTMLPanel, defined in the IlvUtil.js file.
The body of the page is now:
<body onload="init()" onunload="IlvObject.callDispose()"
onresize="handleResize()" bgcolor="#ffffff" >
<script>
//position of the main view
var y = 40
var x = 40
var h = 270
var w = 440
// Creates a frame around the main view
var frameBackground = new IlvHTMLPanel(’’)
frameBackground.setBounds(x-20, y-20, w+210, h+80)
frameBackground.setVisible(true)
frameBackground.setBackgroundColor(’#21bdbd’)
var frameTopLeft = new IlvHTMLPanel(’<IMG src="images/frame_topleft.gif">’)
frameTopLeft.setBounds(x-20, y-20, 40, 40)
frameTopLeft.setVisible(true)
var frameBottomLeft =new IlvHTMLPanel(’<IMG src="images/frame_bottomleft.gif">’)
frameBottomLeft.setBounds(x-20, y+h+20, 40, 40)
frameBottomLeft.setVisible(true)
var frameTopRight = new IlvHTMLPanel(’<IMG src="images/frame_topright.gif">’)
frameTopRight.setBounds(x+w+150, y-20, 40, 40)
frameTopRight.setVisible(true)
var frameBottomRight = new IlvHTMLPanel(’<IMG src="images/frame_bottomright.gif">’)
frameBottomRight.setBounds(x+w+150, y+h+20, 40, 40)
frameBottomRight.setVisible(true)
var frameTop = new IlvHTMLPanel(’<IMG src="images/frame_top.gif">’)
frameTop.setBounds(x+20, y-20, 570, 40)
frameTop.setVisible(true)
var frameBottom = new IlvHTMLPanel(’<IMG src="images/frame_bottom.gif">’)
frameBottom.setBounds(x+20, y+h+20, 570, 40)
frameBottom.setVisible(true)
var frameLeft = new IlvHTMLPanel(’<IMG src="images/frame_left.gif">’)
frameLeft.setBounds(x-20, y+20, 5, 270)
frameLeft.setVisible(true)
var frameRight = new IlvHTMLPanel(’<IMG src="images/frame_right.gif">’)
frameRight.setBounds(x+w+185, y+20, 5, 270)
frameRight.setVisible(true)
var border = new IlvHTMLPanel(’’)
border.setBounds(x+w+45, y, 130, h)
border.setVisible(true)
border.setBackgroundColor(’#09a5a5’)
var secondBorder = new IlvHTMLPanel(’’)
secondBorder.setBounds(x+w+47, y+2, 128, h-2)
secondBorder.setVisible(true)
secondBorder.setBackgroundColor(’#21d6d6’)
// message panel
var messagePanel = new IlvHTMLPanel(’’)
messagePanel.setBounds(x, y+h+20, w, 25)
messagePanel.setVisible(true)
messagePanel.setBackgroundColor(’#21d6d6’)
IlvButton.defaultMessagePanel = messagePanel;
// Rogue Wave logo
var logo = new IlvHTMLPanel(’<IMG src="images/ilog.gif">’)
logo.setBounds(x+w+95, y+h+10, 85, 40)
logo.setVisible(true)
IlvButton.defaultInfoPanel = messagePanel;
// Main view
var view = new IlvView(x, y, w, h)
view.setRequestURL(’/xmlgrapher/demo.xmlgrapher.servlet.XmlGrapherServlet’)
view.setMessagePanel(messagePanel)
// Overview window.
var overview=new IlvOverview(x+w+50, y+4, 120, 70, view)
overview.setColor(’white’)
overview.setMessagePanel(messagePanel)
// Legend
var legend = new IlvLegend(x+w+50, y+150,120, 115, view)
legend.setTitle(’Themes’)
legend.setTitleBackgroundColor(’#21bdbd’)
legend.setTextColor(’white’)
legend.setBackgroundColor(’#21d6d6’)
legend.setTitleFontSize(2);
// Some buttons for navigation
var topbutton, bottombutton, rightbutton, leftbutton
topbutton = new IlvButton(x+w/2, y-15, 30, 13,’images/north.gif’,’view.panNorth()’)
topbutton.setRolloverImage(’images/northh.gif’)
topbutton.setToolTipText(’pan north’)
topbutton.setMessage(’pan the map to the north’)
bottombutton = new IlvButton(x+w/2, y+h, 33, 13,’images/south.gif’,’view.panSouth()’)
bottombutton.setRolloverImage(’images/southh.gif’)
bottombutton.setToolTipText(’pan south’)
bottombutton.setMessage(’pan the map to the south’)
leftbutton=new IlvButton(x-13, y+h/2-10, 13, 30,’images/west.gif’,’view.panWest()’)
leftbutton.setRolloverImage(’images/westh.gif’)
leftbutton.setToolTipText(’pan west’)
leftbutton.setMessage(’pan the map to the west’)
rightbutton=new IlvButton(x+w, y+h/2-25, 13, 28, ’images/east.gif’, ’view.panEast()’)
rightbutton.setRolloverImage(’images/easth.gif’)
rightbutton.setToolTipText(’pan east’)
rightbutton.setMessage(’pan the map to the east’)
// Buttons to zoom in and out
var zoominbutton, zoomoutbutton
zoominbutton=new IlvButton(x+w+30, y+h-16,12, 12, ’images/zoom.gif’, ’view.zoomIn()’)
zoominbutton.setRolloverImage(’images/zoomh.gif’)
zoominbutton.setMessage(’click to zoom by 2’)
zoominbutton.setToolTipText(’Zoom In’)
zoomoutbutton=new IlvButton(x+w+30, y, 12, 12, ’images/unzoom.gif’, ’view.zoomOut()’)
zoomoutbutton.setRolloverImage(’images/unzoomh.gif’)
zoomoutbutton.setMessage(’click to zoom out by 2’)
zoomoutbutton.setToolTipText(’Zoom Out’)
view.toHTML()
overview.toHTML()
legend.toHTML()
topbutton.toHTML()
bottombutton.toHTML()
leftbutton.toHTML()
rightbutton.toHTML()
zoomoutbutton.toHTML()
zoominbutton.toHTML()
</script>
</body>
</hmtl>
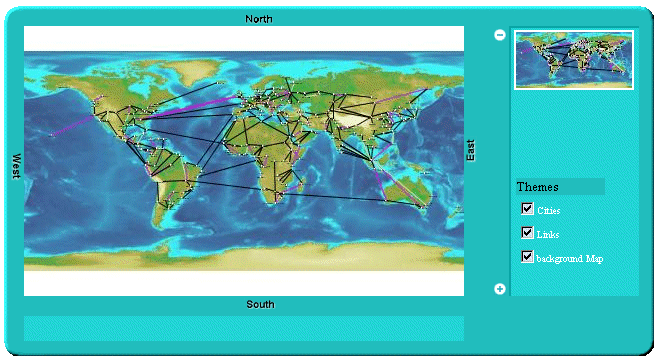
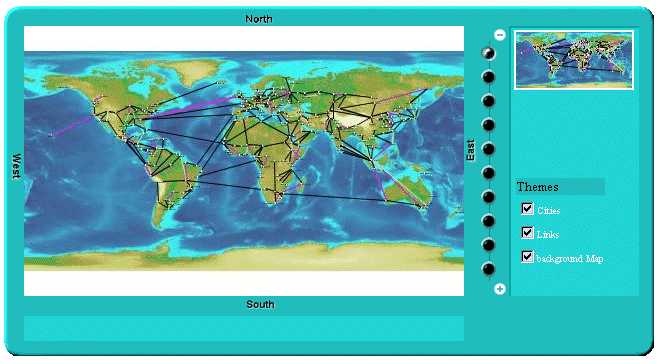
The page now looks like this:
A frame around the page was created by the following lines:
var frameBackground = new IlvHTMLPanel(’’)
frameBackground.setBounds(x-20, y-20, w+210, h+80)
frameBackground.setVisible(true)
frameBackground.setBackgroundColor(’#21bdbd’)
var frameTopLeft = new IlvHTMLPanel(’<IMG src="images/frame_topleft.gif">’)
frameTopLeft.setBounds(x-20, y-20, 40, 40)
frameTopLeft.setVisible(true)
var frameBottomLeft=new IlvHTMLPanel(’<IMG src="images/frame_bottomleft.gif">’)
frameBottomLeft.setBounds(x-20, y+h+20, 40, 40)
frameBottomLeft.setVisible(true)
var frameTopRight = new IlvHTMLPanel(’<IMG src="images/frame_topright.gif">’)
frameTopRight.setBounds(x+w+150, y-20, 40, 40)
frameTopRight.setVisible(true)
var frameBottomRight = new IlvHTMLPanel(’<IMG src="images/frame_bottomright.gif">’)
frameBottomRight.setBounds(x+w+150, y+h+20, 40, 40)
frameBottomRight.setVisible(true)
var frameTop = new IlvHTMLPanel(’<IMG src="images/frame_top.gif">’)
frameTop.setBounds(x+20, y-20, 570, 40)
frameTop.setVisible(true)
var frameBottom = new IlvHTMLPanel(’<IMG src="images/frame_bottom.gif">’)
frameBottom.setBounds(x+20, y+h+20, 570, 40)
frameBottom.setVisible(true)
var frameLeft = new IlvHTMLPanel(’<IMG src="images/frame_left.gif">’)
frameLeft.setBounds(x-20, y+20, 5, 270)
frameLeft.setVisible(true)
var frameRight = new IlvHTMLPanel(’<IMG src="images/frame_right.gif">’)
frameRight.setBounds(x+w+185, y+20, 5, 270)
frameRight.setVisible(true)
This creates four JavaScript panels for the corners, four additional panels for the sides, and a panel for the background. The corners and the sides of the frame are composed of simple GIF images.
Four buttons to pan south, north, east, and west have been added by the lines:
topbutton = new IlvButton(x+w/2, y-15, 30, 13,’images/north.gif’,’view.panNorth()’)
topbutton.setRolloverImage(’images/northh.gif’)
topbutton.setToolTipText(’pan north’)
topbutton.setMessage(’pan the map to the north’)
bottombutton = new IlvButton(x+w/2, y+h, 33, 13,’images/south.gif’,’view.panSouth()’)
bottombutton.setRolloverImage(’images/southh.gif’)
bottombutton.setToolTipText(’pan south’)
bottombutton.setMessage(’pan the map to the south’)
leftbutton=new IlvButton(x-13, y+h/2-10, 13, 30,’images/west.gif’,’view.panWest()’)
leftbutton.setRolloverImage(’images/westh.gif’)
leftbutton.setToolTipText(’pan west’)
leftbutton.setMessage(’pan the map to the west’)
rightbutton=new IlvButton(x+w, y+h/2-25, 13, 28, ’images/east.gif’, ’view.panEast()’)
rightbutton.setRolloverImage(’images/easth.gif’)
rightbutton.setToolTipText(’pan east’)
rightbutton.setMessage(’pan the map to the east’)
A button is defined by its position and size, two images, the main image and the rollover image, and a piece of JavaScript to be executed when the button is clicked.
Note that in order to pan to the north, you use the
panNorth method of
IlvView.
Two additional buttons have been created to zoom in and out, by the lines:
var zoominbutton, zoomoutbutton
zoominbutton=new IlvButton(x+w+30, y+h-16,12, 12, ’images/zoom.gif’, ’view.zoomIn()’)
zoominbutton.setRolloverImage(’images/zoomh.gif’)
zoominbutton.setMessage(’click to zoom by 2’)
zoominbutton.setToolTipText(’Zoom In’)
zoomoutbutton=new IlvButton(x+w+30, y, 12, 12, ’images/unzoom.gif’, ’view.zoomOut()’)
zoomoutbutton.setRolloverImage(’images/unzoomh.gif’)
zoomoutbutton.setMessage(’click to zoom out by 2’)
zoomoutbutton.setToolTipText(’Zoom Out’)
Each button has a message property. The message be automatically displayed in the status window of the browser when the mouse is over the button. The message can also be displayed in an additional panel. This is why the line:
IlvButton.defaultInfoPanel=messagePanel
tells you that messages of buttons also be displayed in the JavaScript message panel.
The IlvZoomTool JavaScript component
The IlvZoomTool component is a JavaScript component that shows a set of buttons. Each button corresponds to a zoom level; clicking the button zoom the view to this zoom level. The button corresponding to the current zoom level is visually different from others so that you can tell what the current zoom level is. The component can be vertical or horizontal, and the images of the buttons can be customized.
To add the component, add the following lines to the page:
<script TYPE="text/javascript" src="script/IlvZoomTool.js"></script>
This line imports the script.
Note that this component uses the IlvButton class, so the IlvButton.js script must be included also.
var zoomtool = new IlvZoomTool(x+w+25, y+15, 25, h-30, 10, view)
zoomtool.setOrientation(’Vertical’)
zoomtool.upImage = ’images/button.gif’
zoomtool.rolloverUpImage = ’images/buttonh.gif’
zoomtool.downImage = ’images/button.gif’
zoomtool.rolloverDownImage = ’images/buttonh.gif’
zoomtool.currentImage = ’images/center.gif’
zoomtool.rolloverCurrentImage = ’images/centerh.gif’
zommtool.toHTML()
The page now looks like this, with the vertical zoom tool on the right of the main view:
The IlvZoomInteractor JavaScript component
The
IlvZoomInteractor allows direct interaction with the image; it allows the user to select an area on the image to zoom this area. Installing an interactor on the view is simple: you need only create the interactor and set it to the view:
var zoomInteractor = new IlvZoomInteractor()
view.setInteractor(zoomInteractor)
In the example, you add a button that installs the interactor. To do this, add the following lines to the page:
<script TYPE="text/javascript"
src="script/IlvInteractor.js"></script>
<script TYPE="text/javascript"
src="script/IlvDragRectangleInteractor.js"></script>
<script TYPE="text/javascript"
src="script/IlvZoomInteractor.js"></script>
<script TYPE="text/javascript"
src="script/IlvInteractorButton.js"></script>
To use the interactor, you have to import three JavaScript™ files:
IlvInteractor.js,
IlvDragRectangleInteractor.js, and
IlvZoomInteractor.js. This is because the
IlvZoomInteractor component is a subclass of the
IlvDragRectangleInteractor component.
Then you add the following lines to the body of the page:
var zoomInteractor = new IlvZoomInteractor()
zoomInteractor.setLineWidth(1)
zoomInteractor.setColor(’#00ffff’)
...
var zoomrectbutton
zoomrectbutton=new IlvInteractorButton(x+w+50, y+90, 112, 24,
’images/zoomrect.gif’, zoomInteractor, view)
zoomrectbutton.setRolloverImage(’images/zoomrecth.gif’)
zoomrectbutton.setMessage(’click to set zoom mode’)
zoomrectbutton.setToolTipText(’Zoom Mode’)
...
zoomrectbutton.toHTML()
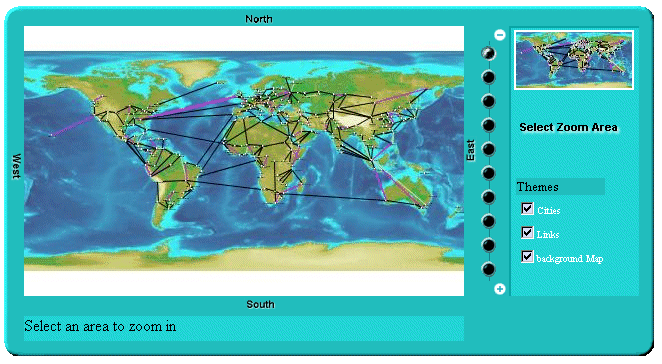
This results in the following page:
You can now click the “Select Zoom Area” button to install the interactor and then select an area to zoom in.
IlvPanInteractor
The
IlvPanInteractor component allows the user to click in the main view to pan the view. Just as for the
IlvZoomInteractor, use the
setInteractor method of
IlvView to install the interactor. In the example, add another button that installs this interactor (see
The IlvZoomInteractor JavaScript component). You now be able to switch from the “Pan” mode and the “Zoom” mode.
To be able to use the component, import the corresponding JavaScript™ file:
<script TYPE="text/javascript"
src="script/IlvPanInteractor.js"></script>
Then add the following lines to the body of the page:
var panInteractor = new IlvPanInteractor()
panbutton=new IlvInteractorButton(x+w+50, y+110, 63, 22, ’images/pan.gif’,
panInteractor, view)
panbutton.setRolloverImage(’images/panh.gif’)
panbutton.setMessage(’click to set pan mode’)
panbutton.setToolTipText(’Pan Mode’)
...
panbutton.toHTML()
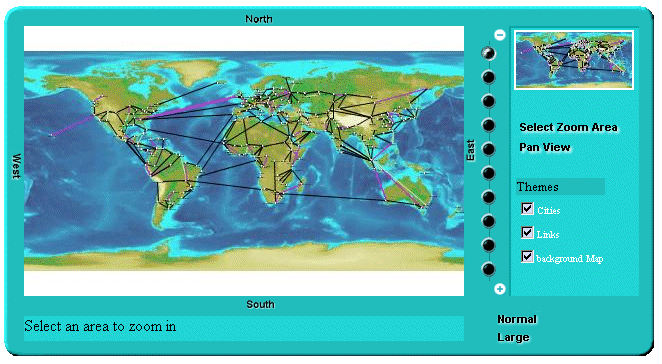
The page now has one additional button labelled “Pan View”:
The example is now complete; it uses most of the JavaScript components provided by Rogue Wave® JViews.
The IlvPanTool JavaScript component
The
IlvPanTool component (located in the
IlvPanTool.js file) is a component that allows panning of the view in all directions. You create the component in this way:
var pantool = new IlvPanTool(10, 10, view)
pantool.toHTML()
Note that this component uses the IlvButton class, so the IlvButton.js script must be included also.
This component looks like this:
The IlvMapInteractor and IlvMapRectInteractor JavaScript components
The
IlvMapInteractor and
IlvMapRectInteractor components are two additional interactors that can be used to perform an action on the server side when a point or an area of the image is selected by the client. These interactors and how to use them are described in detail in
Adding client/server interactions.
The pop-up menu in JavaScript
The pop-up menu component is attached to the main view. This pop-up menu is triggered by a right-click in the view.
To use the pop-up menu, you must first include the following scripts.
The pop-up menu can be contextual or static.
Static pop-up menu
The menu is static, that is, not conditioned by the context in which it is called, and is defined in the HTML file by using
IlvMenu and
IlvMenuItem instances. The menu is a pure client-side object and there is no round trip to the server to generate the menu.
Contextual pop-up menu
The pop-up menu is dynamically generated by the server depending on:

The
menuModelId property of the current interactor set on the view.

The object selected when the user triggered the pop-up menu.
On the client side, you need only declare the pop-up menu and set it on the view.
The factory must implement the
IlvMenuFactory interface.
Styling the pop-up menu
You can style the pop-up menu by setting a CSS class name in the following properties:
 itemStyleClass
: the base CSS class name applied to a menu item.
 itemHighlightedStyleClass
: the style applied over the base style when the cursor is over the item.
 itemDisabledStyleClass
: the style applied over the base style when the cursor is disabled.
The following example shows how to use CSS to style the pop-up menu.
Copyright © 2018, Rogue Wave Software, Inc. All Rights Reserved.
