To create a simple Rogue Wave® JViews applet using Rogue Wave JViews Framework beans, no
coding is necessary. The applet you create is a simple Swing
applet that displays a butterfly with a toolbar allowing you to
zoom and pan the content of the view.
For information on the concepts that underlie JavaBeans™ , refer to the website: http://java.sun.com/products/javabeans.
You are assumed to be familiar with the manipulation of JavaBeans
inside your IDE.
Note
The Swing beans that you will use have the letter “J” in the
prefix of the bean name. You could also create the same type of
application using only AWT controls. To do so, you would simply
use the
IlvScrollManagerView
bean that is an AWT control instead of the
IlvJScrollManagerView
bean.
The following example is carried out
using a typical IDE procedure. It comprises the following
stages:
- Create the manager view
- Set the properties of the manager view
- Create a manager and display its content in a view
- Load an .ivl file into the manager
- Add a control toolbar bean
- Configure the toolbar
- Test the result
Create the manager view
To create the manager view:
-
Create a new project as a Swing applet or application.
-
Display the Rogue Wave JViews beans on the toolbar by selecting that package.
-
From the toolbar, click the IlvJScrollManagerView bean icon
 and drag it inside the form designer of your IDE.
WarningThere are two of these icons on the toolbar. Make sure you are using IlvJScrollManagerView and not IlvScrollManagerView.
and drag it inside the form designer of your IDE.
WarningThere are two of these icons on the toolbar. Make sure you are using IlvJScrollManagerView and not IlvScrollManagerView. -
Drag the handles of your IlvJScrollManagerView bean until it appears as in the following figure.
 IlvJScrollManagerView Object Selected in the Form Designer
 -
Click the IlvManagerView bean icon
 on
the toolbar and drag it inside the
on
the toolbar and drag it inside the
IlvJScrollManagerViewbean.The result is fairly similar to what you obtained previously, except that you can now select the manager view. SeeIlvJScrollManagerViewObject with a SelectedIlvManagerViewObject Inside.NoteIf you were to compile and run the project at this point, you would see that the IlvJScrollManagerView allows you to scroll through the content of the IlvManagerView bean.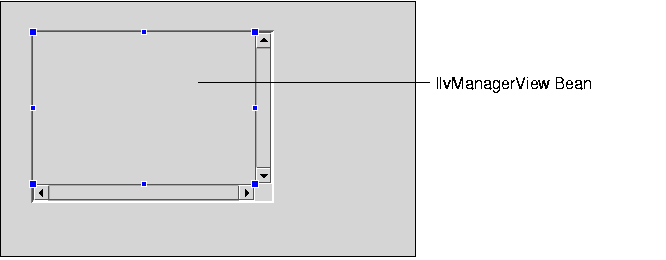
IlvJScrollManagerViewObject with a SelectedIlvManagerViewObject Inside
The next step is to change a manager view property of the bean,
which is done in the following property sheet. This property
sheet is active because the IlvManagerView object is presently
selected in the form designer. The property to change is the
background property.
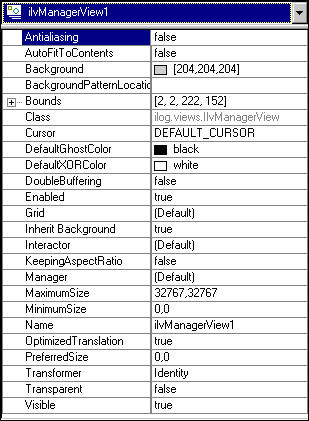
Property Sheet for
IlvManagerView
Object
Set the properties of the manager view
To set the properties of the manager
view:
-
Click the value field of the
Backgroundproperty and change the background of the view towhite: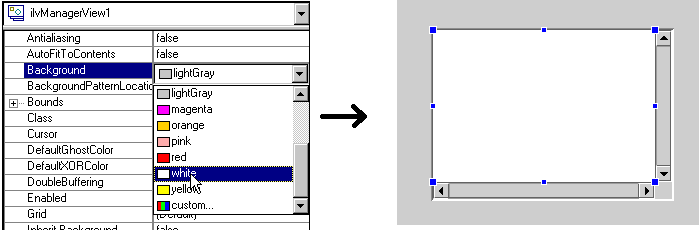 Setting the Background property of a View
 -
Change the
KeepingAspectRatioproperty totrue.This will make sure that the zoom level remains the same along the x and y axis.
You can now create an IlvManager bean. The
IlvManager
bean provides the data structure that contains the graphic
objects you want to display.
Create a manager and display its content in a view
To create the
IlvManager
bean and display its content in a view:
-
Click the
IlvManagerbean icon on the
toolbar.
on the
toolbar.
-
Drag it into the form designer.The class IlvManager is not a graphical bean, so it is not managed the same way by the different IDEs. The image below shows the manager as a small object inside the form designer.
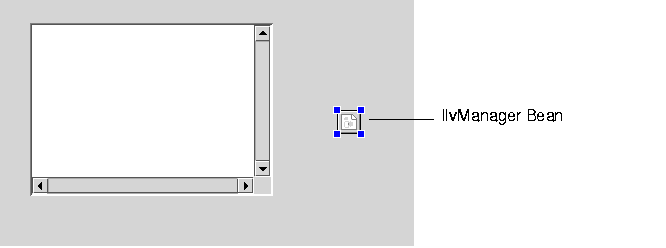 The
TheIlvManagerbean in the Form DesignerYou must now associate the view with the manager. This is done by setting the manager property of the IlvManagerView bean to the new manager bean. -
Select the IlvManagerView object so that its property sheet is active.
-
Set the value of its Manager property to
ilvManager1as shown in the following figure.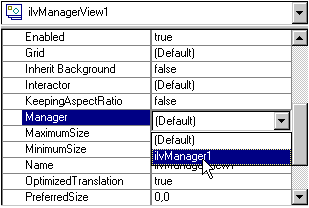 Setting the Manager property of a View
The IlvManagerView will now display
the content of the IlvManager bean.
You can create several IlvManagerView
objects and associate them with the same IlvManager
bean. This allows you to have several views of the same data.
Load an .ivl file into the manager
To load an .ivl file into the IlvManager bean:
-
Select
IlvManager1so that its property sheet is active. -
Click in the value field of the FileName property and then click the ellipsis button that appears.
-
Click the ellipsis button in the FileName Editor window that appears.
-
Browse to the lou.ivl file located in the
datadirectory of JViews Framework and open it. -
Click OK in the FileName Editor dialog box.
The file is automatically displayed in the IlvManagerView
bean.
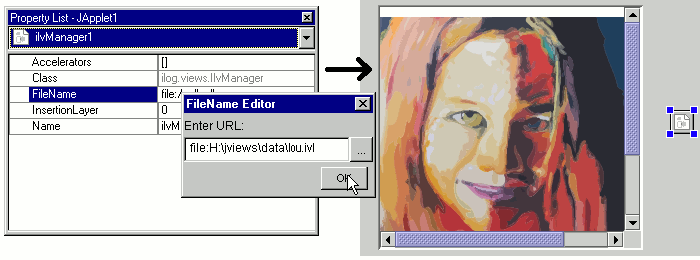
Loading a file into the Manager
The next step is to add a toolbar that
allows the user to control the zoom level of the view and to pan
the view.
Add a control toolbar bean
To add a control toolbar bean:
-
Click the IlvJManagerViewControlBar icon
 on the Rogue Wave JViews beans
toolbar.
on the Rogue Wave JViews beans
toolbar.
-
Drag it into the form designer.
 The Control toolbar in the form designerYou must now associate the toolbar with the view by setting the View property of the toolbar.
 -
Verify that the IlvJManagerViewControlBar object is selected so that its property sheet is active.
-
Select
ilvManagerView1in the value field of the View property as seen in the following figure.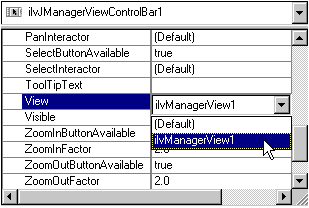 Associating the toolbar with the View
You may configure the toolbar in
different ways. You can:
- Hide some of the predefined button icons of the toolbar by setting the corresponding properties: PanButtonAvailable, SelectButtonAvailable, and so on
- Add your own button icons to the toolbar, as you can with any Swing toolbar
- Modify the default interactors that are used in the toolbar
For example, the toolbar has a selectInteractor
property that allows you to change the selection interactor used
when the user clicks on the Select button icon. You can modify
the properties of the selection interactor bean to define the
type of selection you need. For example, you may want to disable
the editing capability.
Configure the toolbar
To configure the toolbar:
-
Click an IlvSelectInteractor bean
 on the toolbar and drag it into the form designer.
 Selecting the Selection Interactor
 -
Set its EditionAllowed property to
falseas seen below.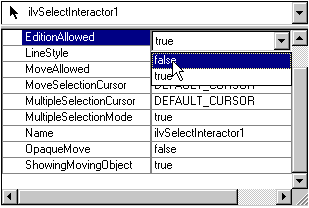 Customizing the Selection InteractorYou are now going to replace the default selection interactor used in the toolbar by setting the SelectInteractor property of ilvJManagerViewControlBar1.
 -
Select the
ilvJManagerViewControlBar1object so that its property sheet is active. -
Change the value of the SelectInteractor property to
ilvSelectInteractor1.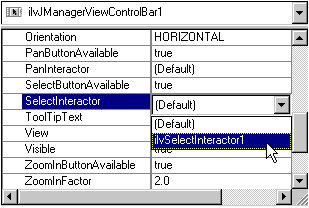 Replacing the default selection interactor
 -
Compile the project.
You have created a Java™
application without writing a single line of code.
Note
In this example, you have added interaction to the view by
means of the control toolbar. You could also directly set an
interactor bean such as the IlvSelectInteractor
on the manager view by using the interactor
property of the IlvManagerView.
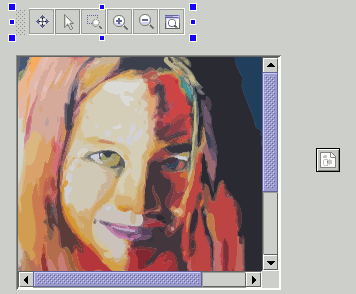
Test the result
To test the result:
-
Execute the applet. The resulting application should be as follows:
 Final application
 -
Use the scroll bars and the following toolbar icons to manipulate the image displayed in the manager view:
- The Pan icon
 to pan the content
of a view
to pan the content
of a view
- The Select arrow icon
 to select
objects in the view
to select
objects in the view
- The Interactive zoom icon
 to drag
a rectangle over an area that you want to zoom
to drag
a rectangle over an area that you want to zoom
- The Zoom-in icon
 and the zoom-out
icon
and the zoom-out
icon 
- The Fit to view icon
 to make
sure that the content of the manager is fully displayed
to make
sure that the content of the manager is fully displayed
This concludes the example. For
information on how to save your project and to know what type of
files are generated when saving, refer to the documentation of
your IDE.