The Altitude Chart bean
Describes the Altitude Chart bean and how to use it.

Describes the Altitude Chart bean.
Explains how to integrate the Altitude Chart bean into your application.
Overview
The Altitude Chart bean is represented by the
IlvAltitudeChart class. This bean is used by the Terrain Cut interactor. The Terrain Cut interactor is a graphic object displayed in one of the layers of a view and represented by the
IlvMakeTerrainCutInteractor class, see
Terrain Cut interactor.
To create the Altitude Chart, you can either use the Terrain Cut interactor, see
Creating and installing the Terrain Cut interactor, or, for more precise control, write the lines of code given in this section.
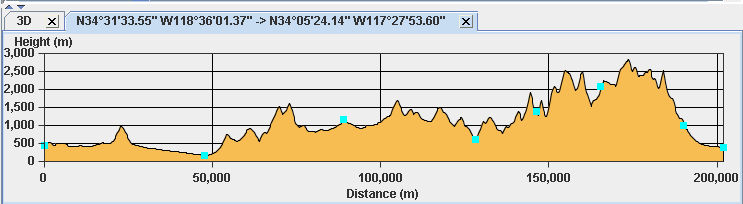
The following figure shows a example of an Altitude Chart.
The Altitude Chart bean
The source code for the Map Builder demonstration, which contains all of the code described in this section, can be found at
<installdir> /jviews-maps/samples/mapbuilder/index.html.
Integrating the Altitude Chart bean into an application
When integrating the Altitude Chart bean into your application, you must first create the Terrain Cut object in your program.
Setting the Terrain Cut interactor parameters
Set the points defining the Terrain Cut polyline for which the altitudes will be displayed:
IlvPoint[] points = new IlvPoint[] {
// Define your points as view coordinates here.
};
// Transform the points into manager coordinates.
// You can also define your points directly in
// manager coordinates.
for(int i = 0; i < points.length; i++)
view.getTransformer().inverse(points[i]);
// Create the terrain cut object.
IlvTerrainCut tc = new IlvTerrainCut(points);
Creating a data source and Map layer
To manage the Terrain Cut in standard
JViews Maps beans, you also need to create a
data source and
Map Layer, and link them with the manager properties.
IlvMapLayerTreeModel ltm =
IlvMapLayerTreeProperty.GetMapLayerTreeModel(manager);
IlvMapDataSourceModel dsm =
IlvMapDataSourceProperty.GetMapDataSourceModel(manager);
IlvGraphicLayerDataSource dataSource=new IlvGraphicLayerDataSource();
dsm.insert(dataSource);
IlvMapLayer mapLayer = dataSource.getInsertionLayer();
mapLayer.setAllowingMoveObjects(true);
mapLayer.setStyle(new IlvPolylineStyle());
ltm.addChild(parent, mapLayer);
Adding the Terrain Cut to the data source
You can then add the Terrain Cut object to the data source so that it can be managed by the data source, for example, to change the representation when the coordinate system changes.
dataSource.add(tc);
Creating an Altitude Chart
To create the Altitude Chart from a Terrain Cut:
IlvAltitudeChart ac = new IlvAltitudeChart(manager,tc.getLatLongs());
NOTE You do not need a Fly Through graphic to create an altitude chart. If the user does not need feedback and control on the map view, only the table of latitudes and longitudes are required.
Recomputing the Altitude Chart
To recompute the chart when it has been resized:
ac.addComponentListener(new ComponentAdapter() {
public void componentResized(ComponentEvent e) {
ac.updateChart();
}
});
Updating the Altitude Chart
To update the chart when a Terrain Cut changes:
tc.addChangeListener(new IlvMapControllingPolyline.ComputeListener() {
public void computationDone(IlvMapControllingPolyline tc) {
if (ac != null) {
ac.setPoints(tc.getLatLongs());
}
}
});
Copyright © 2018, Rogue Wave Software, Inc. All Rights Reserved.