Using layers in a dashboard diagram
Shows how dashboard diagrams use a system of layers to organize the way symbols, links and background objects are displayed.

Describes the allocation of layers in a dashboard diagram.
Explains how to set a layer to be the default layer for the insertion of new background objects.
Explains how to move a background object to a different layer.
Explains how to move all the objects of a layer to a different layer.
Explains how to make a layer visible or invisible.
Explains how to adjust the transparency level of the objects on a layer.
Understanding layers
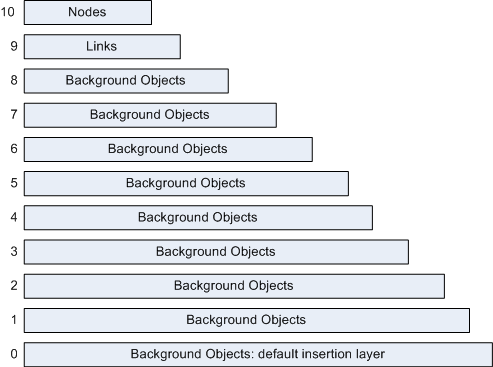
A dashboard diagram allocates 11 layers for symbols and background objects. Symbols are stored in layer 10 (the node layer) and links are stored in layer 9. Layers 0 - 8 are available for background objects. The following figure shows the logical structure for layers in a dashboard diagram.
The layer structure in a dashboard diagram
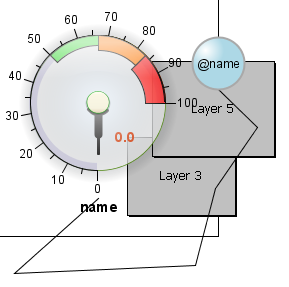
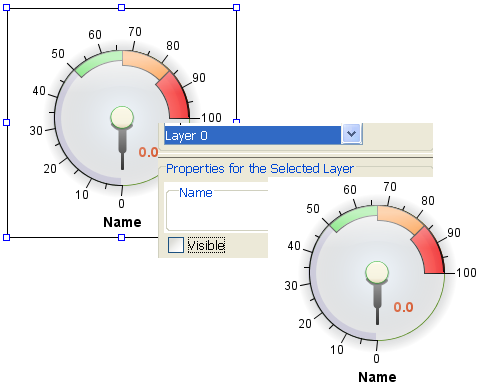
The following figure shows that objects on a higher layer overlay the objects below it. Links are displayed above background objects and symbols are contained in the topmost layer.
Symbols, links, and background objects on different layers
NOTE Symbols and links cannot change layers.
Setting the default insertion layer
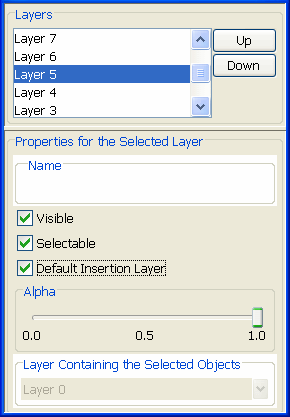
By setting the Default Insertion Layer in the Layers window, you can control into which layer the next background object added to the diagram is inserted.
1. Open the Layers window by clicking Tools > Layer Panel.
The Layers window opens.
2. Select a layer in the Layers pane.
3. Select the Default Insertion Layer check box.
4. Close the Layers window by clicking the red cross in the upper right of the window.
The Layers window
Raising and lowering a background object between layers
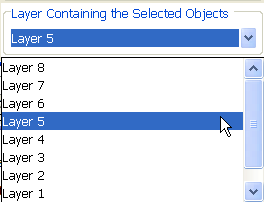
The Layer Containing the Selected Objects pane, at the bottom of the Layers window, shows the layer in which the object currently selected in the dashboard diagram is stored.
To raise or lower a background object between layers 0 and 8:
1. Select the background object you want to move.
2. Click Tools > Layer Panel.
The Layers window opens.
3. Select the new layer for the object in the Layer Containing the Selected Objects list.
4. 
Changing the layer of a background object
5. Close the Layers window by clicking the red cross in the upper right of the window.
Raising and lowering a layer
A single layer can contain more than one background object. You can change the visibility of all objects in a layer simultaneously by raising or lowering the whole layer in the layer order.
1. Open the Layers window by clicking Tools > Layer Panel.
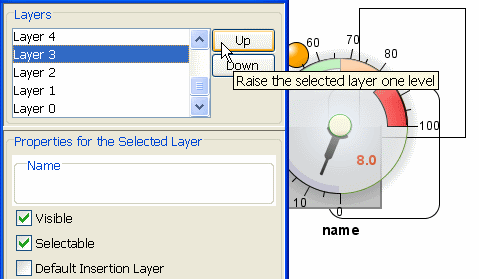
2. Select the layer you want to raise or lower in the Layers list.
3. Click Up or Down to raise or lower the layer.
Raising a layer in the dashboard diagram layer hierarchy
Setting layer visibility
Using the Layers window, you can make all objects stored in a specific layer visible or invisible.
To make the contents of a layer invisible:
1. Open the Layers window.
2. Select the layer you want to change in the Layers list at the top of the window.
3. Clear the Visible check box.
4. Close the Layers window.
Setting a layer to be invisible
Setting layer transparency
You can set the degree of transparency for all objects contained in a specific layer. Transparency changes can be applied to all layers, including layers 9 and 10 that contain symbols and links.
To set the transparency level for a layer:
1. Open the Layers window.
2. Select the layer to change in the Layers pane at the top of the window.
3. Move the Alpha slider to the transparency level you require.
Setting transparency for a layer
Copyright © 2018, Rogue Wave Software, Inc. All Rights Reserved.