Editing the dashboard background
Shows you how to add and edit background objects in a dashboard diagram.

Explains how to add a background to the dashboard.
Explains how to add a polyline object to a dashboard.
Explains how to add a point to a polyline.
Explains how to edit properties of the background objects.
Adding shape background objects
To add a shape background object to a dashboard diagram:
1. Select the object in the background editing toolbar.
2. Drag the mouse over the area where you want to place the background object.
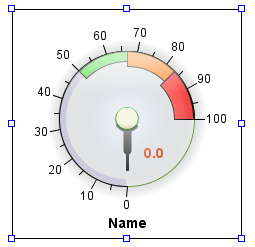
To add a frame around the dashboard symbol you created in
Adding a symbol to a dashboard:
1. Select the Rectangle button in the background editing toolbar.
1. 
The Rectangle button
2. Drag the mouse over the Dial_1 symbol in Document_1.
A framed symbol in a dashboard diagram
Adding and editing polyline objects
To add a polyline object to a dashboard diagram:
1. In the background editing bar, select the button for the polyline you want to add.
You have the choice between a Polyline, Arrow Polyline, or Polygon object.
1. 
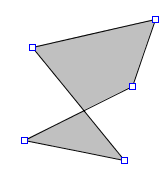
Add a polygon to a dashboard diagram
2. Click in the current diagram to mark each point in the polyline object.
3. Double-click in the diagram to mark the last point in the polyline object.
A polygon
Adding a point to a polyline object
To add a point to a polyline object:
1. Select the polyline object you want to edit in current dashboard diagram.
2. Hold down the Control key and click the polyline object.
NOTE To remove a polyline object point, press Ctrl and click the existing points in the polyline object.
Editing background object properties
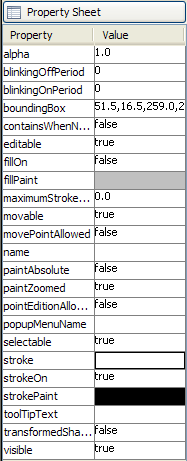
When a background object is selected, its properties are displayed in the Property Sheet pane. When you select more than one background object, only the properties common to the selected objects are displayed.
The following figure shows the properties for the frame you created in
Adding shape background objects.
Properties for a background object
The property name is shown in the left column, its value in the right column. The value of each property can be edited.
To edit a property:
1. Click the corresponding cell in the right column.
2. Change the value accordingly.
To change the line style of the frame you created in
Adding shape background objects:
2. In the Property Sheet pane, click the cell to the right of the name field.
3. Type border.
4. Press Enter.
5. In the Property Sheet pane, click the cell to the right of the strokePaint field.
A button appears at the right of the field.
6. 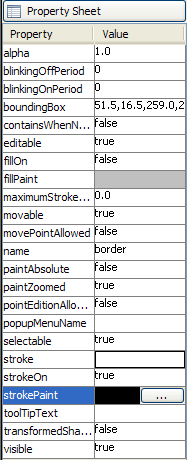
The stroke paint button
7. Click the button at the right of the strokePaint field.
The Paint Editor window appears.
8. In the Swatches tab of the color chooser, select a tone of red.
9. Click Apply.
The frame is now red.
10. Scroll down the Property Sheet pane until you see the visible field.
11. Click the cell to the right of the visible field.
A drop-down list is displayed.
12. Select true.
You have now customized a background object.
Copyright © 2018, Rogue Wave Software, Inc. All Rights Reserved.