Customizing genealogy nodes by type
Explains how to customize the appearance of a person node and make it look different from a couple node.

Explains how to define nodes as persons through style rules.
Explains how to customize the name of a rule.
Explains how to change the graphic representation of the person nodes.
Explains how to customize each node to display a specific name and a birthdate.
Explains how to visually distinguish male from females person nodes.
Explains how to identify dead persons in the diagram.
Explains how to customize the death date.
Explains how to define nodes as couples through style rules.
Explains how to change the graphic representation of the couple nodes.
Explains how to customize each node to display a specific status and a date.
Explains how to interpret the visual feedback you get when selecting a rule.
Explains how to distinguish local and inherited properties.
Creating a person rule
To create a person rule:
1. Select the node rule in the Style Rules.
2. Click Edit > Create Style Rule.
The Create Style Rule Wizard opens.
3. Click Next to reach the Conditions page.
4. Select user-defined type from the first drop-down list.
5. Type person in the field next to the second drop-down list. See the following figure.
6. 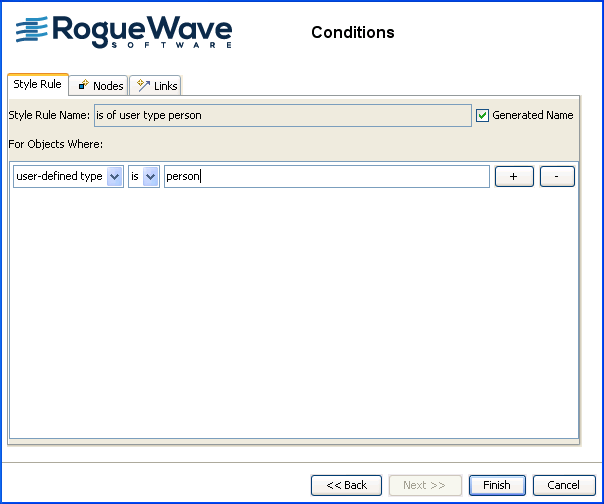
Creating a style rule on a user-defined type
7. Click Finish to exit the wizard.
The new rule appears in the Style Rules for nodes and is selected.
When you add a more specific rule, like the is of user type person rule, it overrides some or all of the property values set by the general rule for the objects affected.
NOTE If you do not specify a rule name, the default name is concatenated from the condition strings.
Renaming a rule
You can rename the rule at any time in two different ways:
Method 1: using Rename
1. In the Style Rules pane, right-click the rule.
2. Click Rename in the pop-up menu.
3. Type node.person in the dialog box and click OK. The new rule name displays in the Style Rules pane.
Method 2: using Change Style Rule
1. In the Style Rules pane, right-click the rule.
2. Click Change Style Rule in the pop-up menu. The Change Style Rule Wizard starts.
3. Click Next.
4. Clear the Generated Name check box.
5. Type the new name, node.person, in the Style Rule Name field.
6. Click Finish.
Assigning a specific symbol to the person nodes
The symbol used in the diagram is quite basic. You will assign a different symbol to the person nodes to graphically represent more data, such as the birth date and the death date.
To change the symbol assigned to person nodes:
1. Select the node.person rule.
2. Click Assign Symbol at the bottom of the Styling Customizer.
The Assign Symbol dialog box is displayed.
3. 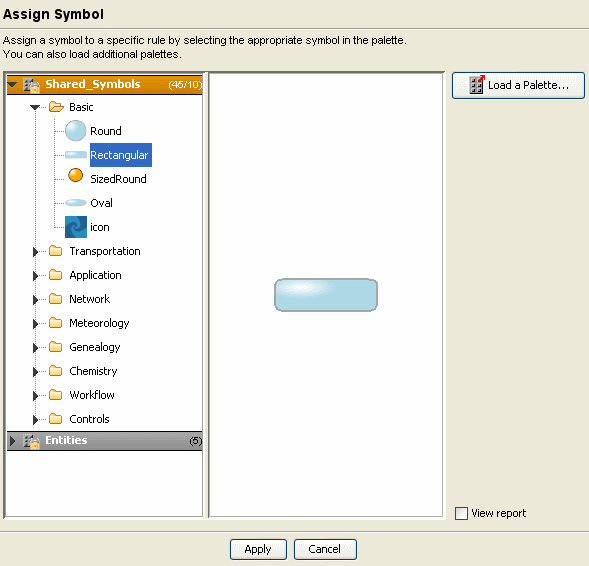
Assigning a symbol
The jviews-palette-shared-symbols-9.0.jar palette is loaded by default. This palette is located in <installdir>/jviews-diagrammer/lib/palettes.
4. Open the Genealogy category of symbols in the left pane.
5. Select the symbol Person.
6. Click Apply.
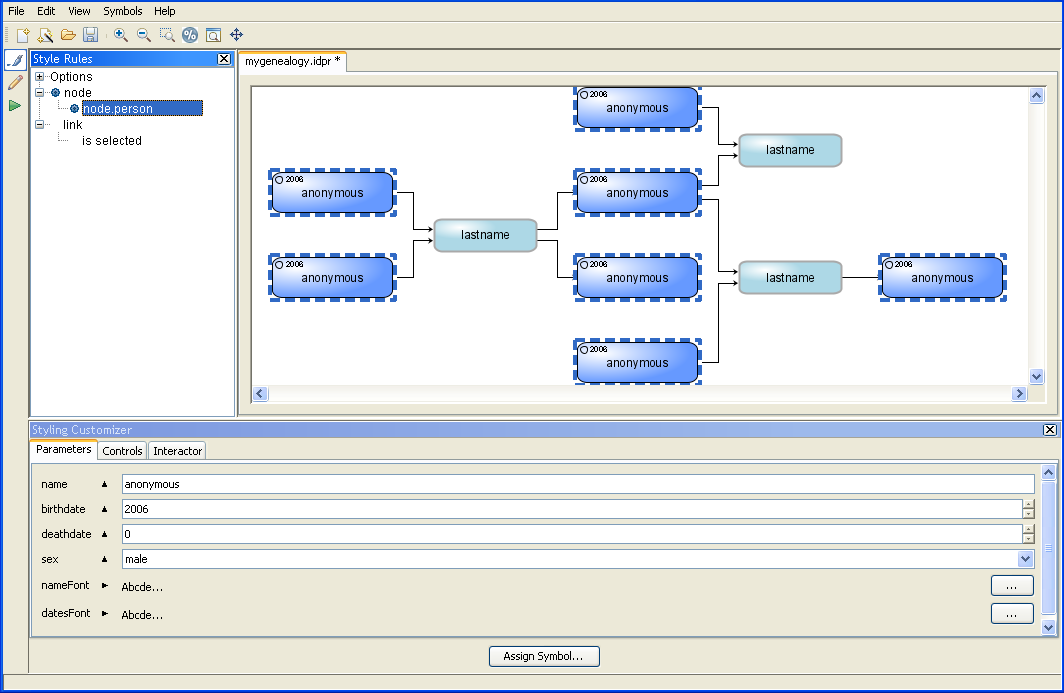
Assigning the person symbol to nodes
Setting properties in the Styling Customizer for person nodes
With the node.person rule selected, you will set name and birthdate properties in the Styling Customizer.
To set properties for the person nodes:
1. Select the node.person rule in the Style Rules pane.
2. In the Parameters tab of the Styling Customizer, set name to @firstname+" "+@name, as follows:
Right-click in the field.
Choose Enter an Expression.
Delete the current value.
Select
@firstname from the list of available expressions.
Type
+" "+.
Select
@name from the list of expressions.
Press Enter.
The at sign (@) is an operator specifying a model value: it prefixes the name of an attribute in the
data model. The expression used here concatenates the value of the
firstname attribute, a space, and the value of the
name attribute.
3. Set birthdate to @birthdate in the same way and press Enter.
You can see the diagram change as you work, see the following figure.
Customized person nodes
NOTE You can undo any unwanted changes in your Style Rules or Styling Customizer by clicking Edit > Undo.
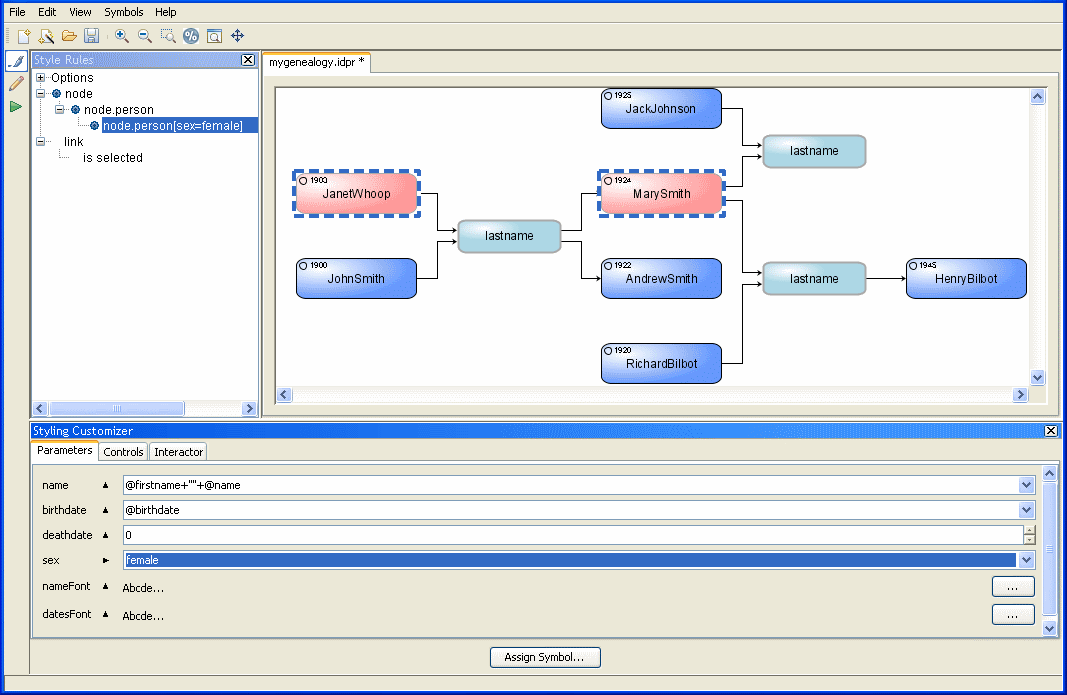
Setting properties for females
You can use the value of sex, which is either male or female, to style subsets of person nodes differently. The color of a person node can be used to distinguish between male and female : blue for a man, red for a woman.
To create a rule for females:
1. Select node.person in the Style Rules.
2. Click Edit > Create Style Rule.
The Create Style Rule Wizard opens.
3. Click Next.
In the Conditions page, the condition user-defined type is person is already present as it has been defined for the node.person rule.
4. Click the plus button to add a new condition.
5. Select sex, then equals, and type female.
See the following figure.
6. 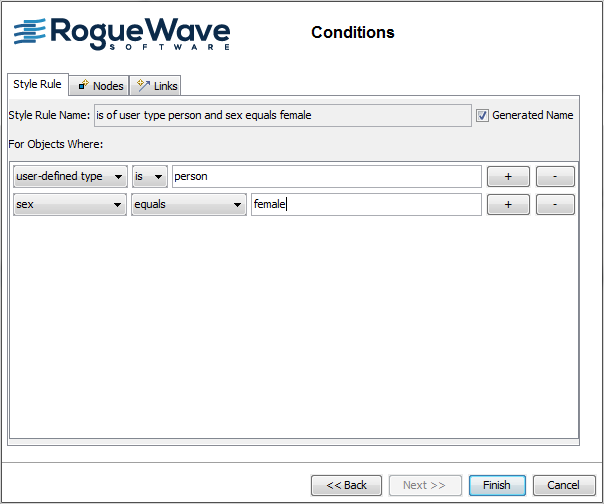
Creating a data rule with an attribute condition
7. Click Finish.
The new rule is in the Style Rules and is selected.
8. Right-click the rule name and rename it to something shorter: node.person[sex=female].
To set the female property:
1. Select the node.person[sex=female] rule in the Style Rules pane.
2. In the Styling Customizer, select female for the sex parameter.
NOTE You can undo any unwanted changes in your Style Rules or Styling Customizer by clicking Edit > Undo.
The result is as shown in the following figure.
Customized person nodes for men and women
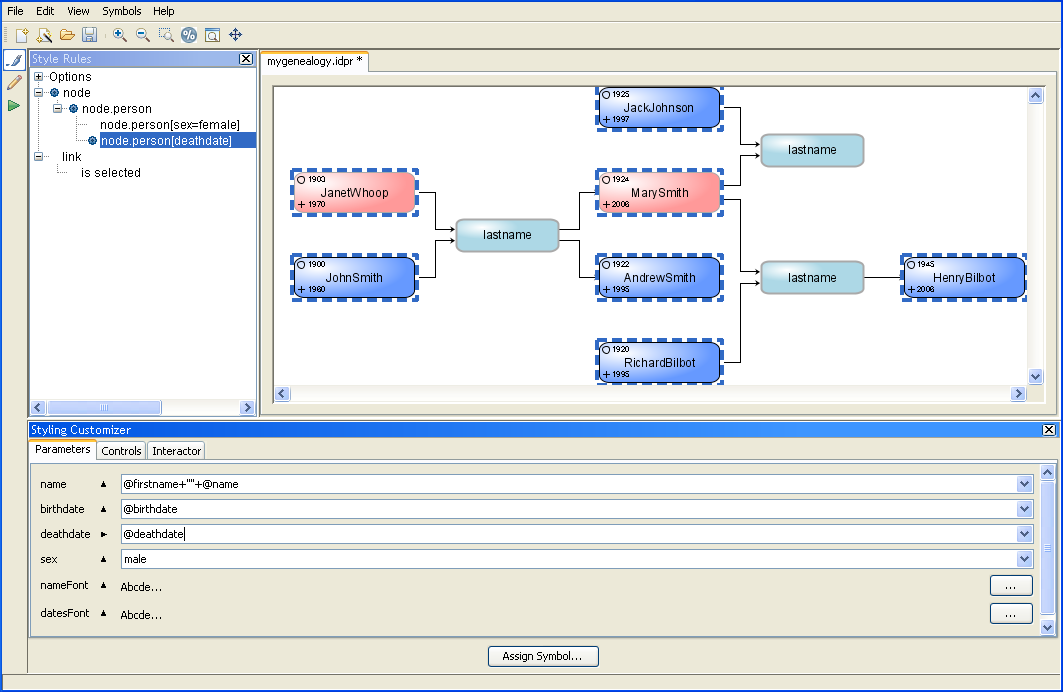
Adding a death fact to person nodes
At this stage, the person nodes have a label showing the person’s name and birthdate. You will now add a death fact for the persons that are dead. This fact will not appear for living persons. Therefore you need to create a style rule to insert the death date only for dead persons.
To add a death fact to person nodes:
1. Select the node.person rule.
2. Click Edit > Create Style Rule.
3. Click Next.
In the Conditions page, the condition user-defined type is person is already present as it has been defined for the node.person rule.
4. Click the plus button to add a new condition.
5. Select the attribute deathdate and select exists and not null.
6. Click Finish.
The new rule is in the Style Rules and is selected.
7. Right-click the rule name and rename it to something shorter: node.person[deathdate].
Customizing the death date
To customize the death date:
1. Select the node.person[deathdate] rule in the Style Rules pane.
2. In the Styling Customizer, right-click in the deathdate field and choose Enter an expression.
3. Delete the current value and select @deathdate from the list of available expressions.
4. Press Enter.
The result is as shown in the following figure.
Customizing the death date of person nodes
Creating a couple rule
To create a couple rule:
1. Select the node rule in the Style Rules pane.
2. Click Edit > Create Style Rule.
The Create Style Rule Wizard opens.
3. Click Next to reach the Conditions page.
The Conditions page of the Create Style Rule Wizard displays.
4. Clear the Generated Name check box and type node.couple in the Style Rule Name field.
5. Select user-defined type in the first drop-down list, then type couple in the field next to the second drop-down list.
6. Click Finish to exit the wizard.
The new rule appears in the Style Rules for nodes and is selected.
NOTE You can switch back at any time to the default name of a rule which is a concatenation of the condition strings by selecting the Generated Name check box.
Assigning a specific symbol to the couple nodes
The symbol used in the diagram is basic. You will assign a different symbol to the couple nodes to graphically represent more data, such as the marital status and the date of the marriage.
To assign a different symbol to the couple nodes:
1. Select the node.couple rule in the Style Rules pane.
2. Click Assign Symbol at the bottom of the Styling Customizer.
The Assign Symbol dialog box is displayed.
3. Select the Couple symbol in the Genealogy category.
4. Click Apply.
See the result in the following figure.
Assigning the couple symbol to nodes
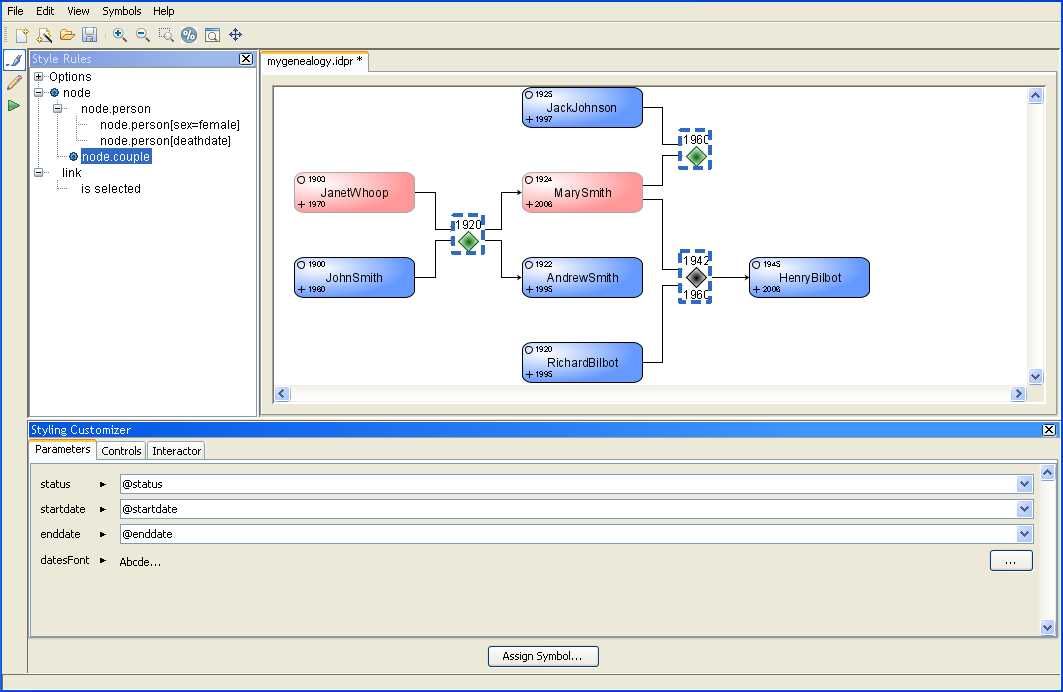
Setting properties in the Styling Customizer for couple nodes
With the new node.couple rule selected, you will set the status and date properties in the Styling Customizer.
To set properties for the couple nodes:
1. Select the node.couple rule in the Style Rules pane.
2. In the Parameters tab of the Styling Customizer, set the status to @status, as follows:
Right-click in the field.
Click
Enter an Expression.
Delete the current value.
Select
@status from the list of available expressions.
Press Enter.
3. Set the start date to @startdate and the end date to @enddate in the same way.
4. Press Enter.
You can see the diagram change as you work, see the following figure.
Customized couple nodes
The Couple symbol has been designed to change colors according to the status: green for married couples, black for divorced couples.
You can see that person nodes and couple nodes now look different to represent the semantics of the data. You can see your new rules in the node section of the Style Rules.
Rule-select and blue icons
If you click an object in the diagram, the most specific rule that affects that object is selected in the tree and also has a blue icon. This action is called
rule-select. Less specific rules that are applicable to the object also have the blue icon, see figures
Customized person nodes and
Customized couple nodes.
In the diagram, the selected object is surrounded by a selection box. Further objects to which the selected rule applies are also surrounded by selection boxes. Objects to which the rule applies, but for which more specific rules might override the settings for that rule, are surrounded by thin selection boxes.
If you change the selected rule, the change is sure to affect all the objects shown with a (thick) selection box; it might or might not affect the objects shown with a thin selection box. Keep clicking a given graphic object to switch between and select the rules marked with a blue icon.
Status icons and local properties
In the Styling Customizer, a right arrowhead indicates that the property has been set locally, that is, in the selected rule. An upward arrowhead indicates that the property value has been inherited from a previous rule.
Copyright © 2018, Rogue Wave Software, Inc. All Rights Reserved.