Creating a simple applet using beans
This topic explains how to:

Create a Rogue Wave® JViews applet using Rogue Wave®
JViews Framework beans

Add graph layout features using the graph layout beans
The sample applet is a simple JFC/Swing applet that displays a graph and provides graph layout capabilities. No coding is necessary.
For more information on Rogue Wave
JViews Framework beans, see
Framework classes available as JavaBeansin The Essential JViews Framework
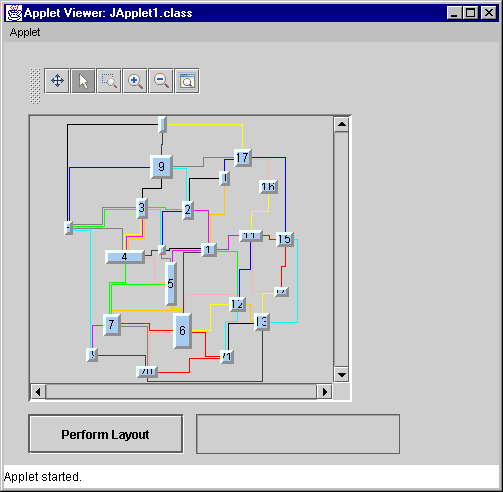
The following figure shows the application panel created in this tutorial.
Final JFC/Swing applet
This example shows how to create an Rogue Wave JViews applet using a typical IDE procedure, which consists of:
For information on the concepts that underlie JavaBeans™, refer to the website:
http://java.sun.com/products/javabeansYou are assumed to be familiar with the manipulation of JavaBeans within your IDE.
Creating the manager view
To create the manager view:
1. Create a new project as a JFC/Swing applet or application.
2. On the beans toolbar, click the JViews tab to display the JViews Framework beans.
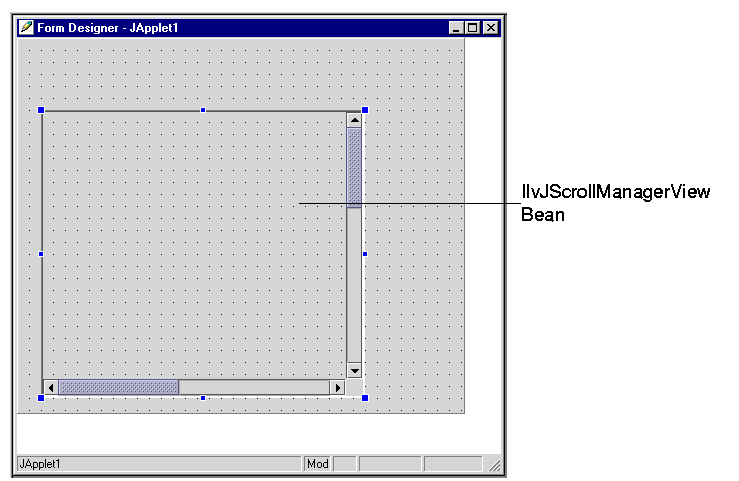
3. On the Rogue Wave JViews Framework beans toolbar, click the IlvJScrollManagerView bean
4. 
5. icon and drag it to the Form Designer.
a. You will notice two scroll manager view icons on the toolbar. Place the pointer over the icon to read the name and choose the one with “J” in its prefix, IlvJScrollManagerView.
b. Rogue Wave JViews Framework Swing beans have the letter “J” in the prefix of the bean name. You could also create the same type of application using only AWT controls. To do so, you would simply use the IlvScrollManagerView bean that is an AWT control instead of the IlvJScrollManagerView bean. However, there is no AWT equivalent of the IlvJGraphLayoutProgressBar bean
6. Drag the handles of the IlvJScrollManagerView bean until it looks approximately like this:
7. 
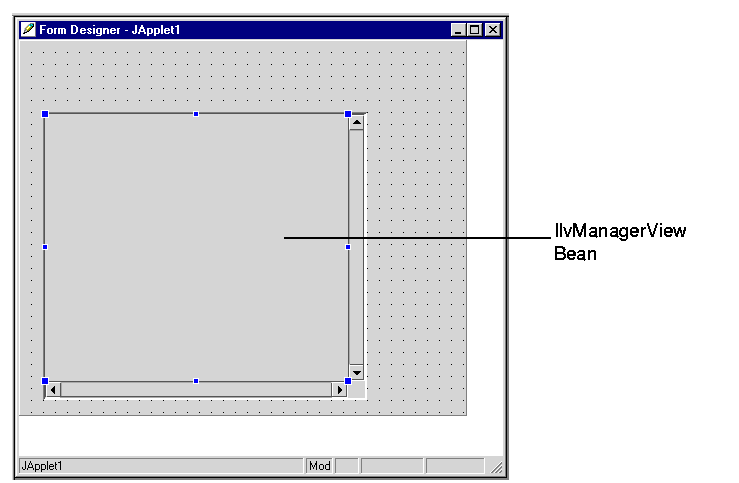
8. On the JViews beans toolbar, click the IlvManagerView
9. 
10. icon and drag it inside the IlvJScrollManagerView bean.
The result is fairly similar to what you obtained in the previous step, except that you can now select the manager view.
11. 
NOTE If you were to compile and run the project at this point, you would see that the IlvJScrollManagerView allows you to scroll through the contents of the IlvManagerView bean. (At the moment, the manager view is empty, so there is nothing to scroll.)
Setting the properties of the manager view
The next stage involves changing two properties of the
IlvManagerView bean to make sure that the double-buffering mechanism will be used and that the zoom level of the manager views will always remain the same along the x-axis and y-axis.
To change the manager view properties:
1. Make sure that the IlvManagerView bean is selected in the Form Designer.
When the IlvManagerView bean is selected in the Form Designer, its properties are displayed in the Property List.
1. 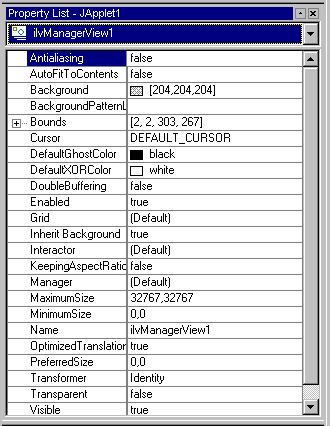
2. Click the value field of the DoubleBuffering property. Change the value from false to true. This will ensure that the double-buffering mechanism will be used.
3. Click the value field of the KeepingAspectRatio property. Change the value from false to true. This will ensure that the zoom level remains the same along the x-axis and y-axis.
Creating a grapher and associating a manager view
This stage involves creating an
IlvGrapher bean and associate a manager view with it. The
IlvGrapher bean provides the data structure that contains the grapher to display.
To create the IlvGrapher bean and associate a manager view with the grapher:
1. On the Rogue Wave JViews Framework beans toolbar, click the IlvGrapher
1. 
1. icon and drag it into the Form Designer.
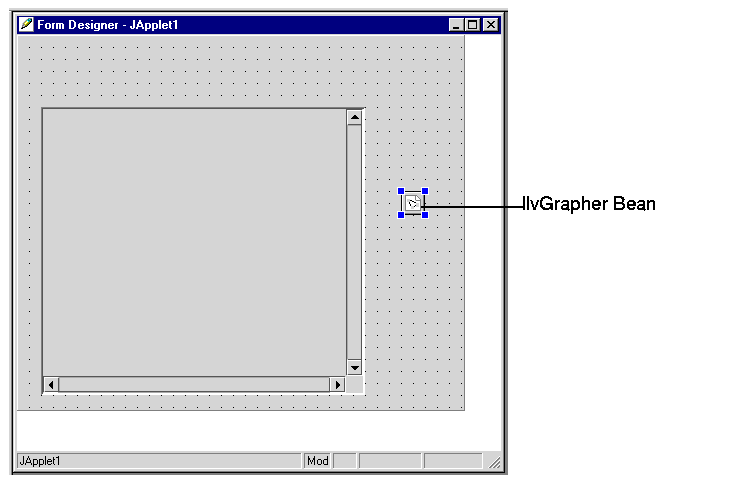
The IlvGrapher class is not a graphical bean, so it is not managed in the same way by the various IDEs. The following figure shows the grapher as a small object inside the Form Designer.
1. 
2. To associate the manager view with the grapher, select the
IlvManagerView bean so that its properties appear in the Property List.
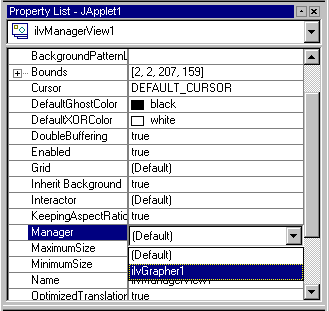
You now need to set the Manager property of the IlvManagerView bean to the new IlvGrapher bean. (Keep in mind that the IlvGrapher class is a subclass of IlvManager.)
3. In the Property List window, click the value column of the Manager property. Change Default to ilvGrapher1.
4. 
Once this operation is done, the IlvManagerView can display the contents of the IlvGrapher bean. You can create several IlvManagerView beans and associate them with the same IlvGrapher bean. This allows you to have several views of the same graph.
Loading an .ivl file into the grapher
The next stage involves loading an .ivl file into the IlvGrapher bean so that the contents of the .ivl file are displayed in the manager view.
To load an .ivl file:
1. In the Form Designer, select the
IlvGrapher bean so that its properties appear in the Property List.
2. Click the value field of the FileName property and then click the Browse button
3. 
4. .
The FileName Editor dialog box appears.
5. 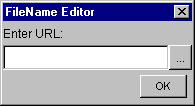
6. To specify the .ilv file, click the Browse button
7. 
8. in the FileName Editor.
The Choose URL dialog box appears.
9. Go to the <installdir>/jviews-diagrammer/data/graphlayout/link directory.
10. Select the sample1.ivl file and click Open.
11. Click OK in the FileName Editor dialog box.
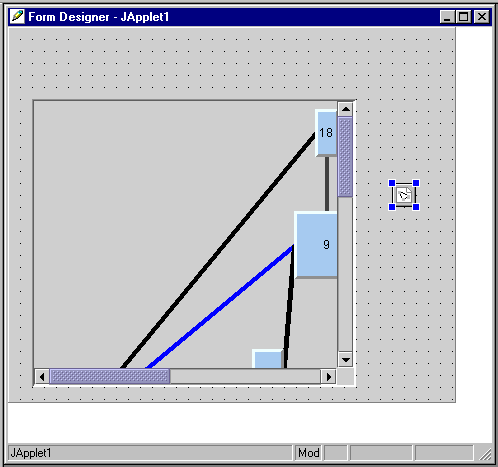
The file is automatically displayed in the IlvManagerView bean. As you can see, only a portion of the graph is visible in the manager view.
12. 
Adding a control toolbar bean
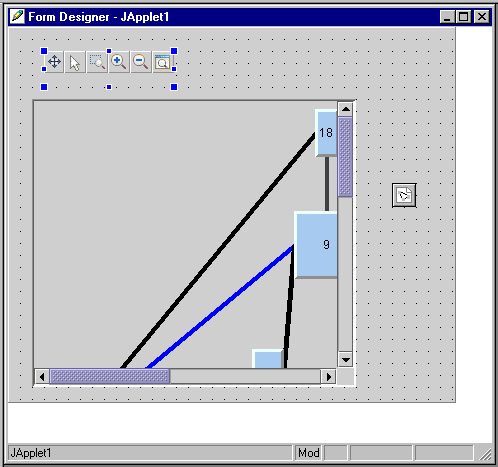
This stage involves adding a toolbar and associating the toolbar with the manager view. The toolbar allows the user to control the zoom level of the view and to pan the view.
To add the toolbar:
1. On the Rogue Wave JViews Framework beans toolbar, click the IlvJManagerViewControlBar icon
1. 
1. and drag it to the Form Designer.
1. 
2. Make sure that the IlvJManagerViewControlBar bean is selected in the Form Designer so that its properties appear in the Property List.
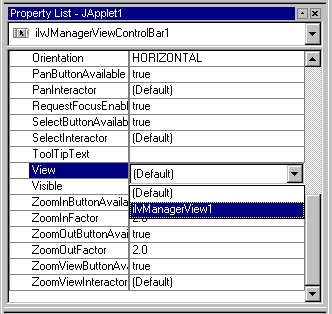
3. To associate the toolbar with the manager view, click the value field of the View property and select ilvManagerView1.
4. 
NOTE n this example, you added interaction to the view using the control toolbar. You could also set an interactor bean, such as the IlvSelectInteractor, directly on the manager view by using the interactor property of the IlvManagerView bean.
Adding a graph layout bean
This stage involves adding the capability to apply a link layout to the graph displayed in the applet.
To add the required graph layout bean:
1. On the beans toolbar, click the JViews graph layout tab to display the JViews Graph Layout beans.
2. On the JViews Graph Layout beans toolbar, click the orthogonal bean icon
IlvLinkLayout 3. 
4. and drag it to the Form Designer. Place it under the IlvGrapher bean.
You are now going to associate the IlvLinkLayout bean with the IlvGrapher object.
5. Make sure that the IlvLinkLayout bean is selected in the Form Designer and its properties are displayed in the Property List.
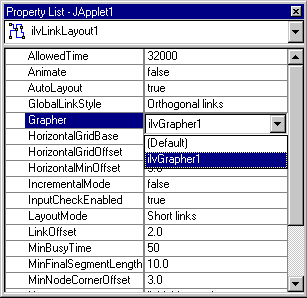
6. In the Property List window, click the value field of the Grapher property. Change Default to ilvGrapher1. This indicates to the layout bean which grapher is to be laid out.
7. 
Adding a Swing bean
This stage involves adding a Swing bean to the applet. This bean will allow you to launch the layout process on the graph.
To add the Swing bean:
1. On the beans toolbar, click the Swing tab to display the Swing beans.
2. On the Swing beans toolbar, click the JButton bean icon
3. 
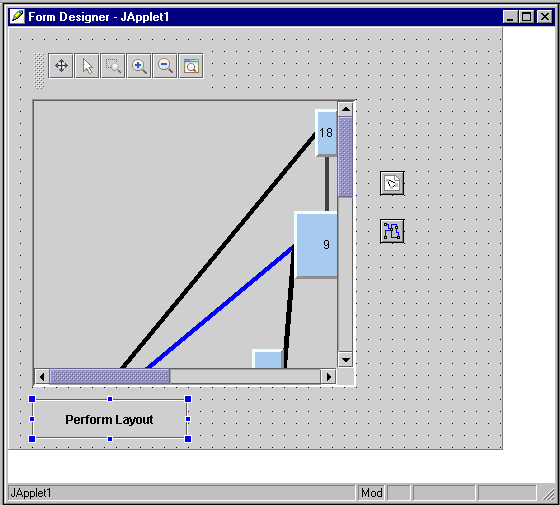
4. and drag it to the Form Designer. Place this button below the IlvJScrollManagerView bean.
5. Make sure that the JButton bean is selected in the Form Designer and its properties are displayed in the Property List.
6. In the Property List window, click the value field of the Text property. Change jbutton to Perform Layout.
7. 
Adding user interaction
This stage involves defining the action that will be performed when the user clicks the Perform Layout button.
To define the user interaction:
1. With the right mouse button, click the JButton bean in the Form Designer.
2. From the pop-up menu that appears, select Add interaction.
The Interaction Wizard appears.
3. Click Next on the first page of the wizard.
4. In the Events area, make sure that actionPerformed is selected. Click Next.
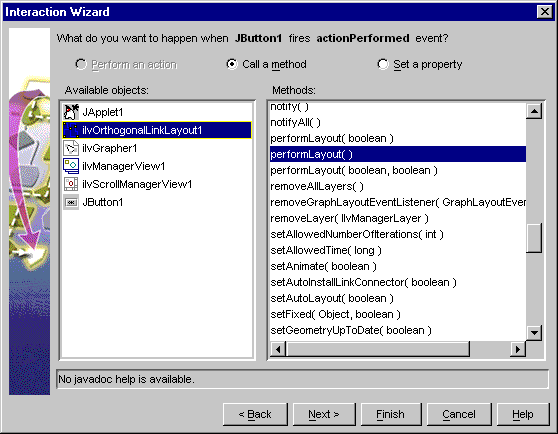
5. On the next page of the Interaction Wizard, click Call a method.
6. In the Available objects area, select IlvLinkLayout1.
7. In the Methods area, select performLayout().
8. 
9. Click Finish to apply the interaction. The Interaction Wizard closes.
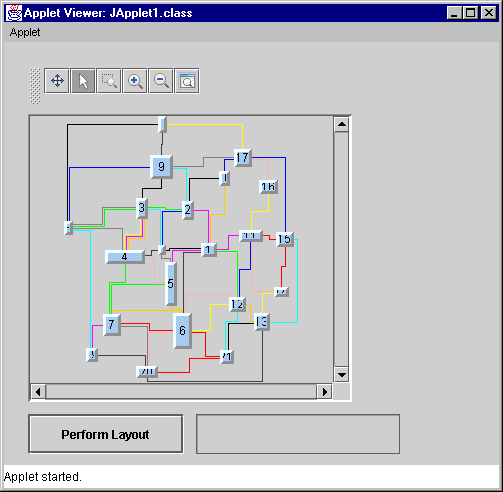
Now when the user clicks the Perform Layout button, the layout is performed and the links of the graph are reshaped to orthogonal. (The links appear as alternating horizontal and vertical segments.)
Adding a progress bar to the Applet
This stage involves adding a progress bar to your applet. It is not mandatory. In some cases, a layout algorithm may take a long time to perform a layout and it may be useful to keep the user informed of the activity of the layout.
To add the progress bar:
1. On the beans toolbar, click the JViews Graph Layout tab to display the JViews Graph Layout beans.
2. On the JViews Graph Layout beans toolbar, click the progress bar icon IlvJGraphLayoutProgressBar bean
3. 
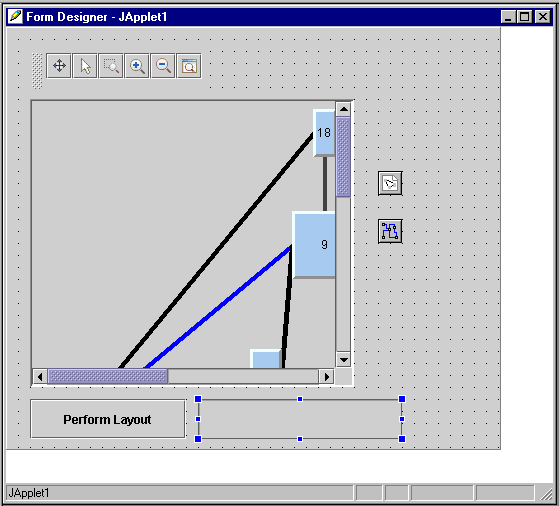
4. and drag it to the Form Designer. Place in under the IlvJScrollManagerView bean next to the Perform Layout button.
5. 
You are now going to associate the IlvLinkLayout bean with the IlvJGraphLayoutProgressBar object.
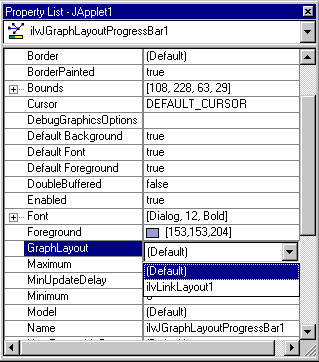
6. Make sure that the IlvJGraphLayoutProgressBar bean is selected in the Form Designer and its properties are displayed in the Property List.
7. In the Property List window, click the value field of the GraphLayout property. Change Default to ilvLinkLayout1.
8. 
Testing the result
Now that the applet has been created, you can test the result.
To test the resulting applet:
1. Select Project>Execute to execute the applet.
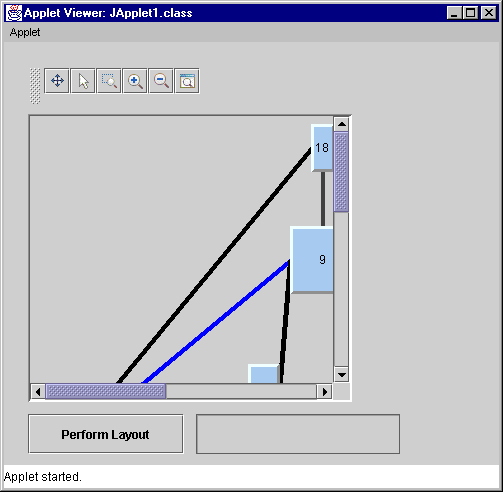
Initially, the resulting application should appear as shown in the following image (the graph is not yet laid out).
1. 
2. You can use the icons in the toolbar to manipulate the graph displayed in the manager view. The toolbar contains the following icons:

The Pan icon

to pan the content of a view.

The Select arrow icon

to select and edit objects in the view.

The Interactive zoom icon

to drag a rectangle over an area that you want to zoom.

The Zoom-in icon

and the zoom-out icon

to view the graph at different zoom levels.

The Fit-to-content icon

to size the graph so that it fits entirely in the manager view.
When you click the Fit-to-content icon, the applet window appears as shown in the following image.
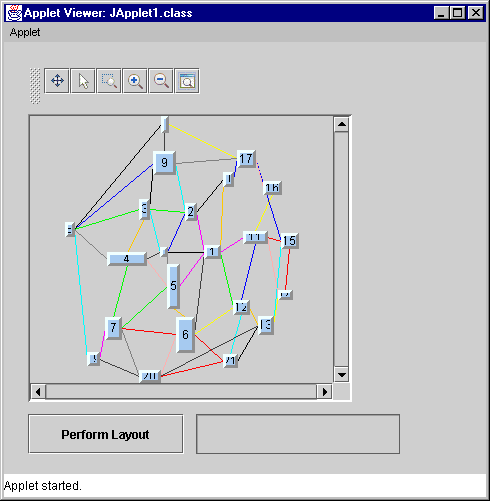
3. To lay out the graph, click the Perform Layout button.
As the layout is being performed, you should see the progress indicated in the progress bar at the bottom of the window. When the layout is completed, the applet window should appear similar to the window in the following image.
4. 
This completes the graph layout beans tutorial. For information on how to save your project and on the type of files that are generated when saving, refer to the documentation of your IDE.
Copyright © 2017, Rogue Wave Software, Inc. All Rights Reserved.
