手順 2:振る舞い変更によるガジェットの拡張
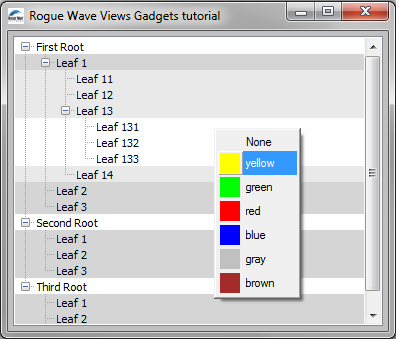
この手順では、既存のガジェットの振る舞いの変更方法を説明します。このチュートリアルの手順 1 で作成した ColoredTreeGadget の拡張法を学びます。ユーザーが右マウス・ボタンでツリーをクリックしたときに文脈依存型メニューが表示されるように、ツリーの振る舞いを変更します。この文脈依存型メニューで、次の図で示すように、クリックした場所のアイテムの色を変更することができます。
この手順では、次のタスクを実行する方法を紹介します。
既存ガジェットの振る舞いを変更する適切な方法の選択
既存ガジェットの振る舞いを変更するには 2 つの方法があります。
1. ガジェットをサブクラス化してその handleEvent メソッドをオーバーライドする。
これは振る舞いの変更が、それが適用する種類のガジェットと強くリンクされている場合に、より論理的な方法です。
2. ガジェットに設定される新しいインタラクターを作成する。
新しいインタラクターを作成するのは、オブジェクトの振る舞いを一時的に変更したい場合、あるいは新しいインタラクターが汎用であるとき、つまり異なる複数のガジェット上にこれを設定することができる場合に適した方法です。
汎用インタラクターの作成
このチュートリアルでは、2 番目の方法 (新しいインタラクターを作成する) を選択します。この例を実装する振る舞い (右クリックで文脈依存型メニューを表示する) は汎用性があるため、どのガジェット・クラスにも使用できます。
ContextualMenuInteractor クラス用の完全なコードは、ctxminter.h および ctxminter.cpp にあります。次に示すのは、クラスの記述です。
目的
ContextualMenuInteractor クラスの目的は、文脈依存型メニューを処理し、接続されているガジェットの振る舞いを維持する汎用インタラクターを提供することです。この理由により、ContextualMenuInteractor クラスは IlvGadgetInteractor クラスのサブクラスでなくてはなりません。つまり、すべてのガジェットに設定されている定義済みインタラクター・クラスです。
class ContextualMenuInteractor : public IlvGadgetInteractor { public: virtual IlBoolean handleEvent(IlvGraphic* obj, IlvEvent&, const IlvTransformer* t); virtual IlBoolean shouldShowMenu(IlvGraphic*, IlvEvent&, const IlvTransformer*) const; virtual IlvPopupMenu* getMenu(IlvGraphic*, IlvEvent&, const IlvTransformer*) const = 0; }; |
次に、これらの各メソッドの詳細を検討します。
shouldShowMenu メソッド
shouldShowMenu メソッドは、指定されたイベントに対してポップ・アップ・メニューを表示する必要がある場合、IlvTrue を返します。デフォルトの振る舞いは、マウスの右ボタンがリリースされると IlvTrue を返します。このメソッドは、他の全イベントに対してポップ・アップ・メニューを表示するようにサブクラスで再定義することもできます。
IlBoolean ContextualMenuInteractor::shouldShowMenu(IlvGraphic*, IlvEvent& event, const IlvTransformer*) const { // The contextual menu is displayed by default when the right button // is released. return event.type() == IlvButtonUp && event.button() == IlvRightButton; } |
getMenu メソッド
getMenu メソッドは、純粋であるため、表示するポップ・アップ・メニューを返すためにサブクラスで再定義される必要があります。
virtual IlvPopupMenu* getMenu(IlvGraphic*,
IlvEvent&,
const IlvTransformer*) const = 0;
このメソッドは、shouldShowMenu メソッドが IlvTrue を返したときに handleEvent メソッドにより呼び出されます。
handleEvent メソッド
以下に handleEvent メソッドの実装を示します。
IlBoolean ContextualMenuInteractor::handleEvent(IlvGraphic* obj, IlvEvent& event, const IlvTransformer* t) { // Check that the object is a gadget. IlvGadget* gadget = accept(obj) ?IL_CAST(IlvGadget*, obj) : 0; if (gadget && gadget->isActive()) { // Is it time to display the contextual menu? if (shouldShowMenu(obj, event, t)) { // Get the menu. IlvPopupMenu* menu = getMenu(obj, event, t); // Show the menu. if (menu) { menu->get(IlvPoint(event.gx(), event.gy()), /* transient */ 0); return IlvTrue; } } } // Default behavior of the gadget. return IlvGadgetInteractor::handleEvent(obj, event, t); } |
専用インタラクターの作成
ColoredTreeGadget クラスに専用の ContextualMenuInteractor クラスのサブクラスが、作成されます。ColoredTreeGadgetInteractor と呼ばれるこのサブクラスは、getMenu メソッドをオーバーライドし、次の図で示すように、いくつかの共通色が利用できるメニューを作成します。
色を選択すると、ポップ・アップ・メニューが表示される前にマウスが置かれていたアイテムの色が変更されます。
メニューの作成
以下に getMenu メソッドの実装を示します。
IlvPopupMenu*
ColoredTreeGadgetInteractor::getMenu(IlvGraphic* graphic,
IlvEvent& event,
const IlvTransformer* t) const
{
ColoredTreeGadget* tree = (ColoredTreeGadget*)graphic;
// Find the item located at the event location.
IlvTreeGadgetItem* item = tree->pointToItemLine(IlvPoint(event.x(),
event.y()),
(IlvTransformer*)t);
if (!item)
return 0;
// Create the menu if needed.
static IlvPopupMenu* menu = 0;
if (!menu) {
// Create the pop-up menu.
menu = new IlvPopupMenu(tree->getDisplay());
// Fill it with predefined colors.
AddColor(menu, 0);
AddColor(menu, "yellow");
AddColor(menu, "green");
AddColor(menu, "red");
AddColor(menu, "blue");
AddColor(menu, "gray");
AddColor(menu, "brown");
}
// Set the item that asked for the contextual menu so that the menu
// will be able to use it later.
SetSelectedItem(menu, tree, item);
// Return the menu.
return menu;
}
マウスの下に位置するアイテムを IlvTreeGadget::pointToItemLine メソッドを使用して取得した後、スタティック関数 AddColor を呼び出すことでメニューが定義済みの色で作成されます。
それからメニューがツリーおよびツリー・アイテムに、スタティック・メンバー関数
SetSelectedItem を呼び出して接続されます。このスタティック・メンバー関数は、
メニュー・コールバックに説明されているように、メニュー・コールバックも設定します。
最後に、メニューが返されます。
スタティック関数 AddColor の内容をより詳細に示します。
static void
AddColor(IlvPopupMenu* menu, const char* color)
{
// This static function is used to fill the contextual menu.
IlvDisplay* display = menu->getDisplay();
// A menu item is created with the specified color name.
IlvMenuItem* item = new IlvMenuItem(color? color :"None");
if (color) {
// An IlvFilledRectangle object is created with the specfied color.
IlvPalette* palette = display->getPalette(0, display->getColor(color));
IlvFilledRectangle* rectangle =
new IlvFilledRectangle(display,
IlvRect(0, 0, 20, 20),
palette);
// The IlvFilledRectangle object is set as the picture of the item.
item->setGraphic(rectangle);
}
// The item is inserted into the pop-up menu.
menu->insertItem(item);
}
関数の 2 番目のパラメーターとして与えられた名前を使用してメニュー・アイテムを作成した後、IlvFilledRectangle が右パレットで作成され、メニュー・アイテムのピクチャーとして設定されます。次に、メニュー・アイテムがメニューに挿入されます。
メニュー・コールバック
メニュー・アイテムが選択されたときにアイテムの色がどのように変更されるかの詳細を次に示します。メニュー・コールバックのコード詳細を示します。
static void
ChangeColor(IlvGraphic* g, IlvAny arg)
{
IlvPopupMenu* menu = (IlvPopupMenu*)g;
// Retrieve the selected item of the pop-up menu.
IlvShort selected = menu->whichSelected();
if (selected != -1) {
// Retrieve its graphical representation.
IlvSimpleGraphic* graphic =
(IlvSimpleGraphic*)menu->getItem(selected)->getGraphic();
// Use the second argument of the callback:A pointer to the colored
// tree gadget object.
ColoredTreeGadget* tree = (ColoredTreeGadget*)arg;
// Retrieve the item whose color is going to be changed.
IlvTreeGadgetItem* item =
ColoredTreeGadgetInteractor::GetSelectedItem(menu);
// Change the color of all the children of the parent item.
if (item && item->getParent())
tree->setChildrenBackground(item->getParent(),
graphic
? graphic->getForeground()
: (IlvColor*)0);
}
}
選択されたメニュー・アイテムのピクチャーから色が取られ、setChildrenBackground メソッドを呼び出して ColoredTreeGadget に設定されます。
新しいインタラクターのテスト
ファイル main.cppは、ColoredTreeGadgetInteractor クラスをテストするコードを含んでいます。手順 1 の main.cpp ファイルと同じですが、ColoredTreeGadget インスタンスにインタラクターが設定される点が異なります。
tree->setInteractor(new ColoredTreeGadgetInteractor());
これで手順 2 は完了です。テスト・プログラムは、次のように見えるはずです。
Version 6.0
Copyright © 2015, Rogue Wave Software, Inc. All Rights Reserved.