

3.5 Add the Finishing Details
Now you are going to learn how to polish the application. In this section, you learn how to:
3.5.1 Adding Drop-Down Menus
Let's enhance the application by adding a few finishing details. First, let's add some drop-down menus. Adding a drop-down menu is a three-fold process. To add a drop-down menu you need to:
Open the Objective Views resource script file.
Copy the resource elements to your application.
Delete any string resources generated by the copy/paste operation that are already present in the included OD resource file.
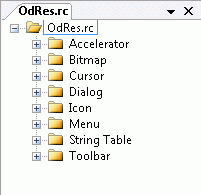
Select Open from the File menu. Then, select OdRes.rc from the INCLUDE subdirectory, which is immediately under the Objective Views install directory. Double-click the file to open it. It appears as in Figure 32.

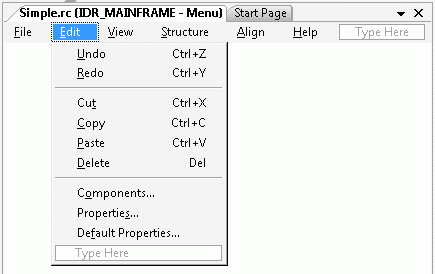
Let's copy the Structure and Align drop-down menus to the application. Select the Structure menu from the IDR_OD_MENU resource in OdRes.rc and copy it. Select the empty slot in the project's IDR_MAINFRAME menu resource and paste it. Do the same for the structure menu. The finished menu should appear as in Figure 33.

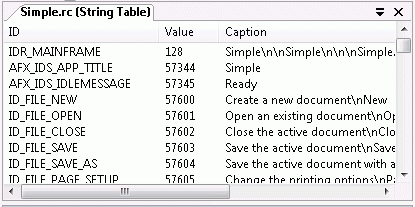
When you copy a resource to your application, its string table entry is copied over as well. You need to delete each of the OD string table definitions from your string table before you can begin compiling your application. Otherwise, the application considers the string table entries to be duplicates of the existing string table entries in the included OdRes.rc resource file. After copying resource elements, your string table should look like Figure 34.

Delete each of the ID_OD_xxx entries to prevent the compiler from producing errors.
3.5.2 Organizing Toolbars in the Application
You almost have a fully functional application. Next, let's rearrange the tool bars.
Find the CMainFrame::OnCreate() method in your application's MainFrame.cpp source file. The following code is near the end of the file.
// TODO: Delete the DockControlBar lines if you don't want
// docking toolbars.
  //  To make the toolbars line up better, utilize the
  // utility method CODGlobal::DockControlBarLeftOf()
  DockControlBar(&m_wndToolBar);
  DockControlBar(&m_wndAlignBar);
  DockControlBar(&m_wndNudgeBar);
  DockControlBar(&m_wndStructureBar);
  DockControlBar(&m_wndSymbolBar);
|
Now, incorporate CODGlobal::DockControlBarLeftOf() into your code. The code should look like the following after you make a change:
DockControlBar(&m_wndToolBar);
DockControlBar(&m_wndSymbolBar);
CODGlobal::DockControlBarLeftOf(this, &m_wndAlignBar,
                                &m_wndToolBar);
CODGlobal::DockControlBarLeftOf(this, &m_wndNudgeBar,
                                &m_wndSymbolBar);
CODGlobal::DockControlBarLeftOf(this, &m_wndStructureBar,
                                &m_wndNudgeBar);
|
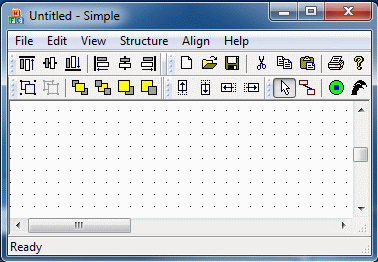
After you rebuild and execute the application, your application should look like Figure 35.

3.5.3 Add an Arrow to the Link
Our application is almost complete. Let's add an arrow to the link by adding a command handler for the ID_OD_LINK_SYMBOLS command.
First, add the following line to the class declaration for CSimpleController.
afx_msg void OnLinkSymbols ();
…
|
Then, add the following code to CSimpleController's message map.
BEGIN_MESSAGE_MAP(CSimpleController, CODController)
  //{{AFX_MSG_MAP(CSimpleController)
  …
  ON_COMMAND(ID_OD_LINK_SYMBOLS, OnLinkSymbols)
  …
  //}}AFX_MSG_MAP
END_MESSAGE_MAP()
…
|
Lastly, add the following code to SimpleCtlr.cpp.
…
void CSimpleController:: OnLinkSymbols ()
{
   CODLinkComponent* pLinkComp = new CODLinkComponent();
   pLinkComp->Create();
   pLinkComp->SetTargetEndpoint(new CODArrowEndpoint());
   OnInsertLink(pLinkComp);
 }
…
|
This is the same technique you used to add other symbols to a canvas. We create the link component and add a CODArrowEndpoint object to it by calling SetTargetEndpoint(). Then, you pass the link component to the controller for insertion onto the canvas by calling OnInsertLink(). The OnInsertLink() method serves the same purpose as OnInsertSymbol(). Any command handler can add custom links to a canvas using OnInsertLink(). The CODController class provides a default handler for the ID_OD_LINK_SYMBOLS command, which creates a link with no adornments.
Our simple application is now complete. Rebuild the application and experiment with it.
Although this sample is not equivalent to a fully functional Objective Views application, it demonstrates many of its basic features.


Copyright © Rogue Wave Software, Inc. All Rights Reserved.
The Rogue Wave name and logo, and Stingray, are registered trademarks of Rogue Wave Software. All other trademarks are the property of their respective owners.
Provide feedback to Rogue Wave about its documentation.


