
In this step, we add syntax coloring to the 1stEdit skeleton application that we created in Step 1. The procedure for adding syntax coloring requires four steps, which are covered in detail in the following four sections.
The first step in adding syntax coloring to our application is to modify the function CMy1stEditApp::InitInstance(). Here is the procedure:
Open 1stEdit.cpp.
Add the following macro to the InitInstance() implementation:
SECEDIT_REGISTER_INI_LANGUAGE(_T("DevStudio"), _T(".\\DevStudio.ini"));
|
This macro sets the configuration source to be an .ini file. There are other macros that allow information to be read in from either a binary file or resources embedded in the application, and persisted to either a binary file or the registry. For example,
// Read and write from a bin configuration file SECEDIT_REGISTER_BIN_LANGUAGE(lang, file) // Read from a resource and then the registry, write to the // registry SECEDIT_REGISTER_RES_REG_LANGUAGE(lang, file, key) // Read from an ini and then the registry, write to the // registry SECEDIT_REGISTER_INI_REG_LANGUAGE(lang, file, key) // Read from a bin and then the registry, write to the // registry SECEDIT_REGISTER_BIN_REG_LANGUAGE(lang, file, key) |
For clipboard support, add code to initialize the OLE libraries in the application object's InitInstance(). Add a call to AfxOleInit() at the beginning of the InitInstance().
AfxOleInit(); |
In this step, we continue to modify functions. Still in 1stEditDoc.cpp, edit OnOpenDocument()and OnNewDocument() to look like the following:
BOOL CMy1stEditDoc::OnOpenDocument(LPCTSTR lpszPathName)
{
      if (!CDocument::OnOpenDocument(lpszPathName))
         return FALSE;

      m_Edit.SetLanguage(_T("DevStudio"));

      return (m_Edit.ReadFile(lpszPathName));
}

BOOL CMy1stEditDoc::OnNewDocument()
{
   if (!CDocument::OnNewDocument())
     return FALSE;

   m_Edit.SetLanguage(_T("DevStudio"));
   m_Edit.Init();

   return TRUE;
}
|
In the OnNewDocument() override, calling SetLanguage() before calling Init() is recommended.
Copy the DevStudio.ini file from the Samples\Edit\MdiApp directory into the project directory. This file contains language and keyword information to support highlighting.
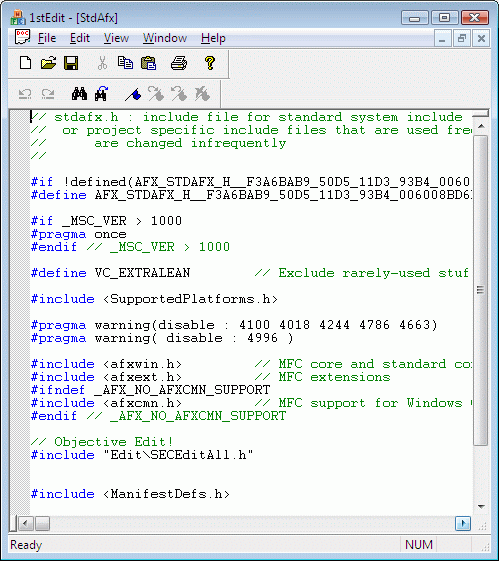
You may now build and run Step 2. Load some .cpp files, or type in some code. Figure 29 shows Step 2 in action.
Copyright © Rogue Wave Software, Inc. All Rights Reserved.
The Rogue Wave name and logo, and Stingray, are registered trademarks of Rogue Wave Software. All other trademarks are the property of their respective owners.
Provide feedback to Rogue Wave about its documentation.