

2.4 Building Libraries with Software Parts Manager
Before building your Rogue Wave libraries, you should consider carefully the functionality you require in the applications you expect to build with these libraries, as discussed above in Section 2.2, "Build Consistency."
If your applications require special command line compile or link options, you may need to create a custom build configuration. The procedure for this is described in Section 2.4.1.
If you can use one of Rogue Wave's standard configurations, skip to Section 2.4.2, "Building Libraries and Examples."
2.4.1 Creating a Custom Build Configuration
If your applications require special command line options, you may need to create a custom build configuration. To do this:
Display the Build Configuration dialog either by selecting the Configurations folder in the BuildInfo tab and clicking the Add button on the toolbar, or by selecting a configuration within the folder and clicking the Copy button. The second choice lets you use one of Software Parts Manager's standard configurations as a starting point for your custom configuration.
NOTE: Not all products support all configurations. Before starting to create your custom configuration, it is a good idea to open the Build dialog and select the product you are thinking of building. The configuration selection box then shows which standard configurations the product you have selected supports. Use this as a guide in creating your custom configuration.

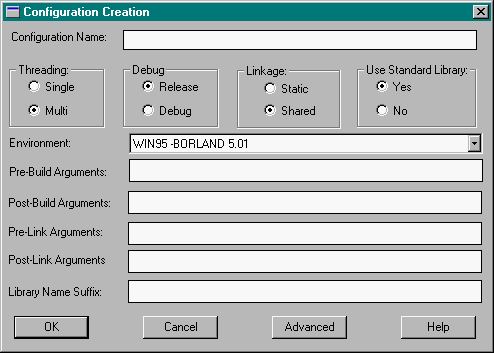
In the Configuration Creation dialog, enter a configuration name.
This will be the name that appears in the Configurations folder in the BuildInfo window, and also in the list of configurations in the Build dialog.
For each of the primary build options, select the preferred option.
If you selected one of the standard configurations as the template for your custom configuration, these buttons are already set correctly for the standard configuration and should not be changed.
The four configuration options are:
Single or Multi. Specifies either single thread or multi-thread safe.
Debug or Release. Debug means that two facilities are active: Rogue Wave's RWDebug, and the symbolic debugging provided by the compiler. Release means that neither of these two facilities is active.
For a build configuration that specifies just one of these two facilities, choose the Release option, and then include a custom compiler argument specifying the desired facility.
Static or Shared. Specifies a static or a shared (also called dynamic or DLL) build.
StdLib. If present, indicates that the part was built to support the Standard C++ Library, either Rogue Wave's implementation or one of several others.
To specify compiler options not included in the build profile, use the Build Arguments field, as explained below.
Select an environment profile.
The profile list contains only Rogue Wave-supported operating system and compiler pairs. On Unix systems, you have the option of building your library using a non-supported compiler and/or operating system. Select the environment profile Other. The Software Parts Manager build mechanism will then prompt you for compiler and operating system information as it builds the library.
In the Pre-Build Arguments and Post-Build Arguments fields, specify compiler command line arguments to supplement the build configuration.
The Pre-Build Arguments are inserted into the command line before any arguments inserted by Software Parts Manager, whereas the Post-Build Arguments are inserted after any Software Parts Manager arguments. How the positioning affects the assigned precedence depends on the compiler you are using.
You are responsible for ensuring that the arguments you specify do not conflict with the standard makefile generated by the build configuration. If the arguments you specify cause errors in the build, examine the makefile created during the build to determine the cause. The makefile is located in the buildloc directory of the product's workspace, as explained in Section 2.3.2, "Product Build Locations (Workspaces)."
You will then need to select the defective build configuration in the Buildinfo Tab, click the Copy button on the toolbar, and create a corrected version of the configuration under a new name.
To delete the defective configuration, select it and press Delete on your keyboard.
In the Pre-Link Arguments and Post-Link Arguments fields, specify link arguments to supplement the build configuration.
As you would guess, in terms of command line placement these two fields function like those for the library compilation arguments.
Adding compile and link arguments to the build configuration places them in the build makefiles, which you can then use as a template for building your applications.
Note that if a particular argument is needed for both object compilation and application linkage, that argument must appear in both a Build Arguments and a Link Arguments field.
Specify a suffix to be added to the library name (required).
A custom suffix helps keep builds performed using a custom configuration differentiated from builds performed using SPM standard configurations. Specifying a suffix has two effects:
The suffix appears in the library name just before the extension. For example, the suffix foo would change the library name tls7d.lib to tls7dfoo.lib.
The workspace for the built library will differ from the workspace for the SPM standard build. For example, if the default workspace path for the tls7d.lib library is <rw_root>\workspaces\WINNT40\MSVC60\7d, the default path for the custom tls7dfoo.lib library will be <rw_root>\workspaces\WINNT40\MSVC60\7dfoo.
To override the default workspace path, click the Advanced button.
The Advanced Configuration Options dialog shows the SPM default workspace path, and gives you the option of overriding the default with any other location you prefer.
WARNING: If you create more than one custom configuration that overrides the default workspace location, specify a different location in each. Otherwise, critical files such as config.dat will be overwritten by successive builds, possibly leading to build failures should you attempt to rebuild libraries.
Click OK
2.4.2 Building Libraries and Examples
Once you have determined the standard build configuration you want to use, or have created a custom configuration, building the library or its examples is straightforward.
Building a library in Software Parts Manager is actually a two-step process:
Install the product, which creates the product tree and writes information from the product repository to the product tree.
Build the product, which creates a workspace if necessary, prepares a makefile, writes the needed support files to the workspace, and performs the build in the product directory under buildloc.
You only need to install a product one time, and can then build it under as many configurations as you wish. Installed parts are listed in the Installed Parts folder of the Software Parts Manager Buildinfo tab. To build an already installed product, skip to Section 2.4.2.2, "Build Procedure."
Installable products are listed under the various product category folders in the Products and Services folder of the SPM Repository tab. The product you want to install must have a green key beside it, indicating that you have purchased and unlocked the product.
If you have had SPM for awhile, you may have more than one product repository. If you do not see the product you want to install and build anywhere in the Products and Services folder, try using the Repository|Select Active Distribution Repository menu item to check for additional repositories.
2.4.2.1 Install Procedure
To install the product:
Click the Install button on the toolbar.

If necessary, select the product to install from the list of unlocked products.
Change the default installation name if you wish.
You can click the Change RW Root Directory button to change the location on your local disk where the part will be installed. Generally, it is better not to change this once you have first specified it. If you do, you are advised to move the existing Rogue Wave directory tree to the new location.
Click OK
A message box after the install gives you the option of building the library immediately. If you accept, you are into the procedure that follows.
2.4.2.2 Build Procedure
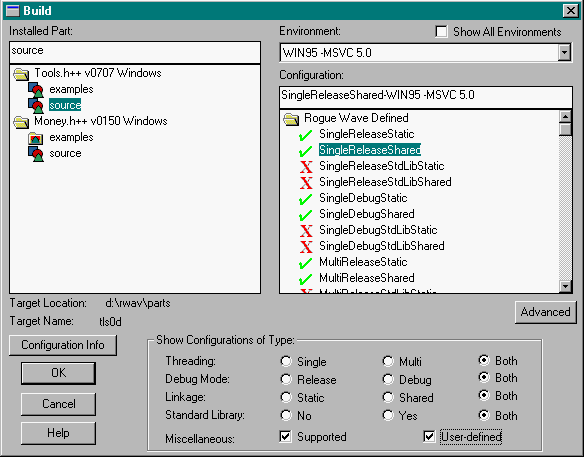
To build the part, select the Build button on the toolbar to display the Build dialog.

Now follow these steps:
Select the library or examples to be built.
The source selection box shows the source and examples for all products you have purchased and installed. Examples may consist of a directory tree of folders containing example sub-sets. You can select a single buildable example entity or a folder, in which case all example entities in the folder are built recursively through any sub-folders.
Select an environment.
By default, the Environment selection box shows only those environments for which configurations have been defined, either through loading standard configurations, or through creating custom configurations. You can gain access to all supported environments by clicking the Show All Environments checkbox.
To build for an unlisted platform-compiler pair, use a command line build or, on Unix platforms, create a custom configuration that specifies the Other environment option.
Select the build configuration to be used.
By default, the Configuration selection box shows all build configurations available for the selected code (step 1) in the selected environment (step 2), including Software Parts Manager standard configurations (Rogue Wave Defined folder) and any custom configurations (User-Defined folder) you have defined. You can filter the list through selections in the Show Configurations of Type region.
Usable configurations are preceded by a green check mark, non-supported configurations by a red X. If no suitable configuration is displayed, cancel out and either:
add SPM standard configurations by selecting Misc|Generate Configurations,
or
define the custom configuration you need as described in Section 2.4.1.
If you wish, select advanced options.
Click the Advanced button to display the Advanced Build Options dialog, which offers the following options:
Export Source to Workspace: Copies the source code (.cpp files) to the product directory under the buildloc directory in the workspace.
Export Source and Generate Makefile Only (No Build): Stops the build process after header files have been copied to the workspace and makefiles have been generated. Use this option if you wish to examine and perhaps modify the makefile(s) before invoking make.
Before clicking OK, click the Configuration Info button to check your build configuration.
You don't have to do this, of course, but it is advisable to be sure you know what you are going to get before setting the build in motion.
Click OK.
A shell window shows the progress of the build. The display from this window is saved in a transcript file, and is also attached to the build record. At the end of the build, the build record, including the transcript, is displayed in a scrollable window.
The build record resides in the workspace lib directory under the name <product_name>.rec, such as tools.rec for Tools.h++. This file remains available for review unless you later build the same product with the same build configuration, in which case it gets overwritten.
2.4.3 Command Line Library Builds
Generally, this is not something you want to do. By circumventing Software Parts Manager, you give up the many checks and controls that SPM uses to ensure consistent builds among Rogue Wave libraries. There is a good chance this could cause problems down the road when you attempt to build applications that depend on two or more of these libraries.
However, you may have special needs that require command line builds, or you may wish to build for an unsupported Windows platform, in which case you have no choice but to build from the command line. For such situations, Rogue Wave provides two information sources on command line builds:
The Software Parts Manager online help covers this information.
An independent document in HTML format, the Configuration and Build Model User's Guide, provides essentially the same information as in the SPM online help, but outside of SPM.
If you have a need for the HTML document, contact your Rogue Wave sales representative.


©Copyright 1999, Rogue Wave Software, Inc.
Contact Rogue Wave about documentation or support issues.


