Using JWAVE Beans with BeanBox
This section is a step-by-step exercise that explains how to use JWAVE Beans with JavaBeans Development Kit from Sun Microsystems, Inc. (You must use BDK version 1.0 July 98, or a later version). The latest version of the BDK can be downloaded from the JavaSoft web site:
http://java.sun.com/beans/index.htmlThis exercise uses one invisible Bean, JWAVE Bean tester (which generates some data), and two visible Beans, JWAVE Surface Tool and OrangeButton, to produce a surface plot.
Step 1: Modify Your CLASSPATH
You must add the following files to your CLASSPATH variable:
(UNIX) RW_DIR/classes/JWaveConnectInfo.jar
RW_DIR/classes/JWave.jar
SWINGDIR/swing.jar
(WIN) RW_DIR\classes\JWaveConnectInfo.jar
RW_DIR\classes\JWave.jar
SWINGDIR\swing.jar
where
RW_DIR is the main Rogue Wave installation directory, and
SWINGDIR is the directory where Swing version 1.1 or later is installed (see the
Glossary).
Step 2: Copy JWaveBeans.jar
Copy the file:
(UNIX) RW_DIR/classes/JWaveBeans.jar
(WIN) RW_DIR\classes\JWaveBeans.jar
where RW_DIR is the main Rogue Wave installation directory.
to:
(UNIX) BDKDIR/jars
(WIN) BDKDIR\jars
where BDKDIR is the directory in which the BeanBox is installed.
When the BeanBox starts, this JAR file is automatically opened and inspected.
Optional: Modify the Startup Script
Normally, the following script is used to start the BeanBox:
(UNIX) BDKDIR/beanbox/run.sh
(WIN) BDKDIR\beanbox\run.bat
where BDKDIR is the directory where the BeanBox is installed.
note | You can make the CLASSPATH modifications described in Step 1 directly in this script, so that CLASSPATH includes $CLASSPATH (UNIX) or %classpath% (Windows). |
Step 3: Start the BeanBox
note | You must CD to the BDKDIR/beanbox directory to run run.sh or run.bat. where BDKDIR is the directory in which the BeanBox is installed. |
To start the BeanBox, from the BDKDIR type:
(UNIX) run.sh
(WIN) run.bat
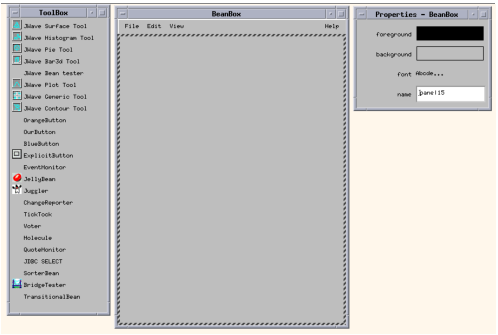
When you run the BeanBox, the graphical JWAVE Beans and the “invisible”
JWAVE Bean tester Bean are listed in the ToolBox along with other Beans that came with the BDK or that you added (
Figure 7-1: JWAVE BeanBox ToolBox on page 92).
Step 4: Try Out the JWAVE Bean Tester and Surface Tool
Remember, the JWAVE Manager must be running to use JWAVE Beans.
1. From the ToolBox, select JWAVE Bean tester, then click in an open area of the BeanBox window to place it as an object in the BeanBox.
2. Select a button (such as OrangeButton) from the ToolBox and place it near the bottom of the BeanBox window.
3. Select the button object in the BeanBox, and then select Edit=>Events=>button push=>actionPerformed.
4. Click over the JWAVE Bean tester object in the BeanBox. This links the button object to the JWAVE Bean tester object.
5. In the EventTargetDialog dialog box, select the start2d target method (this method will form the connection between the JWAVE Bean tester and the push button), then click OK. Now, every time you click the button, the tester Bean will generate new 2D data.
6. In the ToolBox, select JWAVE Surface Tool and place it above the button object in the BeanBox.
7. Resize the Surface Tool Bean until it is big enough to hold a surface plot.
8. Select the JWAVE Bean tester object in the BeanBox, then from the Edit menu, select Events=>propertyChange=>propertyChange.
9. Click over the Surface Tool in the BeanBox. This links the Bean tester to the Surface Tool.
10. In the EventTargetDialog dialog box, select the propertyChange target method as the event, then click OK.
11. Click the button object in the BeanBox.
The
Bean tester generates 2D data and sends that data to the
Surface Tool. Next, the
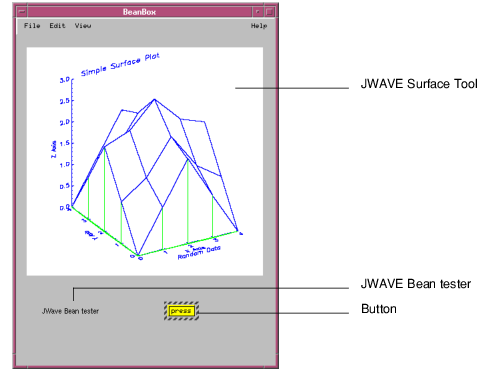
Surface Tool instructs JWAVE to generate a plot. Then the surface plot displays in the BeanBox (see
Figure 7-2: JWAVE Surface Tool on page 93).
Step 4: Customize the Surface Bean
Each visible JWAVE Bean has a Customizer interface for changing the values of parameters that affect the appearance of the plot.
1. Select the surface object in the BeanBox, then from the Edit menu, select Events=>Customize. The Customizer window for the JWAVE Surface Tool Bean appears.
2. Change the settings for some of the surface plot’s parameters, then click Done.
3. Click the button in the BeanBox. The surface plot is re-generated and then displayed with the new parameter values applied.
Version 3.6
Copyright © 2017, Rogue Wave Software, Inc. All Rights Reserved.


