Tutorial Exercises for Navigator
To get you started quickly and to pave the way for using your own data, we’re giving you three short Navigator exercises using datasets that we have provided for you.
The first example uses an ASCII dataset containing atmospheric temperature and air quality data. You start by importing data into PV‑WAVE, and then you create simple graphics. You will see how to use the WzImage Tool to get a quick visual overview of the data, even though it was not originally obtained from an imaging device.
The second dataset was obtained from an imaging device. The data is in 8‑bit image format and consists of a poor-quality image of a flame. You will use the WzImage Tool to modify the image by changing its size, cropping bad data along its edges, increasing the contrast, and adding color. You will see how easy it is to manipulate and enhance image data.
The third example contains data from shock wave measurements. Each data point represents the calculated pressure at a point in a simulated block of graphite epoxy composite. You’ll look at surfaces representing pressures along slices through this volume and learn how to “animate” these surfaces to look at the progression of shock waves.
Starting PV‑WAVE
If PV‑WAVE isn’t already installed on your system, install it first. If you’re installing PV‑WAVE yourself, the installation information is included with the media you received from Rogue Wave Software, Inc. Along with the PV‑WAVE software, the media contains several data files you will use to work through the examples.
note | The illustrations in this document depict PV‑WAVE being run with the Motif window manager in an X Window System environment. |
Once PV‑WAVE is installed, you’re ready to begin. If you have trouble running the software, refer to the installation instructions for detailed information.

Start PV-WAVE. Refer to your installation documation for specific instructions for starting PV-WAVE on your system.
Starting Navigator
To start the Navigator, enter the following command at the PV‑WAVE prompt:
WAVE> navigator
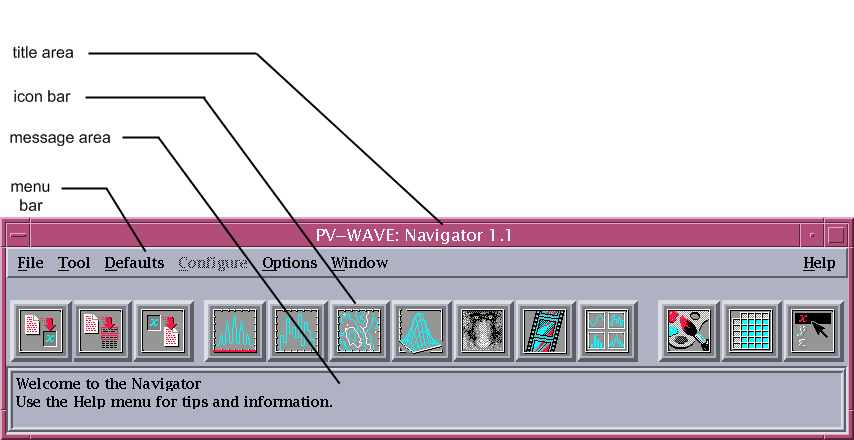
Now take a look at the Navigator window shown in
Navigator Window to get a feel for the point-and-click interface.
This window contains four parts:
 Title Area
—You can move the window to a different location on the screen by pressing and holding down MB1 (the left mouse button) in the title area while you drag the window to its new location. The title area also contains the window manager menu (on the left) and buttons for minimizing or maximizing the window (on the right).
 Menu Bar
—The menus available in the Navigator are listed below the title area. If you click on a menu, a list of commands appears.
 Icon Bar
—Clicking on an icon opens the corresponding VDA Tool.
note | To see the name of the VDA Tool associated with an icon, simply position the pointer over the icon. The name of the icon appears in the space just above the leftmost icon. |
 Message Area
—Messages appear at the bottom of the window. They provide information that can be helpful when you’re using the window.
At any time, you can exit the Navigator by selecting File=>Close from the Navigator window.
note | The notation File=>Close means “select the Close command from the File menu”. This notation is used throughout the tutorial. |
Now we’ll introduce you to the online help system.
Online Help System
Online help is provided on all platforms. You can get information on any PV‑WAVE routine and many aspects of the programming language by typing HELP at the WAVE> prompt. In addition, context sensitive help is provided for the VDA Tools and Navigator.
You will have many opportunities to explore the online help system as you work through this tutorial.
Version 2017.0
Copyright © 2017, Rogue Wave Software, Inc. All Rights Reserved.
