Upgrade P4 Server from 2019.1 or later (single server) - Windows
You can upgrade P4 Server to allow users to take advantage of features introduced in later releases. Earlier P4 applications should continue to work with newer versions of P4 Server.
Upgrading to P4 Server 2026.1 or later increases the default security level. This can affect:
-
Authentication behavior
-
Password requirements
-
API clients and scripts
This can cause existing scripts or integrations to fail if they rely on previous authentication behavior. To learn more, see Important security update: Secure by default.
For multi-server environments, see Upgrade P4 Server from 2019.1 or later to latest (multi-server).
Before you upgrade
These steps help reduce the risk of data loss or upgrade failure. Ensure you complete the following:
-
Review the release notes for the version you are installing.
-
Ensure you have
superaccess to the server. -
Inform users of planned downtime
-
Confirm your license is valid for the P4 Server version you are upgrading to. To learn more, see License statements.
-
Identify
P4ROOT. -
Confirm journaling is enabled.
-
Take a checkpoint.
-
Verify file integrity.
To learn more, see Before you upgrade.
Upgrade for proxy, broker, and offline database
A proxy or broker only needs to get the latest binary.
You do not need to run p4d -xu against offline db.* files. An offline database is a set of db.* files periodically made current by replaying the journal files from the production server.
Upgrade P4 Server on Windows
-
Stop the P4 Server:
-
Open Services.
-
Locate P4 Server.
-
Click and select Stop.
-
-
Take a checkpoint:
-
Run:
p4d -r <P4ROOT> -jc.Windows paths with spaces
If your P4ROOT contains spaces, enclose it in double quotation marks when using the
-roption.For example:
p4d -r "C:\Program Files\Perforce" -jcDo not include a trailing backslash before the closing quotation mark.
-
Verify the checkpoint is created:
-
A file named
checkpoint.<number>is created inP4ROOT. -
The command completes without errors.
-
-
-
Install the new P4 Server:
-
Download the latest Windows installer from the Perforce website.
-
Run the installer.
-
Follow the prompts to upgrade the existing installation.
The installer might report that the server failed to start:
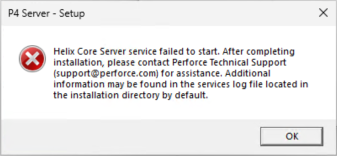
This is expected because the database has not yet been upgraded.
Continue with the next step.
-
-
Important: Upgrade the database schema:
-
Confirm P4 Server is still stopped.
-
Run
p4d -r <P4ROOT> -xu.If your P4ROOT contains spaces, enclose it in double quotation marks when using the
-roption.For example:
p4d -r "C:\Program Files\Perforce" -jcDo not include a trailing backslash before the closing quotation mark.
If you are using offline databases, do not runp4d -r <P4ROOT> -xuagainst offlinedb.*files. An offline database is a copy of thedb.*files that is periodically updated by replaying journal files from the production server.Running
p4d -xucreates a file namedstate.xuinP4ROOT. This file records the database schema upgrade level and is checked each time the server starts. To learn more, see The state.xu file.Ensure you are using the newly installed
p4dexecutable. Do not use an older version from your system PATH. -
Confirm the output. Wait for the following message in the terminal:
Upgrades will be applied at server startup.This step prepares the database for upgrade which will be completed when the server starts.
If you are upgrading to P4 Server 2026.1 or later, a warning about increased security defaults is displayed.This is informational only. Review the new defaults to avoid disruptions to authentication, scripts, or integrations. To learn more, see Important security update: Secure by default.
-
-
Start the P4 Server service.
-
Go to Windows > Services.
-
Find P4 Server.
-
Click and select Start.
-
-
Verify the upgrade:
-
Run
p4 info. -
Confirm that:
-
The Server version matches the expected release.
-
The server is running without errors.
-
-
-
Test basic operations:
-
Connect using P4V or the P4 CLI.
-
Run
p4 usersto see a list of your users. -
Run
p4 clientsto see a list of your workspaces.
-
Your P4 Server upgrade is complete. Users can now resume normal operations.