Create a workspace in P4V
A workspace is a local folder on your computer that stores a copy of the assets on your company's P4 Server. Your workspace is stored in a folder on your computer where you do your work. P4 Sync regularly checks the files and folders in your workspace against the P4 Server and shows both your changes and changes made by other users. You can upload your changes to the P4 Server and download changes made by other users to your local workspace folder. You can have more than one workspace on your computer. For example, you may have a workspace for each of your projects.
You must have the P4 Visual Client (P4V) (P4V) installed to create a workspace on your computer. For information on installing P4V, see Install P4V. Ask your administrator if you need help creating a workspace or installing P4V.
-
Open P4V.
-
In the Open Connection dialog box, enter the details provided by your administrator for Server and User, leave the Workspace field empty, and click OK. Enter your password if prompted.
-
If you connected to the P4 Server before, select it in the Connections field on the right side in the dialog box.
-
If the Open Connection dialog box is not displayed, select Connection > Open Connection.
-
-
Select Connection > New Workspace.
-
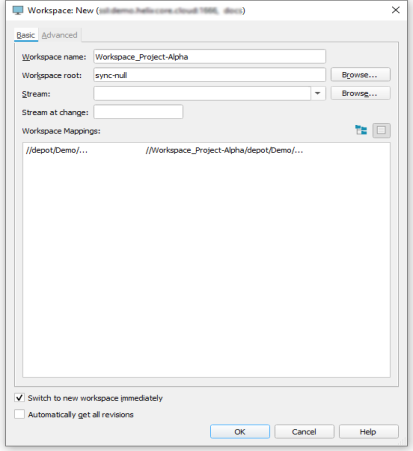
In the Workspace dialog box, enter the following information on the Basic tab.
-
Workspace name: Enter a name for the workspace. The workspace root will automatically update with this name.
-
Workspace root: Replace with sync-null. This enables you to select the local workspace folder in P4 Sync later.
-
Stream: Leave empty unless your team is using a stream. If streams are used, click Browse to associate the workspace with the stream.
-
Stream at change: Leave empty.
-
Workspace Mappings: This section is automatically populated and defines what folders and files in P4 Server are in your local workspace. In the following example, everything in the //depot/Demo folder will be in the local workspace. For information about editing the workspace mappings, click Help in the dialog box.

-
-
Click the Advanced tab.
-
In the File Options area, clear or select the Allwrite: checkbox.
We recommend clearing this checkbox. Files in your workspace are set to read-only. To work on a file, you must lock it in P4 Sync. This makes the file writable in your workspace. P4 Sync users can see that you locked the file and know they cannot edit it until you submit your changes. This helps to avoid more than one user editing the same file at the same time.
If the checkbox is selected, you will have write permissions for the files in your workspace so you can edit a file without locking it. This means other users do not know that you are working on a file and they might start working on the same file. You will have to resolve any conflicts in the different versions of the file. See Resolve upload and download conflicts.
Allwrite workspace paths are labeled in the P4 Sync My Workspaces list as (writable).
For example: c:\Workspace_Project_Alpha (writable)
-
Click OK to create the workspace. P4V indicates that it failed to create the workspace. This is expected because the Workspace root is set to sync-null.
- Click Yes to close the dialog box and then click OK in the next dialog box to confirm.
-
Select a local folder to store your workspace in. See Select a folder for your workspace.