Adding tags to assets
Tags help identify and group assets for better searching and browsing. You can add tags to an asset to help categorize it. Depending on the Helix DAM configuration, tags may be automatically added when adding assets to a collection.

If an asset is checked out in Helix Core Server, an error is displayed when you try to add tags to the asset in Helix DAM. If you have the asset checked out, use the same Helix Core client you used to check out the asset to check it in before adding tags. If another user has the file checked out, ask them to check it in.
For information about removing tags that are no longer relevant, see Removing tags from assets.
-
In a project, open or select the assets to add tags to. To select an asset, click the circle in the top left corner of it. You can select multiple assets.
TipOnly company admins can add tags to assets selected in or opened from the Recent assets area on the home page.
-
Do one of the following:
-
If the asset is open and does not yet have tags, or assets are selected, click Add tags.
-
If the asset is open and has existing tags, click the Manage tags button
 next to the tags.
-
-
In the Add tags or Manage tags dialog box, enter the tag and then press Enter. Repeat for all tags to add.
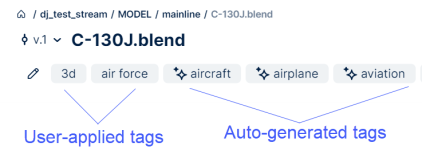
If you are adding tags to an open asset, existing tags added by users are displayed in the User-applied tags area and existing tags added automatically are displayed in the Auto-generated tags area. If you enter a tag that already exists, a warning is displayed. A tag can only be applied to an asset once.
If you are adding tags to selected assets that already have tags, existing asset tags are not displayed.
-
To remove a tag, click the X on it. See Removing tags from assets for information.
-
Click Save when you finish.
The tag changes are saved.


