Harden security
You can harden security for your P4 DAM instance.
On this page:
Enable MongoDB authentication
By default, MongoDB only listens on localhost on Standard installations and does not use authentication. For added security, authentication can also be configured on Standard installations.
-
Run the following command to create P4 DAM MongoDB administrator and user credentials:
 sudo su - hth
 create_mongodb_users.sh
-
Update the P4 DAM Configuration file at
/var/opt/hth/shared/hth.jsonwith the P4 DAM MongoDB user credentials:"backend": { ... "db_username": "Enter username of P4 DAM MongoDB user", "db_password": "Enter password of P4 DAM MongoDB user" ... } ... "mongodb": { ... "username": "Enter username of P4 DAM MongoDB user", "password": "Enter password of P4 DAM MongoDB user" ... } -
Apply the changes by reconfiguring P4 DAM:
sudo hth-ctl reconfigure
Enable Redis authentication
By default, Redis only listens on localhost on Standard installations and does not use authentication. For added security, authentication can also be configured on Standard installations.
-
Generate a password for your P4 DAM Redis instance.
-
Update the P4 DAM Configuration file at
/var/opt/hth/shared/hth.jsonwith the Redis password:"redis": { "password": "Generated Redis password" ... } "backend": "redis_password": "Generated Redis password" ... } -
Apply the changes by reconfiguring P4 DAM:
sudo hth-ctl reconfigure
Configure HTTPS and SSL/TLS
HTTPS
By default, P4 DAM does not enforce HTTPS and SSL/TLS connections to your server instance. This might be acceptable for services running behind an organization's firewall, but enforcing HTTPS and SSL/TLS becomes important if the P4 DAM instance is exposed to a public network.
To enforce HTTPS:
- Log in to the /admin URL of the P4 DAM installation and navigate to Preferences.
-
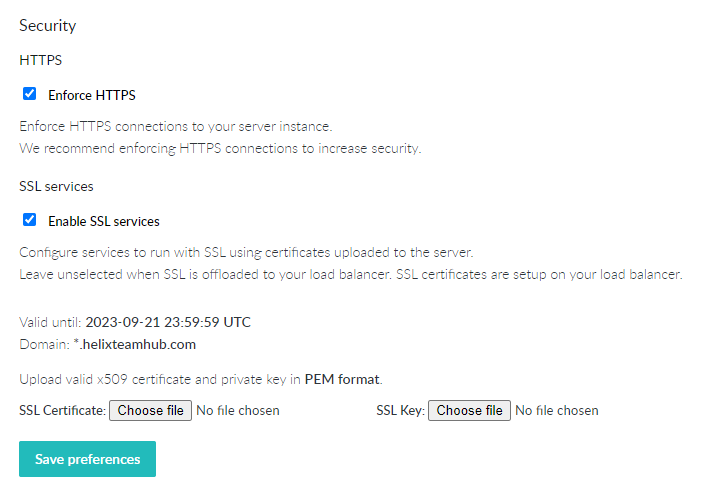
Under Security, select Enforce HTTPS.
-
Click Save preferences.
SSL/TLS services
If Enforce HTTPS is selected:
-
To configure the P4 DAM services to use the SSL/TLS certificates uploaded to your server, select Enable SSL services.
-
If have P4 DAM running in Enterprise mode with a load balancer, leave Enable SSL services unselected when SSL/TLS is offloaded to your load balancer. The SSL/TLS certificates must be setup on your load balancer.
To enable SSL/TLS services:
- Log in to the /admin URL of the P4 DAM installation and navigate to Preferences.
-
Under Security, select Enable SSL services.
-
Upload a valid x509 certificate and private key (RSA) in PEM format, with base64-encoded content between header and footer lines.
Instructions for generating the certificate and private key depend on the provider. For security reasons, only use a self-signed certificate for testing.
To generate a self-signed certificate and key, you can use OpenSSL:
openssl req -newkey rsa:2048 -new -x509 -days 730 -nodes -out hth.crt -keyout hth.key -
Click Save preferences.
The certificate expiration date and the assigned domain are displayed.
Troubleshooting tips
Include all certificates to the PEM file.
A single PEM file can contain several certificates and a key. For example:
- Public certificate
- Intermediate Certificate
- Root certificate
- Private key
Check SSL/TLS verification
SSL/TLS verification verifies the host certificate is valid when P4 DAM connects to the host. This helps to secure online communication with the host.
To see the current configuration applied to the server, run the following command:
sudo hth-ctl show-config
Check that SSL/TLS verification is set to true for the following:
-
Section: p4search: es_ssl_verify - Validates the Elasticsearch host certificate for the for the P4 DAM connection
-
Section: p4search: ssl_verify - Validates the P4 Search host certificate for the P4 DAM connection
If you make a change to the SSL/TLS verification configuration, run the following command to reconfigure P4 DAM:
sudo hth-ctl reconfigure
Configure the P4 DAM web session timeout
A P4 DAM web interface session is valid for the duration of the timeout configured on P4 Server, or until the browser is closed. The default timeout is 12 hours, but you can configure the value using the Timeout option in the p4 group command. To learn more, see p4 group in the P4 CLI Reference.
The P4 integration user must have an unlimited ticket timeout. For P4 Server 2025.1 and later, the integration user must also have an unlimited idle timeout.
To learn more, see Ticket-based authentication in the P4 Server Administration Documentation and p4 group in the P4 CLI Reference.
Configure nginx security
The following nginx security settings are configured using the nginx configuration flags.
Limit access to the administrator UI by IP address
Limit access to the administrator UI to specified IP addresses or CIDR (Classless Inter-Domain Routing) using the admin_allowed_ips configuration flag.
The default value is []. All IP addresses have access to the P4 DAM admin UI.
Limit access to specific hosts
Specify the hosts that can connect to P4 DAM by adding them to the allowed_hosts configuration flag. This mitigates host header injection attacks.
-
[] All hosts can connect to P4 DAM. This is the default value.
-
["https://other1.com", "https://other2.com"] An array of specific hosts that can connect to P4 DAM.
Configure Cross-Origin Resource Sharing (CORS)
Cross-Origin Resource Sharing controls the external domains that can be used with P4 DAM. Set the cors_allowed_domains configuration flag to the external domains to use with P4 DAM:
-
"*" An asterisk allows any domain. This is the default value.
-
"" An empty string disables CORS support.
-
["https://other1.com", "https://other2.com"] An array of specific external domains to support for CORS.
For more information about CORS, see Cross-Origin Resource Sharing (CORS).
Specify enabled ciphers
Specify the nginx ciphers you want enabled in the ssl_ciphers configuration flag in the format understood by the OpenSSL library
The default nginx ciphers are:
ECDHE-ECDSA-AES128-GCM-SHA256:ECDHE-RSA-AES128-GCM-SHA256:ECDHE-ECDSA-AES256-GCM-SHA384:ECDHE-RSA-AES256-GCM-SHA384:ECDHE-ECDSA-CHACHA20-POLY1305:ECDHE-RSA-CHACHA20-POLY1305:DHE-RSA-AES128-GCM-SHA256:DHE-RSA-AES256-GCM-SHA384:DHE-RSA-CHACHA20-POLY1305
Enable the SSL/TLS protocols to use
Specify the SSL/TLS protocols you want enabled using the ssl_protocols configuration flag.
The default value is TLSv1.2 TLSv1.3.
Configure anti-virus protection
To protect your P4 DAM data, set up your preferred anti-virus tool to scan the following locations:
-
P4 Server that P4 DAM connects to
-
/var/opt/hth/shared directory where all attachments are stored for P4 DAM
Enable backups
To enable backups, activate them by setting the following configuration flags:
Standard
-
Merge the following configuration to /var/opt/hth/shared/hth.json and ensure you add the backup settings under the existing keys if they already exist in the configuration.
{ "backend": { "backups": true }, "mongodb": { "backups": true } } -
Apply the changes by reconfiguring P4 DAM:
sudo hth-ctl reconfigure
Enterprise
In Enterprise deployment, the P4 DAM services are distributed across the server roles. To enable backups, activate the backup flags in /var/opt/hth/shared/hth.json on the appropriate servers. Ensure you add the backup settings under the existing keys if they already exist in the configuration.
P4 DAM DB
{
  "mongodb": {
    "backups": true
  }
}
By default, mailing is not configured for the DB node. To get notifications if failures occur during DB backups, you need to add the following:
- Configure the postfix section of hth.json to be identical with the one on your web node.
-
Add the email that receives the notifications to the app section of hth.json:
{
  "app": {
    "email": "support@acme.com"
  }
}
P4 DAM Web
{
  "backend": {
    "backups": true
  }
}
Apply the changes by reconfiguring P4 DAM on each server:
sudo hth-ctl reconfigure