Tips for importing Microsoft Word requirement documents
You can quickly start managing requirements with Helix ALM by importing existing requirement documents from Microsoft Word. A wizard guides you through the import process and lets you to preview requirements before starting the import.
Use the following tips to help prepare your documents and Helix ALM for a higher quality import.
In addition to performing the actual import, the import process also includes:
- Preparing the Word document for importing
- Configuring Helix ALM
- Testing the import
- Adding information to new requirements after importing
Before you import a Word document, take the time to prepare it to ensure the resulting requirements in Helix ALM match the Word document as closely as possible.
Use formatting compatible with Helix ALM
Helix ALM imports text, images, tables, and hyperlinks from Word documents. Some formatting is not compatible with Helix ALM and may be changed during the import or not imported at all. The content added to the requirement Summary field uses the default Helix ALM format. The formatted content imported into the requirement Description field is preserved.
Use the following format guidelines to ensure the imported requirement description content matches the Word document as closely as possible.
- Numbered lists—Do not use numbered lists in description text. If numbered lists must be imported, add them to a table. These lists always start with 1 and numbering cannot be restarted. Numbered lists that are not in tables are converted to bulleted lists during the import.
- Bulleted lists—Use the default bullet symbol. Other bullet symbols are converted to the default symbol during the import.
- Multi-level lists—Do not use multi-level lists in description text. The levels are flattened to a single level during the import.
- Images—Only use pixel-based images, such as GIF, JPG, PNG, or TIF, or vector-based images, such as EMF, PICT, or WMF. Vector-based images are attached to requirements instead of displayed inline. A single requirement can include only 100 images. For best results, see if any images are missing in the import preview and change the format in the Word document before importing.
- Illustrations—Illustration objects are displayed as inline images. Charts, clip art, drawing canvases, shapes, and SmartArt objects are supported. For best results, see if any illustrations are missing in the import preview and update or replace them in the Word document before importing.
- Graphical text—Graphical text objects are displayed as inline images. Equations and text boxes are fully supported. Drop caps are displayed as formatted text, but wrapping around the drop cap is not supported. Text following a drop cap object is displayed on a separate line. WordArt text is displayed as an inline image, but the color and other styling in the object is not applied. For best results, see how graphical text objects look in the import preview and replace objects that do not preview as expected with text in the Word document before importing.
- Tables—Do not apply formatting to tables. Table formatting is removed during the import and the default Helix ALM format is used. However, table cell formatting is preserved.
- Hyperlinks—Do not apply formatting to hyperlinks. Formatting is removed during the import and the default Helix ALM format is used.
- Tracked changes—Accept or reject changes before importing. Added and deleted text is imported, but the track changes formatting (underline and strikethrough) is removed.
- Comments—Remove comments before importing or add them as regular text in the document. Comments are not imported.
Requirement Summary and Description field character limits are enforced during imports. The requirement summary is limited to 256 characters and is truncated if it exceeds the limit.
Use section breaks to separate requirements from other content
Your Word document may include content that should not be imported, such as a title page, table of contents, or glossary. Or, you may only want to import a portion of a document. Add section breaks to the document to separate this type of content from requirements you want to import. When you set up the import, you can choose to import all sections of the document or a range of sections.
Break large documents into smaller documents
If the Word document is large or includes groups of different requirement types, you may want to split it into smaller documents to make the import process more manageable. You can append requirements from additional imports to existing requirement documents in Helix ALM.
Before you import, you may need to create a new Helix ALM project for testing purposes and configure the requirement types your organization uses.
Create a project for testing
You will use trial and error to figure out the best way to import Word documents. Create a separate project with limited user access to perform import testing. After you successfully import the document into the test project, you can then import it into a project in your production environment.
Configure requirement types
Every requirement has an assigned requirement type. By default, Helix ALM includes the following requirement types: business requirement, functional requirement, and non-functional requirement.
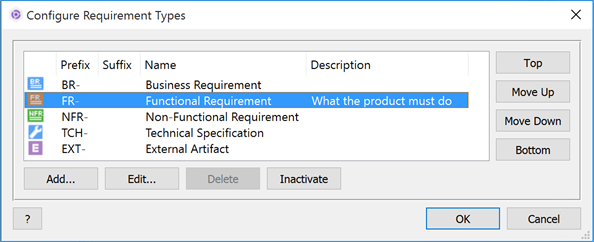
When you import a Word document, Helix ALM divides the document into individual requirements. You can choose to add requirements to the Helix ALM project based on styles used in the document that you select when setting up the import or items in numbered lists. The method you choose depends on the structure of the Word document and the type of requirements it includes.
Selected styles
Using styles to identify new requirements gives you the most control during the import. You can map any paragraph style used in the Word document to any requirement type configured in the Helix ALM project. For example, if you use a Heading 1 style for business requirements and a Heading 2 style for functional requirements, you can map each style to the corresponding requirement type.
If you use the styles method, Helix ALM add new requirements for each paragraph that uses a style mapped to a requirement type. The first paragraph is used as the requirement Summary value. Subsequent paragraphs are used as the requirement Description value until a paragraph that uses a style mapped to a requirement type is found, which adds another new requirement.
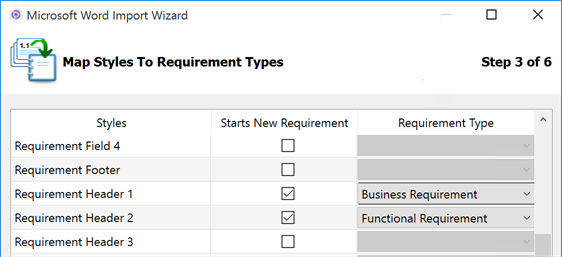
Items in numbered lists
Using items in numbered lists to identify new requirements adds a new requirement for every numbered item in the Word document. You cannot map Word paragraph or list styles to requirement types. Bulleted list items can be treated as new requirements or included as requirement description text under the parent list item.
This method does not offer as much flexibility as using styles because you can only choose one default requirement type for all requirements and you cannot control which requirements are imported. However, you can change the individual requirement types and remove requirements you do not want to import when you preview the import.
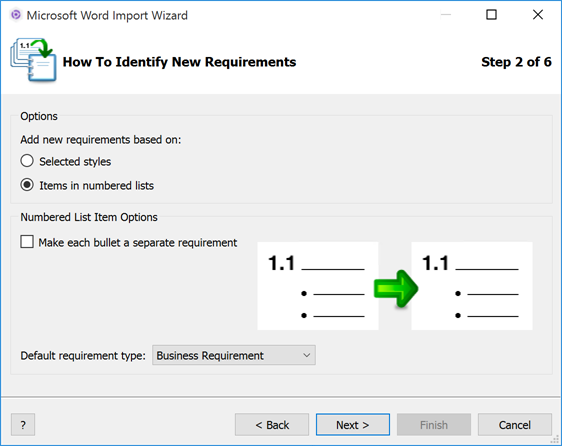
How to choose a method
If you use styles in the Word document, select Selected styles when setting up the import to identify new requirements. If you do not use styles, selecting Items in numbered lists may work better for you. The easiest way to select the correct method is to set the import options, preview the requirements using each method, and choose the method that displays the requirements in a structure most similar to the Word document.
Helix ALM uses list levels from the Word document to determine the requirement document hierarchy. If the Word document does not use list levels, the imported requirement hierarchy is flat in the requirement document. If you use multi-level lists in Word, the document uses list levels.
If you use Word styles, but do not use an outline structure in the document, you may need to modify the styles to create the hierarchy. A quick way to modify the styles is to import styles from one of the Word export templates installed with Helix ALM. The appearance of the Word document may change slightly, but this does not affect the formatting of imported requirement descriptions.

To set levels:
1. Open the requirement document and a template in the templates directory in the Helix ALM application directory (e.g., C:\Program Files\Perforce\Helix ALM\templates).
2. Import the Requirement Level 1 through Requirement Level 9 paragraph styles into your Word document.
3. Base the styles you are using for the requirement summary text on the corresponding Requirement Level styles. For example, if you use Heading 1 and Heading 2 styles, base Heading 1 on Requirement Level 1 and Heading 2 on Requirement Level 2.
After you select the import options, preview the requirements that will be imported. You can make adjustments in the preview to ensure requirements are imported correctly before you start the import.
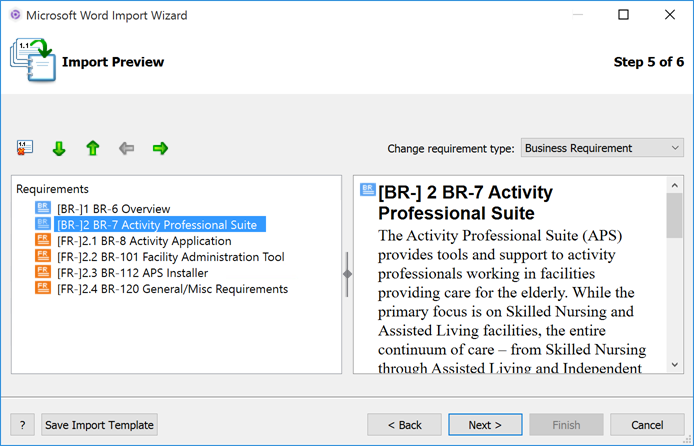
To preview a requirement description, select the requirement in the Requirements list. You can also change a requirement's type
If you want to change the import settings, navigate back in the import wizard, change the settings, and then preview the import again. If the Word document needs changes, such as fixing a formatting issue or missing image, make the change, save the document, and navigate back in the import wizard to reload the preview.
When you are satisfied with the import preview, save the settings as an import template. The import template includes all options set during this import, which can be helpful if you use the same structure for all your existing requirement documents. The next time you import a document, you can save time by loading the import template and using the saved settings.
After you finalize the import settings, import the Word document into the test project. Any import errors that occur are displayed and can be saved to help you troubleshoot. If the import is successful, the requirement document and requirements are added to Helix ALM.
When the import is complete, open the document to view the imported requirements. Check the document closely to make sure you are satisfied with the import. If you decide to make changes to the Word document, you can reimport as many times as needed to get the expected results. You should delete any incorrectly imported requirements before you import them again. Remember to create a new import template if you change any import settings.
When you are ready, import the Word document into the project in your production environment. Load the import template to use the same settings from the test project. Also, remember to add any new requirement types you created in the test project.
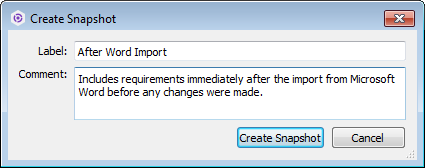
After the import is complete, you may want to create a requirement document snapshot before the imported requirements begin to change. A snapshot is a version of a document used to compare against other versions to view the differences. To create a snapshot, select the requirement document and choose
Before other users start working with requirements, take the time to set requirement fields and move requirements to the correct status.